Introduction
Down hairstyles for Black women offer a versatile way to showcase natural texture, length, and personal style while maintaining comfort and elegance. These styles highlight the beauty of curls, coils, waves, and straightened hair without the need for complex updos or restrictive styling. On Pinterest, these looks are widely shared as inspiration because they combine aesthetic appeal with practical wearability. This article explains how to create ten distinct down hairstyles using clear, structured guidance suitable for beginners and experienced individuals alike. Readers will learn how to prepare hair, choose appropriate techniques, and execute each look step by step using accessible materials. The focus remains on achieving polished results while protecting hair health and maintaining a consistent routine. Whether the goal is a minimalist style, a defined curl pattern, or a sleek finish, these creative ideas support a wide range of preferences. Each method is explained in a practical way to ensure that the process is easy to follow and adaptable for everyday styling or special occasions.

Why This Idea Is Trending or Useful
Down hairstyles continue to trend because they balance simplicity with visual impact, making them suitable for daily wear and styled events. Pinterest ideas often highlight looks that are beginner friendly and require minimal tools, which increases accessibility for a broader audience. These styles support natural hair care practices by allowing reduced tension on the scalp compared to tight braids or updos. They also provide flexibility in achieving different aesthetics, including minimalist style, modern design, or textured volume. Many DIY tutorials focus on enhancing natural patterns instead of altering them, which aligns with current preferences for authenticity and low-maintenance beauty routines. Additionally, these hairstyles can be adapted for different hair lengths and densities, making them practical for a wide range of users. The ability to transform a simple down hairstyle into a refined look using basic materials adds to their appeal. As a result, they remain a consistent source of inspiration for creative projects in home decor styling, photography, and personal presentation.
Materials and Preparation
Before creating any down hairstyle, proper preparation ensures better results and longer-lasting styles. Start with clean, conditioned hair to improve manageability and reduce breakage during styling. Essential materials include a wide-tooth comb, detangling brush, sectioning clips, hair ties, and a spray bottle with water. Styling products such as leave-in conditioner, curl cream, or lightweight oil help define texture and maintain moisture. Heat tools may be used for certain styles, but heat protectant is necessary to prevent damage. Planning involves deciding whether the style will emphasize natural curls, stretched texture, or sleek finishes. Sectioning the hair into manageable parts simplifies the process and ensures even application of products. For DIY styling, working in front of a mirror with adequate lighting helps maintain accuracy. It is also important to consider time availability, as some styles require drying or setting periods. Preparing all materials in advance supports an efficient workflow and reduces interruptions during the styling process.
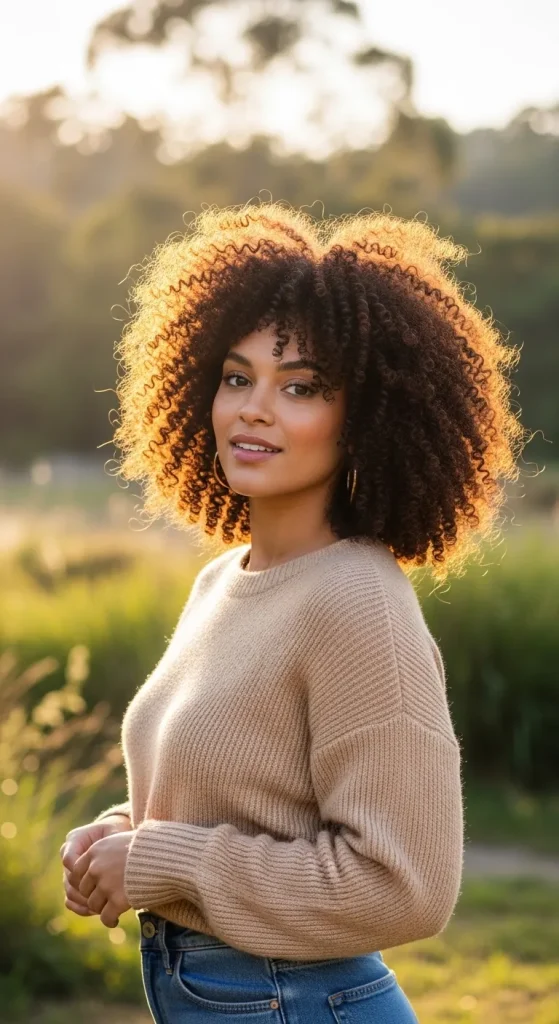
Idea 1: Defined Natural Curls
How to Create
Defined natural curls emphasize the natural coil pattern while enhancing shine and structure. This style focuses on hydration and controlled definition rather than altering the hair’s natural form. It works well for various curl types and supports a healthy hair routine. The key concept involves evenly distributing moisture and styling product to encourage curl clumping. This method is widely used in Pinterest inspiration because it creates a polished yet natural appearance suitable for everyday wear. The aesthetic aligns with modern design preferences that highlight texture and simplicity. Maintaining consistent curl definition requires attention to moisture balance and gentle handling during styling. This look is particularly effective as a beginner friendly approach because it does not require advanced techniques or tools. The final result presents soft, bouncy curls with a smooth finish, making it a reliable option for both casual and formal settings.
To achieve this style, begin with damp hair and divide it into sections using clips. Apply leave-in conditioner followed by a curl cream, ensuring even coverage from roots to ends. Use a detangling brush or fingers to distribute the product and define curls through a raking or shingling method. Allow the hair to air dry or use a diffuser for faster results while maintaining curl shape. Avoid touching the hair during drying to prevent frizz. Once dry, lightly separate curls for volume and apply a small amount of oil for shine. This step by step process ensures consistent results and supports long-lasting definition. Regular maintenance involves refreshing curls with water and a small amount of product to maintain the style throughout the day.

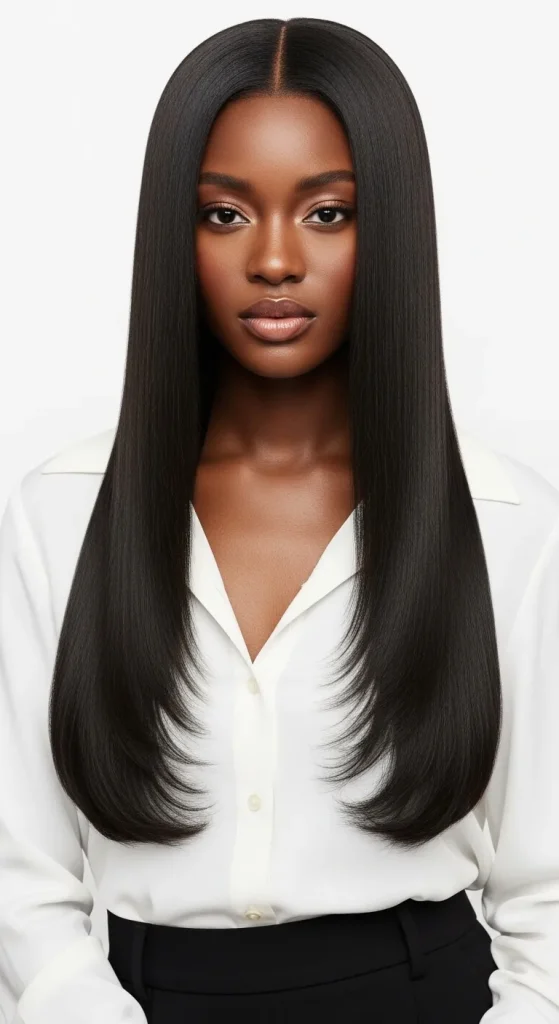
Idea 2: Sleek Straight Down Style
How to Create
A sleek straight down hairstyle offers a refined and polished look that highlights length and smoothness. This style is commonly featured in Pinterest ideas due to its clean lines and minimalist style. It is suitable for both professional and formal environments, providing a structured appearance without complexity. The concept focuses on achieving a smooth texture with controlled shine while minimizing frizz. Proper preparation is essential to protect hair during the straightening process. This hairstyle reflects modern design aesthetics by emphasizing simplicity and precision. It works well for those seeking a low-profile yet elegant look that can be maintained throughout the day.
Start by blow-drying clean, conditioned hair using a heat protectant. Section the hair and use a flat iron to straighten each part evenly, working from roots to ends. Maintain consistent temperature settings to avoid damage. After straightening, apply a lightweight serum to enhance shine and reduce flyaways. Use a fine-tooth comb to ensure alignment and smoothness. This step by step method creates a uniform finish. For maintenance, wrap the hair at night or use a silk scarf to preserve the sleek appearance. This easy project requires careful execution but delivers a professional result suitable for various occasions.
Idea 3: Side-Parted Volume Waves
How to Create
Side-parted volume waves introduce movement and dimension to a down hairstyle while maintaining a soft and natural look. This style is often used in creative ideas for its ability to frame the face and add visual interest. The deep side part creates asymmetry, enhancing volume on one side while maintaining balance overall. It aligns with aesthetic trends that favor relaxed yet intentional styling. This hairstyle works across different textures and can be adapted for both casual and formal settings. The concept focuses on creating controlled waves with a defined part for structure.
To create this look, start by parting the hair deeply to one side. Apply a styling cream or mousse to damp hair, focusing on mid-lengths and ends. Use a curling wand or twist sections of hair to form waves, ensuring consistent direction for a cohesive finish. Allow the hair to cool before separating the waves gently with fingers. Finish with a light hold spray to maintain the shape. This step by step approach ensures even distribution and balanced volume. The result is a soft, flowing style that enhances natural movement while maintaining structure.

Idea 4: Half Braided Down Style
How to Create
The half braided down style combines structure and freedom by incorporating braids into loose hair. This design is popular in Pinterest inspiration because it offers a creative balance between intricate detail and relaxed styling. The braid acts as a focal point while the remaining hair flows naturally. This approach supports organization within the hairstyle while maintaining a soft overall appearance. It is suitable for various occasions and allows for customization in braid size and placement.
Begin by sectioning the top portion of the hair and creating a braid, such as a cornrow or twist. Secure the braid at the back while leaving the rest of the hair loose. Apply styling products to define the remaining hair, whether curly or straight. Ensure that the braid is neat and evenly tensioned. This step by step method provides structure without requiring complex techniques. The final look blends detailed craftsmanship with effortless styling, making it a versatile option.

Idea 5: Wet Look Texture
How to Create
The wet look texture creates a sleek, glossy appearance that mimics freshly styled hair. This style is widely featured in trending ideas due to its bold and modern aesthetic. It emphasizes shine and definition, making it suitable for events or photography. The concept involves using styling products to create a controlled, glossy finish while maintaining shape. This look aligns with contemporary preferences for clean and striking visuals.
Apply a generous amount of styling gel or cream to damp hair, distributing it evenly. Use a comb to shape the hair and define sections. Allow the hair to set naturally or with minimal heat. Avoid over-manipulation to maintain the glossy effect. This step by step process ensures a consistent finish. The result is a high-shine style that remains structured throughout wear.

Idea 6: Layered Blowout Style
How to Create
A layered blowout style adds volume and movement through strategic shaping. This hairstyle highlights layers while maintaining a smooth finish. It is commonly used in creative projects for its dynamic appearance. The concept focuses on creating lift at the roots and soft movement throughout the lengths.
Blow-dry the hair using a round brush, lifting at the roots and curving the ends inward or outward. Section the hair to maintain control and consistency. Apply a light serum for shine. This step by step approach ensures even volume distribution. The final result is a full-bodied style with natural movement.

Idea 7: Twist-Out Down Style
How to Create
A twist-out creates defined texture by unraveling twists after setting. This method enhances curl patterns while adding volume. It is a popular DIY technique due to its simplicity and effectiveness. The concept focuses on creating uniform twists and allowing them to set properly.
Divide damp hair into sections and create two-strand twists. Allow them to dry completely before unraveling. Separate the curls gently to increase volume. This step by step process ensures defined results. The final look is textured and full.

Idea 8: Middle Part Sleek Look
How to Create
A middle part sleek look emphasizes symmetry and balance. This hairstyle aligns with minimalist style trends and provides a clean appearance. The concept focuses on precise parting and smooth texture.
Create a center part and straighten or smooth the hair evenly. Apply a styling product to control flyaways. This step by step method ensures a polished finish. The result is a structured and balanced look.

Idea 9: Loose Afro Style
How to Create
A loose afro celebrates natural volume and texture. This style is widely used in Pinterest ideas for its bold and authentic appearance. The concept focuses on shaping the hair while maintaining its natural pattern.
Use a pick to lift the roots and shape the hair evenly. Apply a light product for moisture. This step by step approach enhances volume without disrupting texture. The result is a full, balanced style.
Idea 10: Curled Ends Down Style
How to Create
Curled ends add subtle detail to a straight or stretched hairstyle. This look introduces movement without altering the entire texture. It is often used in aesthetic styling for its refined finish.
Straighten or stretch the hair, then curl only the ends using a curling tool. Apply a light hold product to maintain shape. This step by step process ensures consistency. The result is a soft, polished style.

Common Beginner Mistakes and How to Avoid Them
Many beginners apply too much product, which can weigh down the hair and reduce definition. Using incorrect tools or skipping preparation steps can also lead to uneven results. Avoid rushing through sectioning, as this step ensures accuracy. Always use appropriate products for your hair type and avoid excessive heat without protection. Maintaining patience during styling improves overall results.
Practical Tips for Better Results
Work in small sections for better control and even distribution of products. Keep hair moisturized to maintain flexibility and reduce breakage. Use mirrors to check symmetry and alignment. Practicing each technique improves consistency over time. Selecting the right tools enhances efficiency and outcome.
Styling, Presentation, or Organization Ideas
Present down hairstyles with clean parting and balanced volume. Accessories can be added for variation while maintaining simplicity. Organize styling tools for easy access during the process. Consistent presentation enhances the overall aesthetic and supports a polished look.
Budget or Time Planning
Most down hairstyles can be completed using basic materials, making them budget ideas for regular styling. Planning ahead reduces time spent during execution. Simple styles require less than an hour, while more detailed methods may take longer. Efficient preparation ensures smoother workflow.
Creative Expansion and Advanced Inspiration
Advanced variations include combining multiple techniques, such as braids with curls or sleek sections with textured ends. Experimenting with parting styles and layering enhances creativity. These creative ideas allow for personalized expression while maintaining practical structure.


Leave a Reply