Introduction
Gel nails with funky art designs have become a major focus in modern Pinterest ideas, combining bold creativity with long-lasting nail techniques. This article explains how to create unique, eye-catching gel nail styles using practical methods, beginner friendly tools, and step by step planning that supports both personal expression and structured DIY execution.
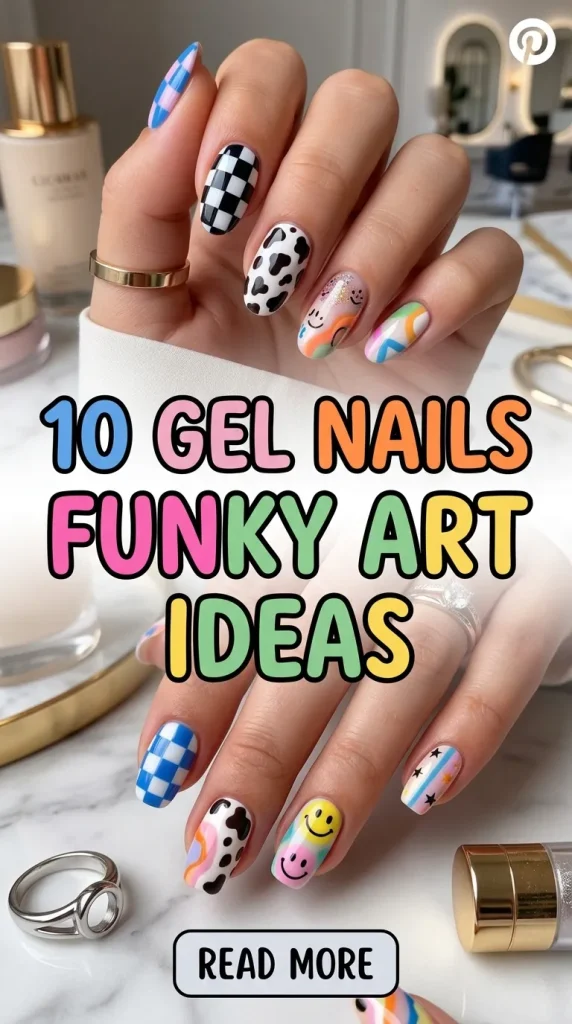
Readers will learn how to design, prepare, and execute ten distinct gel nail concepts using accessible materials and organized techniques. Each idea focuses on clear application methods, modern design trends, and creative project inspiration, helping transform simple nail work into detailed, aesthetic, and visually engaging handmade nail decoration.
Why This Idea Is Trending or Useful
Funky gel nail art is trending because it blends durability with creative freedom. Unlike traditional polish, gel allows precise layering, controlled detailing, and longer wear. This makes it suitable for both beginners and experienced creators who want reliable results. Pinterest ideas highlight bold colors, abstract forms, and artistic experimentation, which align with current modern design preferences.
The popularity also comes from its DIY appeal and accessibility. Many designs can be created at home with basic materials and simple tools. Step by step tutorials make it easier to follow structured processes, reducing mistakes. This makes gel nail art an easy project that supports creativity, organization, and personal style without requiring professional-level training or expensive resources.
Materials and Preparation
Before starting any gel nail creative project, proper preparation ensures consistent and clean results. Essential materials include a gel base coat, gel top coat, colored gel polishes, a UV or LED lamp, nail files, buffers, and cleaning solution. Additional tools such as fine brushes, dotting tools, sponges, and striping tape support detailed designs and artistic effects.
Preparation begins with cleaning and shaping the nails. The surface must be lightly buffed to help the gel adhere properly. Cuticles should be pushed back carefully to create a smooth working area. Planning the design in advance helps maintain consistency across all nails. Organizing materials before starting improves workflow and reduces interruptions during the application process.
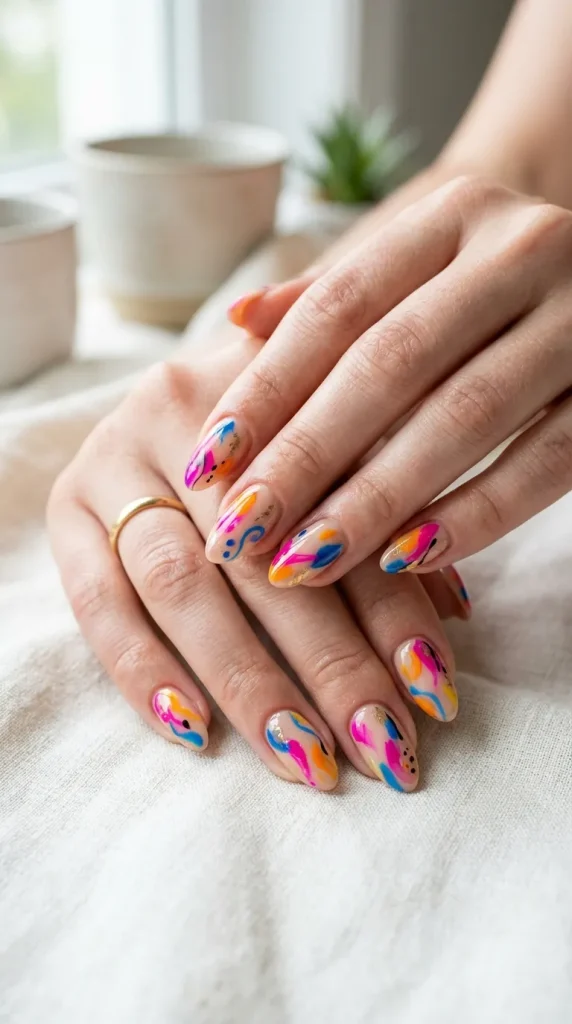
Idea 1: Abstract Color Splash Nails
How to Create
Abstract color splash nails focus on random yet controlled placement of vibrant gel colors. This design uses irregular shapes, overlapping tones, and contrast to create an artistic effect. It reflects modern design principles where structure and spontaneity coexist. This style is popular in Pinterest inspiration because it allows complete freedom without strict patterns or symmetry requirements.
To create this look, apply a neutral base color and cure it. Using a fine brush or dotting tool, place small amounts of different gel colors onto the nail. Blend edges slightly without fully mixing them to maintain contrast. Cure each layer before adding more detail. Finish with a glossy top coat to enhance depth and preserve the layered aesthetic.
Idea 2: Funky Geometric Line Art
Step-by-Step Guide
Geometric line art uses structured shapes such as triangles, squares, and intersecting lines to create a bold visual layout. This minimalist style focuses on precision and spacing rather than heavy color use. It works well in modern home decor-inspired aesthetics, where clean lines and balanced composition are essential elements.
Start with a solid base color and cure it completely. Use striping tape or a fine liner brush to create straight lines and geometric shapes. Apply contrasting colors within selected sections. Remove tape carefully before curing to maintain sharp edges. Seal the design with a top coat to protect the structure and ensure long-lasting clarity.

Idea 3: Neon Pop Accent Nails
How to Make
Neon pop nails use bright, high-contrast colors to create standout accents. This design often combines neutral tones with bold neon elements, creating a visually striking balance. It is widely used in trending ideas because it adds energy and focus without overwhelming the entire nail set.
Apply a neutral or pastel base and cure it. Choose one or two nails for neon accents. Use bright gel colors to create shapes, lines, or small patterns. Keep the rest of the nails simple to highlight the contrast. Cure each layer and finish with a top coat to maintain brightness and durability.

Idea 4: Funky Swirl Pattern Nails
Execution Process
Swirl patterns create fluid, continuous movement across the nail surface. This design mimics natural curves and flowing lines, making it a popular aesthetic choice in creative ideas. It works well with both soft pastel tones and bold color combinations.
Begin with a base color and cure it. Using a thin brush, draw curved lines in contrasting shades. Keep the lines smooth and connected to create a cohesive pattern. Avoid overcrowding the design to maintain clarity. Cure after completing the swirls and apply a top coat to enhance the smooth finish.

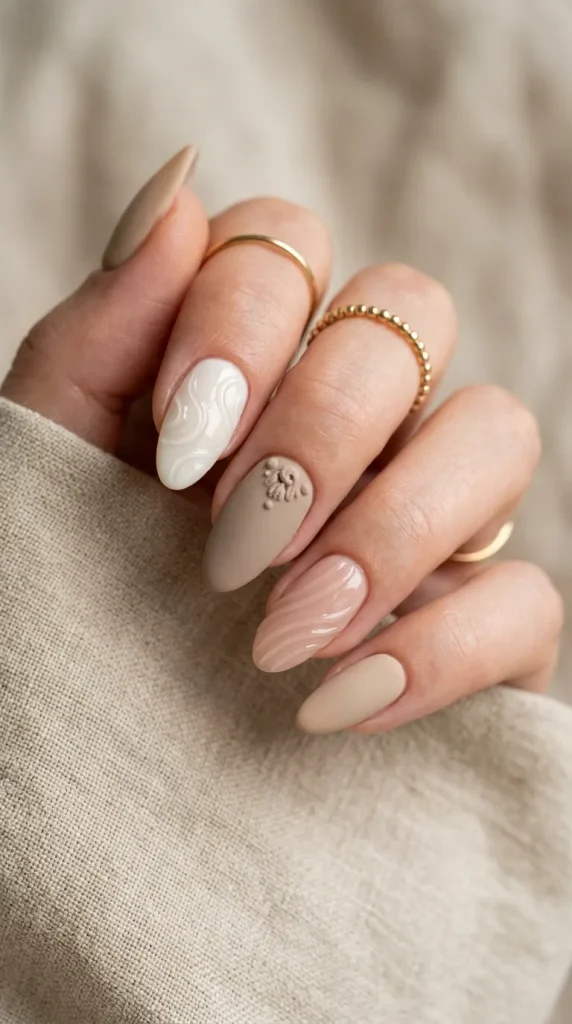
Idea 5: Mixed Texture Gel Nails
Setup Method
Mixed texture nails combine glossy, matte, and raised elements to create depth. This design focuses on tactile variation, making it visually interesting even with limited color use. It aligns with modern minimalist style trends where subtle variation adds complexity.
Apply a base color and cure it. Use matte top coat on selected areas while keeping others glossy. Add small raised details using thicker gel for texture. Cure each layer properly. Finish with appropriate top coats depending on the desired texture in each section.
Idea 6: Funky Checkerboard Design
How to Create
Checkerboard nails use alternating squares to create a structured yet playful pattern. This design is widely used in Pinterest ideas due to its bold visual impact and easy customization with different colors.
Start with a base color and cure it. Use a fine brush to draw a grid pattern. Fill alternating squares with contrasting gel colors. Maintain consistent spacing for a clean result. Cure thoroughly and apply a top coat to seal the design.

Idea 7: Gradient Funk Nails
Step-by-Step Guide
Gradient nails blend two or more colors smoothly across the nail surface. This technique creates a soft transition effect that adds depth without sharp lines. It is commonly used in aesthetic and modern nail designs.
Apply the first color as a base and partially cure it. Use a sponge or brush to blend a second color into the first. Repeat layering for smoother transitions. Cure fully and apply a glossy top coat to enhance the gradient effect.

Idea 8: Funky Cartoon Detail Nails
How to Make
Cartoon detail nails include small illustrated elements such as faces, icons, or playful shapes. This design emphasizes creativity and personalization, making it a strong creative project option.
Apply a base color and cure it. Use a fine detailing brush to draw simple cartoon elements. Keep lines clean and use contrasting colors for clarity. Cure each layer carefully and finish with a top coat to protect intricate details.

Idea 9: Metallic Accent Funk Nails
Execution Process
Metallic accents add reflective elements to gel nail designs. This style combines matte or solid colors with metallic lines or shapes, creating a modern and polished appearance.
Start with a base color and cure it. Apply metallic gel or foil in selected areas using a brush or adhesive. Keep placement minimal for balance. Cure properly and seal with a top coat to maintain shine and durability.

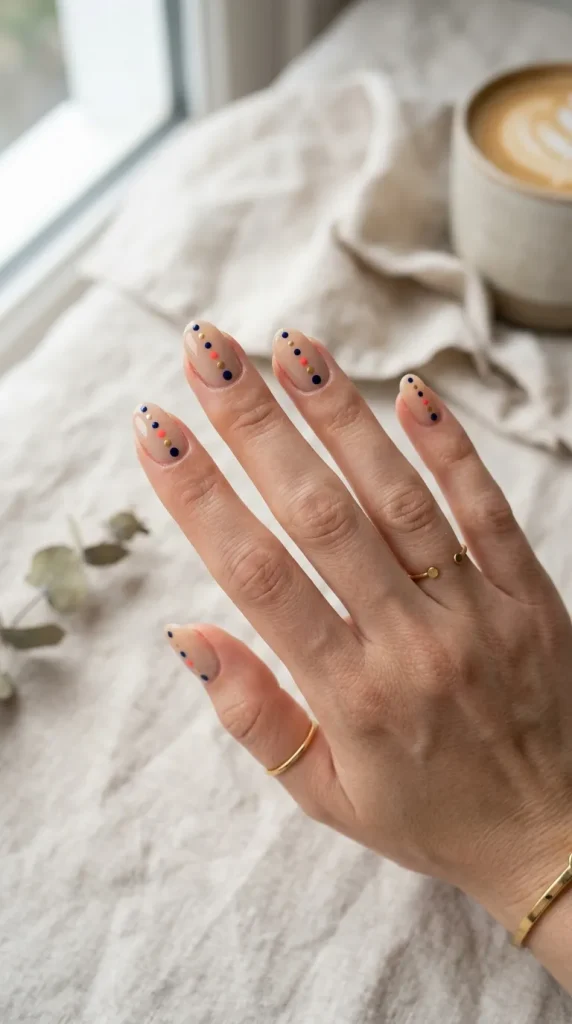
Idea 10: Funky Minimal Dot Design
Setup Method
Dot designs use small, evenly spaced circles to create patterns. This beginner friendly approach focuses on precision and repetition rather than complexity. It is widely used in easy project tutorials.
Apply a base color and cure it. Use a dotting tool to place evenly sized dots in patterns or random arrangements. Maintain consistent spacing for a clean look. Cure and apply a top coat to finalize the design.
Common Beginner Mistakes and How to Avoid Them
One common mistake is applying gel layers too thickly, which prevents proper curing and leads to uneven surfaces. Thin, controlled layers ensure better adhesion and smoother results. Another issue is skipping nail preparation, which reduces durability. Proper cleaning and buffing are essential steps in every tutorial process.
Inconsistent curing times can also affect the final outcome. Each layer must be cured according to the lamp specifications. Rushing the process often leads to smudging or peeling. Planning the design in advance helps avoid errors and improves overall organization during the creative project.
Practical Tips for Better Results
Using high-quality tools improves precision and efficiency. Fine brushes and dotting tools allow better control when creating detailed designs. Keeping materials organized before starting reduces interruptions and supports a smoother workflow.
Working in a well-lit area enhances visibility, making it easier to apply even layers and accurate details. Practicing basic techniques such as lines, dots, and blending builds confidence. Consistent practice helps refine skills and improve the quality of each handmade nail decoration.
Styling, Presentation, or Organization Ideas
Coordinating nail designs with outfits or accessories enhances overall presentation. Choosing color palettes that match seasonal trends or specific events adds relevance to the design. Minimalist styles work well for everyday wear, while bold designs suit special occasions.
Organizing tools and materials in labeled containers improves efficiency. Keeping frequently used items accessible reduces setup time. Presentation also includes maintaining clean edges and consistent shapes across all nails, which contributes to a polished and professional appearance.
Budget or Time Planning
Gel nail projects can be completed efficiently with proper planning. Investing in reusable tools such as lamps and brushes reduces long-term costs. Choosing multi-use materials allows more flexibility across different designs.
Time management is important for achieving clean results. Allocating time for preparation, application, and curing ensures each step is completed properly. Avoid rushing the process, as it can affect durability and overall quality. Structured planning makes the project more manageable and consistent.
Creative Expansion and Advanced Inspiration
Once basic techniques are mastered, designs can be expanded by combining multiple styles in one set. For example, mixing geometric patterns with gradients creates layered visual effects. Experimenting with color combinations and textures introduces new creative possibilities.
Advanced inspiration can include incorporating themes, seasonal elements, or abstract concepts into nail designs. This approach transforms simple DIY ideas into more complex and expressive artistic projects. Continuous experimentation helps develop unique styles and keeps the creative process engaging and evolving.


Leave a Reply