Introduction
Messy bun hairstyles for long hair are among the most saved Pinterest ideas because they combine practicality with effortless style. These looks suit daily routines, casual outings, and organized home settings while maintaining a clean and aesthetic appearance.
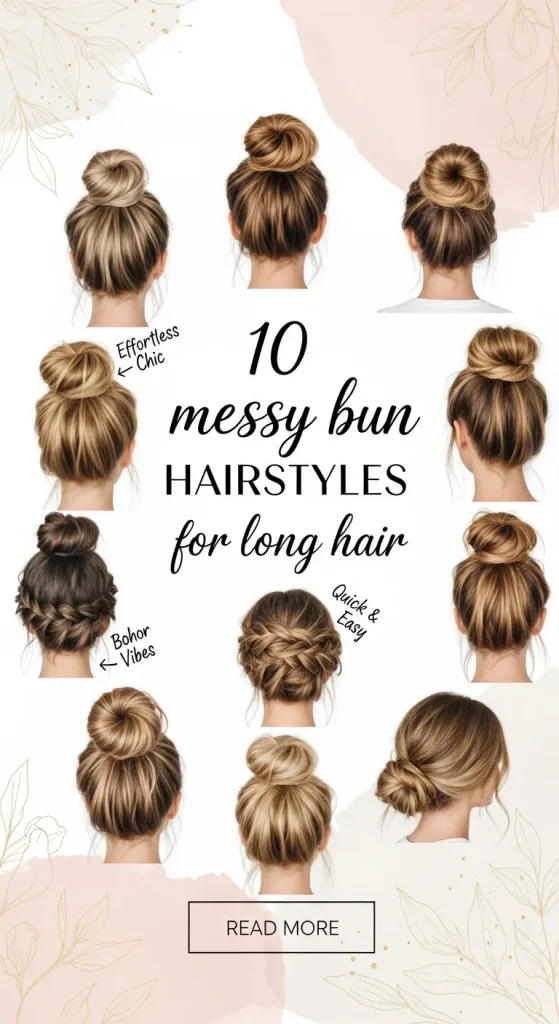
This article explains how to create ten distinct messy bun styles using simple materials and beginner friendly techniques. Each idea includes a clear step by step approach, making it easy to follow as a DIY hair tutorial for modern, minimalist styling.
Why This Idea Is Trending or Useful
Messy bun hairstyles continue to gain popularity in Pinterest inspiration boards due to their balance between functionality and visual appeal. These styles align with modern design preferences that favor relaxed structure over rigid perfection. The messy bun fits into daily routines such as work-from-home setups, quick errands, and casual gatherings, making it a practical hairstyle choice. It supports easy organization of long hair while reducing styling time, which adds to its usefulness for individuals seeking efficient beauty routines.
Another reason for its trend value is accessibility. These hairstyles require minimal materials and do not depend on professional tools, making them beginner friendly. Many people prefer DIY solutions that can be recreated at home without specialized training. The versatility of messy buns allows them to match different aesthetics, including minimalist style, soft romantic looks, and structured casual appearances. This adaptability makes them suitable for various occasions while maintaining consistency with current creative ideas and styling trends found on Pinterest.
Materials and Preparation
Before starting any messy bun hairstyle, it is important to prepare the necessary materials and understand the basic setup process. Common materials include elastic hair ties, bobby pins, a wide-tooth comb, and optional styling products such as light hair spray or texturizing spray. These tools help maintain structure while allowing flexibility in shaping the bun. For individuals with very smooth hair, a texturizing product can improve grip and make the hairstyle easier to manage.
Preparation begins with detangling the hair to ensure smooth handling during styling. Hair can be slightly damp or dry depending on the desired texture. Lightly brushing or finger-combing helps maintain a natural, aesthetic finish. Planning the placement of the bun is also important, whether it is positioned high, low, or centered. Sectioning the hair beforehand can simplify the process and improve results. These preparation steps support a more controlled and efficient DIY tutorial experience, ensuring that each hairstyle remains practical and achievable for beginners.
Idea 1: Classic Loose Messy Bun
How to Create
The classic loose messy bun is a foundational style among Pinterest ideas for long hair. It focuses on creating a relaxed, unstructured look that maintains volume while appearing effortless. This style works well for everyday home decor-inspired aesthetics where simplicity and comfort are key. The bun sits at a medium height and allows strands to fall naturally, contributing to its soft appearance. It is considered a beginner friendly option because it does not require precise sectioning or tight styling.
To create this look, gather the hair into a loose ponytail without pulling it tightly. Twist the ponytail gently and wrap it around the base, forming a bun. Secure it with a hair tie and adjust sections using bobby pins. Pull out small strands around the face and crown to enhance the messy effect. This step by step process ensures flexibility while maintaining structure. Lightly tugging sections of the bun adds volume and creates a balanced, aesthetic finish suitable for daily styling.

Idea 2: High Volume Messy Bun
Step-by-Step Guide
The high volume messy bun is designed to create height and fullness, making it one of the most visually impactful creative ideas. This style is commonly used in modern design aesthetics where bold shapes and lifted structures are preferred. It works particularly well for long hair because it utilizes length to build volume. The elevated placement enhances facial features and creates a clean, organized look.
To achieve this hairstyle, flip the head forward and gather the hair into a high ponytail. Secure it loosely, then tease the ponytail slightly to increase volume. Wrap sections around the base without compressing them tightly. Use bobby pins to hold the shape while keeping the structure airy. Adjust strands to maintain balance and avoid flattening the bun. This method ensures that the hairstyle remains lightweight while achieving a fuller appearance.

Idea 3: Low Relaxed Messy Bun
How to Make
The low relaxed messy bun focuses on simplicity and comfort, making it suitable for minimalist style preferences. Positioned near the nape of the neck, this hairstyle creates a calm and organized look. It aligns with aesthetic home decor themes where subtlety and balance are prioritized. This style is particularly useful for long days when comfort is essential.
To create this bun, gather the hair at the back and secure it loosely with a tie. Twist the length gently and wrap it into a soft bun. Use pins to hold the structure while allowing natural looseness. Pull out a few strands for a relaxed finish. This easy project approach ensures that the hairstyle remains practical and visually balanced.

Idea 4: Braided Messy Bun
Execution Process
The braided messy bun combines structure with texture, offering a more detailed variation of traditional messy buns. This style integrates braiding techniques to add depth and dimension, making it a popular choice for Pinterest inspiration boards. It enhances the overall design without requiring advanced skills.
Start by creating a loose braid from the ponytail. Wrap the braid around the base and secure it with pins. Adjust the braid slightly to loosen sections and create a fuller appearance. This step by step process ensures that the hairstyle maintains both structure and softness, making it suitable for casual and semi-formal settings.

Idea 5: Twisted Side Messy Bun
Setup Method
The twisted side messy bun introduces asymmetry, which is a key element in modern creative ideas. Positioned slightly to one side, it adds variation to traditional bun placements. This style works well for individuals looking to experiment with different aesthetics while maintaining simplicity.
To create it, part the hair slightly and gather it to one side. Twist sections and wrap them into a bun near the ear area. Secure with pins and adjust strands for balance. This method creates a unique look while remaining beginner friendly and easy to manage.

Idea 6: Double Messy Bun Style
How to Create
The double messy bun style divides the hair into two sections, creating a playful and structured appearance. This style aligns with trending ideas that emphasize symmetry and creative expression. It is suitable for casual settings and adds variety to standard hairstyles.
Divide the hair into two equal parts and create two buns on either side. Secure each with ties and pins, then loosen sections for a messy effect. This approach ensures balance while maintaining a relaxed finish.

Idea 7: Half-Up Messy Bun
Step-by-Step Guide
The half-up messy bun combines loose hair with a small bun at the crown. This style offers a balanced look between structured and free-flowing elements. It is commonly used in Pinterest ideas for its versatility and aesthetic appeal.
Gather the top section of hair and form a bun while leaving the rest loose. Secure and adjust for volume. This method provides a simple yet stylish option for everyday wear.

Idea 8: Textured Messy Bun
How to Make
The textured messy bun emphasizes layered structure and depth. It uses slight teasing or natural waves to enhance volume. This style fits well within aesthetic and modern design preferences.
Create a loose ponytail, tease lightly, and wrap into a bun. Adjust strands for texture and secure with pins. This ensures a fuller and more dynamic appearance.

Idea 9: Knotted Messy Bun
Execution Process
The knotted messy bun uses simple knotting techniques to create structure. It provides a unique alternative to twisting or braiding methods. This style is often included in creative project tutorials due to its distinct look.
Divide the ponytail into sections, tie them into loose knots, and secure into a bun shape. Adjust for balance and texture. This method creates a structured yet relaxed hairstyle.

Idea 10: Minimalist Sleek Messy Bun
How to Create
The minimalist sleek messy bun combines clean lines with subtle looseness. It reflects modern minimalist style while maintaining the casual essence of a messy bun. This style is suitable for professional or organized settings.
Smooth the hair into a low ponytail, twist lightly, and secure into a neat bun. Pull out minimal strands to soften the look. This ensures a polished yet relaxed finish.

Common Beginner Mistakes and How to Avoid Them
One common mistake is pulling the hair too tightly, which removes the relaxed appearance that defines messy buns. Maintaining a balance between structure and looseness is essential. Another issue is overusing styling products, which can make the hair appear stiff instead of natural. Using minimal products ensures flexibility and a soft finish. Beginners also often skip preparation steps such as detangling, leading to uneven results. Taking time to prepare the hair improves overall styling quality.
Incorrect placement is another frequent problem. Choosing the wrong bun position can affect the overall balance of the hairstyle. Understanding face shape and desired style helps in selecting the right placement. Additionally, using too few pins can cause the bun to fall apart, while excessive pins can make it look rigid. Finding a balanced approach ensures stability without compromising the aesthetic.
Practical Tips for Better Results
Using slightly textured hair improves grip and makes styling easier. Clean but overly smooth hair may not hold the bun effectively. Light teasing can add volume without creating tangles. Working with sections instead of all hair at once provides better control during styling. This method simplifies the process and improves accuracy.
Another useful tip is adjusting the bun after securing it. Gently pulling sections can enhance volume and create a more natural appearance. Practicing different placements helps identify which styles suit individual preferences. Consistency in technique leads to better results over time, making each hairstyle easier to recreate.
Styling, Presentation, or Organization Ideas
Messy bun hairstyles can be adapted to different styling themes. Pairing them with simple outfits enhances the overall aesthetic. For home decor-inspired visuals, neutral tones and minimal accessories complement the hairstyle. Organizing hair tools in advance supports a smoother styling process.
Presentation also plays a role in achieving a polished look. Ensuring even distribution of volume and balanced strands improves visual appeal. Keeping the hairstyle aligned with personal style preferences ensures consistency. These elements contribute to a cohesive and well-structured appearance.
Budget or Time Planning
Messy bun hairstyles are considered budget ideas because they require minimal materials. Most tools are reusable and commonly available, reducing overall cost. Time efficiency is another advantage, as many styles can be completed within minutes. Planning the hairstyle in advance helps streamline the process.
Allocating a few minutes for preparation improves results significantly. Choosing simpler styles for busy days ensures practicality, while more detailed styles can be reserved for special occasions. This approach balances time and effort effectively.
Creative Expansion and Advanced Inspiration
Once basic messy bun techniques are mastered, variations can be explored to create more advanced styles. Combining braids, twists, and knots allows for unique designs. Experimenting with different placements and textures expands creative possibilities. These methods align with evolving Pinterest inspiration trends.
Advanced ideas may include incorporating accessories or combining multiple techniques in one style. Exploring new approaches helps maintain variety and keeps the styling process engaging. Continuous experimentation leads to improved skills and more refined results.

Leave a Reply