Introduction
Straight hair offers a smooth and versatile base for many styling possibilities, making it one of the easiest textures to work with for everyday looks. Many people search for Pinterest ideas that feel natural, effortless, and suitable for daily wear without requiring complex tools or heavy styling products. This topic focuses on simple yet creative hairstyles designed specifically for straight hair, helping you achieve polished results while maintaining a natural appearance. The goal is to highlight easy project styling approaches that can be followed step by step, even by beginners with no prior experience in hairstyling.
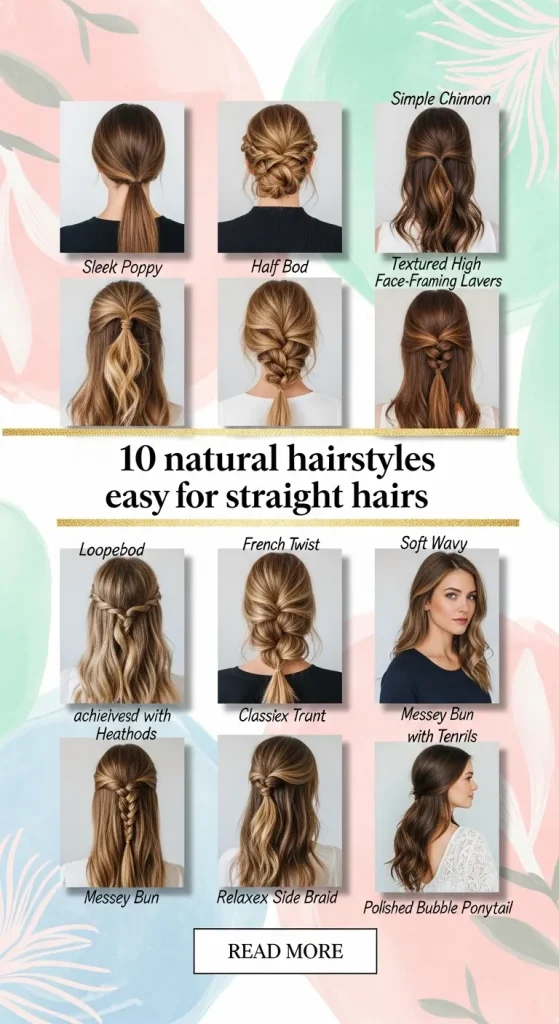
These natural hairstyles are useful for different occasions such as school, work, casual outings, and home settings. Each style is designed to be beginner friendly, requiring minimal materials and quick preparation. The focus is on practicality, modern design, and aesthetic balance that fits current Pinterest inspiration trends. Readers will learn how to transform basic straight hair into stylish looks using simple methods, making everyday styling more creative, organized, and visually appealing.
Why This Idea Is Trending or Useful
Natural hairstyles for straight hair are trending because they combine simplicity with modern aesthetics. Many people prefer styles that do not require heat damage or complex salon treatments, making DIY styling more popular. Straight hair provides a clean foundation that allows different shapes, textures, and arrangements to stand out clearly. This makes it ideal for minimalist style inspiration often seen in Pinterest ideas and creative boards.
Another reason for popularity is accessibility. These hairstyles require minimal tools and materials, making them suitable for beginners and busy routines. People increasingly look for budget ideas that still offer polished results, and these styles meet that demand. They also support creative freedom, allowing small adjustments while maintaining a natural and effortless appearance. The combination of ease, practicality, and visual appeal makes these hairstyles a strong choice for modern home decor-inspired personal styling routines.
Materials and Preparation
Before starting any natural hairstyle for straight hair, proper preparation ensures better results and longer-lasting structure. Basic materials include a wide-tooth comb, a fine-tooth comb for detailing, hair ties, clips, and light styling sprays if needed. Optional tools such as straighteners or curling wands may be used for variation, but most styles focus on heat-free methods to maintain hair health. Having a clean and detangled base is essential for smooth execution.
Preparation begins with washing and drying the hair to remove oil and buildup. Straight hair should be brushed thoroughly to eliminate knots and ensure even distribution. Planning the hairstyle in advance is also important, especially for step-by-step tutorials that require sectioning. Good organization helps achieve a clean finish and reduces styling time. Setting up a mirror in proper lighting also improves precision and makes the process easier for beginners working on DIY creative projects at home.
Idea 1: Sleek Low Ponytail Elegance
How to Create
The sleek low ponytail is a timeless natural hairstyle that works perfectly with straight hair because it enhances smooth texture and clean lines. This style focuses on simplicity and refinement, making it suitable for both casual and formal settings. It highlights facial features while keeping the overall appearance neat and controlled. The aesthetic appeal lies in its minimalist design, which aligns well with modern Pinterest ideas that emphasize polished yet effortless looks. Straight hair naturally supports this hairstyle since it requires minimal manipulation, allowing the natural shine and flow of the hair to stand out.
To create this look, start by brushing the hair thoroughly to remove any tangles and achieve a smooth base. Gather the hair at the nape of the neck and secure it tightly using a hair tie. For a more refined finish, take a small section of hair and wrap it around the base to hide the elastic. Light smoothing products can be applied to control flyaways. This step-by-step method is beginner friendly and requires minimal materials, making it a practical DIY hairstyle for everyday use.
Execution Process
The execution process focuses on precision and balance to maintain the sleek appearance of the ponytail. Begin by dividing the hair into sections and ensuring even smoothness across the scalp. Straight hair benefits from gentle brushing strokes that align strands in a uniform direction. This reduces uneven volume and creates a controlled silhouette. The key is to maintain tension while gathering the hair, ensuring the ponytail sits low and centered. This method is often used in creative project styling because it is quick, efficient, and visually clean.
After securing the ponytail, refine the look by adjusting tightness and smoothing edges around the hairline. A small amount of styling serum can help enhance shine without making the hair heavy. The wrapped section around the base adds a decorative touch while maintaining minimalist style principles. This hairstyle is ideal for organization-focused routines where neat presentation matters. It also works well with home decor-inspired fashion aesthetics, offering a balanced blend of structure and simplicity suitable for daily wear.

Idea 2: Half-Up Twisted Crown Style
How to Create
The half-up twisted crown hairstyle adds a soft and elegant touch to straight hair while keeping the overall look natural and effortless. It is one of the most popular Pinterest ideas because it combines structure with gentle volume. This style works by twisting sections of hair from both sides of the head and joining them at the back, creating a crown-like effect. Straight hair enhances the definition of the twists, making the design more visible and aesthetically pleasing. The result is a balanced look that feels both casual and refined, suitable for everyday styling or simple events.
To create this hairstyle, divide the front sections of the hair on both sides. Twist each section backward, maintaining even tension to keep the shape intact. Once both sides are twisted, secure them together at the back using a small hair tie or clip. The remaining hair is left flowing naturally, which adds contrast and softness. This step-by-step method is beginner friendly and requires only basic materials such as combs and clips, making it an easy project for quick styling inspiration.
Execution Process
The execution process focuses on symmetry and control to ensure both sides of the crown match evenly. Start by sectioning clean parts of the hair to maintain balance. Straight hair should be lightly smoothed before twisting to avoid uneven strands. Each twist should be consistent in tightness to create a uniform appearance. This attention to detail is important in DIY hairstyling because it affects the final shape and overall aesthetic. The crown effect should sit comfortably along the upper back of the head without pulling too tightly.
After securing the twists, gently adjust volume to create a soft lifted effect at the crown area. Lightly loosening the twists can enhance the natural look while maintaining structure. This hairstyle fits well into modern design trends that focus on simplicity and elegance. It is also suitable for beginner friendly tutorials because it requires minimal tools and time. The final result is a balanced, creative hairstyle that enhances straight hair texture while remaining practical for daily use.

Idea 3: Minimalist Straight Hair Clip Back Style
How to Create
The minimalist clip back hairstyle is a simple yet stylish approach that highlights the natural flow of straight hair. It is widely seen in Pinterest ideas due to its clean aesthetic and effortless execution. This style involves pulling back small front sections of hair and securing them with decorative or neutral clips. The rest of the hair remains loose, maintaining a natural and relaxed appearance. Straight hair enhances the smooth transition between clipped and loose sections, creating a polished yet casual effect suitable for everyday wear.
To create this look, part the hair naturally or slightly off-center depending on preference. Take small sections from the front and pull them backward. Secure them at the back of the head using clips or pins. The placement should be balanced to avoid uneven tension. This step-by-step process requires minimal materials, making it ideal for DIY styling. It is also a beginner friendly option for quick preparation, especially when time is limited but a neat appearance is desired.
Execution Process
The execution process emphasizes balance and subtle detailing. Begin by ensuring the hair is fully detangled and smooth. Straight hair naturally supports this style, but light brushing helps maintain uniform direction. The clipped sections should not be too large, as the goal is to maintain a minimalist style rather than a fully pinned look. Proper spacing between clips enhances visual appeal and prevents overcrowding at the back of the head.
Once the clips are in place, adjust the remaining hair to ensure even distribution. Light volume at the crown can add dimension without disrupting the clean aesthetic. This hairstyle is often used in organization-focused routines due to its simplicity and speed. It aligns with modern design preferences that value natural beauty and functional styling. The final appearance is soft, structured, and suitable for both casual and semi-formal settings.

Idea 4: Low Twisted Bun Simplicity
How to Create
The low twisted bun is a refined natural hairstyle that works exceptionally well for straight hair due to its smooth texture. It is commonly featured in Pinterest ideas because it combines elegance with simplicity. This hairstyle involves twisting the hair at the nape of the neck and securing it into a compact bun. The result is a clean and structured look that suits professional environments, casual outings, and minimalist style preferences. Straight hair enhances the bun’s shape by reducing bulk and allowing a sleek finish.
To create this hairstyle, gather all the hair at the lower back of the head. Twist the length of the hair gently until it naturally coils into a bun shape. Secure it with a hair tie or pins depending on hair thickness. This step-by-step process requires minimal materials and is highly beginner friendly. It is a practical DIY hairstyle that can be completed quickly, making it ideal for busy routines or simple styling needs.
Execution Process
The execution process focuses on maintaining tight structure while avoiding unnecessary tension. Start by smoothing the hair thoroughly to ensure even alignment. Straight hair should be controlled carefully during twisting to prevent slipping strands. The bun should sit low and centered for a balanced appearance. Adjusting tension during the twist helps maintain shape and prevents the bun from loosening throughout the day.
After securing the bun, refine the edges by smoothing flyaways and adjusting shape symmetry. A soft finish is preferred to maintain natural aesthetics. This hairstyle is widely used in home decor-inspired personal styling due to its clean and organized appearance. It represents a blend of functionality and elegance, making it suitable for both everyday use and more polished occasions.

Idea 5: Straight Hair Side Braid Flow
How to Create
The side braid hairstyle brings a relaxed yet structured look to straight hair, making it a popular choice in Pinterest ideas focused on natural styling. This hairstyle involves gathering the hair to one side and creating a simple braid that flows over the shoulder. Straight hair enhances the clarity of the braid pattern, making each section visible and defined. The result is a soft, feminine, and effortless appearance that suits casual settings and everyday wear.
To create this look, move all hair to one side and divide it into three equal sections. Begin braiding by crossing sections over each other in a consistent pattern. Continue until reaching the end and secure with a hair tie. This step-by-step method is beginner friendly and requires only basic materials. It is an easy project suitable for quick styling without heat tools or complex preparation.
Execution Process
The execution process focuses on maintaining even tension throughout the braid. Straight hair should be brushed thoroughly before starting to ensure smooth sectioning. Each braid segment must be consistent to avoid uneven gaps. The positioning of the braid over one shoulder creates a natural flow that enhances visual balance.
After completing the braid, gently loosen sections for a softer, more voluminous appearance. This adjustment adds a relaxed aesthetic while maintaining structure. The side braid is ideal for creative projects that emphasize simplicity and practicality. It works well in both casual and organized styling routines, offering a versatile option for straight hair.

Idea 6: Half Ponytail Volume Lift
How to Create
The half ponytail with volume lift is a stylish natural hairstyle that adds dimension to straight hair without requiring complex techniques. It is frequently seen in Pinterest ideas because it creates a youthful and balanced look. This hairstyle involves lifting the top section of the hair and securing it into a ponytail while leaving the rest flowing freely. Straight hair benefits from added volume at the crown, creating contrast between the lifted section and the smooth length below.
To create this style, separate the upper half of the hair from ear level upward. Gather it at the crown and secure it with a hair tie. Light teasing at the crown area can add extra lift if desired. This step-by-step method is beginner friendly and requires minimal materials. It is a quick DIY hairstyle suitable for everyday inspiration and casual styling needs.
Execution Process
The execution process focuses on achieving balanced volume without disrupting the natural flow of straight hair. Begin by sectioning evenly to maintain symmetry. The crown area should be gently lifted before securing the ponytail. Straight hair tends to fall flat, so controlled teasing or light texturizing helps maintain structure.
After securing the ponytail, adjust volume distribution for a natural lift effect. The remaining hair should remain smooth and flowing. This hairstyle works well in modern design aesthetics that emphasize simplicity with subtle enhancement. It is practical for daily routines and provides a fresh, effortless appearance suitable for various settings.

Idea 7: Straight Hair Double Mini Buns
How to Create
Double mini buns offer a playful and creative hairstyle option for straight hair, often featured in Pinterest ideas focused on youthful and trendy looks. This style divides the hair into two sections and forms small buns on each side of the head. Straight hair helps maintain clean bun shapes and reduces bulk, resulting in a neat yet fun appearance. It is suitable for casual outings, creative styling sessions, and beginner friendly DIY experiments.
To create this hairstyle, part the hair down the middle into two equal sections. Twist each section into a small bun and secure with hair ties or pins. This step-by-step method is simple and requires minimal materials. It is ideal for easy project styling and quick transformation of straight hair into a more expressive look.
Execution Process
The execution process focuses on symmetry and placement. Each bun should sit evenly on both sides of the head to maintain balance. Straight hair should be smoothed before twisting to ensure clean structure. Proper tightening helps keep the buns secure without slipping.
After forming both buns, adjust shape and volume for consistency. Lightly loosening strands can create a softer finish while maintaining structure. This hairstyle fits well into creative styling routines and adds variety to simple straight hair looks.

Idea 8: Straight Hair Wrapped Half Knot
How to Create
The wrapped half knot hairstyle creates a subtle decorative effect on straight hair while maintaining simplicity. It is popular in Pinterest ideas due to its minimal yet stylish appearance. This hairstyle involves taking two front sections of hair, tying them into a knot, and securing them at the back. Straight hair enhances the smooth wrap effect, making the knot appear clean and defined.
To create this look, separate two small front sections and tie them together once. Secure the knot with a pin or small elastic underneath. This step-by-step process is beginner friendly and requires very few materials, making it suitable for quick DIY styling.
Execution Process
The execution process focuses on maintaining even tension in both sections. Straight hair should be smoothed before tying to avoid slipping. The knot should sit centered at the back of the head for balance. Adjusting tightness ensures comfort and stability.
After securing, refine surrounding hair for a seamless blend. This hairstyle offers a modern minimalist aesthetic and works well for simple daily styling needs.

Idea 9: Straight Hair Soft Wave Twist
How to Create
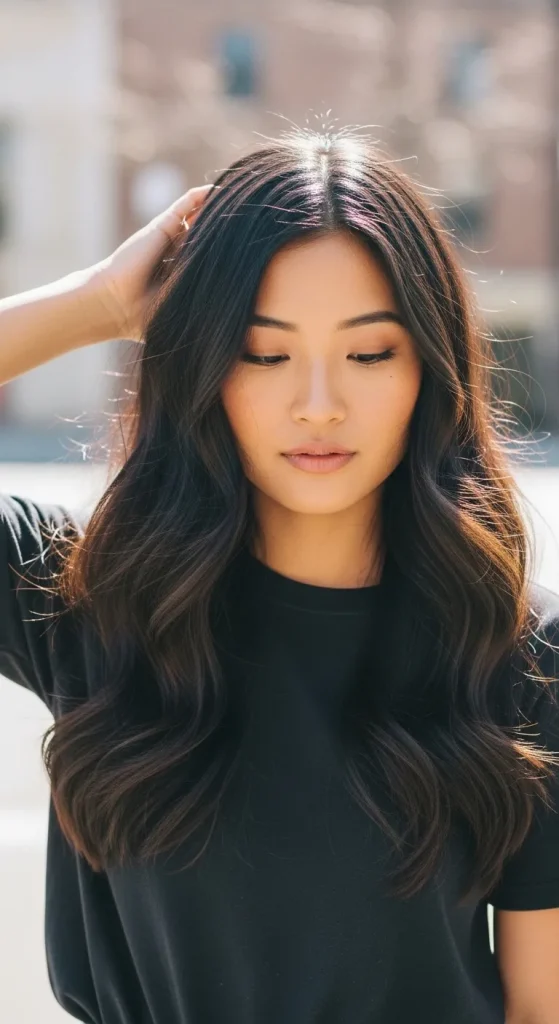
The soft wave twist introduces gentle movement into straight hair without heavy styling. It is often used in Pinterest ideas for creating natural-looking texture. This hairstyle involves twisting sections of damp or slightly textured hair and allowing them to set into soft waves. It enhances straight hair by adding dimension and flow.
To create this style, divide hair into sections and twist each loosely. Allow the twists to set naturally or overnight. This step-by-step method is beginner friendly and requires no heat tools, making it suitable for healthy DIY styling.
Execution Process
The execution process emphasizes loose twisting for natural wave formation. Straight hair should be lightly dampened before starting. Each twist should remain relaxed to avoid tight curls.
After releasing, gently separate waves for a soft finish. This hairstyle is ideal for natural styling routines and adds subtle texture to straight hair.
Idea 10: Straight Hair Clean Half Bun Look
How to Create
The clean half bun is a modern hairstyle that combines structure and simplicity for straight hair. It is widely featured in Pinterest ideas due to its balanced and stylish appearance. This hairstyle involves gathering the top section of hair into a small bun while leaving the rest straight and flowing. It creates a polished yet relaxed look suitable for everyday use.
To create this hairstyle, section the top half of the hair and twist it into a bun. Secure it tightly at the crown. This step-by-step method is beginner friendly and requires minimal tools, making it an easy DIY styling option.
Execution Process
The execution process focuses on maintaining clean lines and balanced placement. Straight hair should be brushed smooth before sectioning. The bun should sit neatly at the top center.
After securing, adjust remaining hair for symmetry. This hairstyle blends modern design with practical simplicity, making it suitable for daily styling inspiration.

Common Beginner Mistakes and How to Avoid Them
Many beginners struggle with uneven sectioning, excessive tension, or lack of preparation when creating natural hairstyles for straight hair. These mistakes often lead to unbalanced results or styles that do not hold properly throughout the day. Straight hair requires controlled handling to maintain structure, especially in DIY styling projects. Another common issue is skipping detangling, which affects smoothness and final appearance. Proper preparation is essential to achieve clean results in any step by step tutorial.
To avoid these issues, always start with brushed and smooth hair. Sectioning should be done carefully using mirrors for balance. Avoid pulling hair too tightly, as this can reduce comfort and distort the natural aesthetic. Using minimal but effective materials ensures better control. Planning the hairstyle before starting also improves execution. These adjustments help create more polished results in beginner friendly styling routines.
Practical Tips for Better Results
Improving natural hairstyles for straight hair requires attention to small details that enhance overall appearance. Consistent brushing helps maintain smooth texture, while light styling products can control flyaways without making hair stiff. Straight hair benefits from subtle volume adjustments, especially at the crown, to avoid flatness. Incorporating gentle techniques ensures a natural and balanced finish.
Another important tip is practicing section control. Even divisions create symmetry, which is essential in modern design-inspired hairstyles. Taking time to adjust shape after completion improves aesthetic quality. Using simple tools effectively rather than relying on complex equipment helps maintain a beginner friendly approach. These small improvements make DIY styling more efficient and visually appealing.
Styling, Presentation, or Organization Ideas
Presenting natural hairstyles for straight hair in a clean and structured way enhances their visual impact. Simple organization methods such as keeping sections neat and symmetrical contribute to a more polished look. Straight hair naturally supports minimalist style, making it ideal for modern aesthetics inspired by Pinterest ideas. Presentation should focus on balance, smoothness, and natural flow.
Styling can be improved by aligning hair direction consistently and avoiding cluttered arrangements. Keeping accessories minimal enhances the natural beauty of each hairstyle. Organization in styling also includes planning each step before execution. This approach helps maintain clarity and reduces errors. The result is a refined appearance that aligns with home decor-inspired simplicity and creative design principles.
Budget or Time Planning
Natural hairstyles for straight hair are cost-effective and require minimal tools, making them suitable for budget ideas. Most styles can be completed using basic household items such as combs, hair ties, and clips. This reduces the need for expensive salon treatments or specialized products. The simplicity of materials makes these hairstyles accessible for beginners and everyday use.
Time planning is also efficient, as most styles can be completed within minutes. Quick step by step methods allow for easy integration into daily routines. Preparing tools in advance further reduces styling time. This makes DIY hairstyling practical for busy schedules while still maintaining aesthetic quality. The combination of low cost and fast execution makes these styles highly useful for modern routines.
Creative Expansion and Advanced Inspiration
Once basic natural hairstyles for straight hair are mastered, creative expansion allows for more advanced variations. Combining multiple styles such as twists, buns, and braids can create unique hybrid looks. Adding subtle texture changes can also enhance visual depth while maintaining simplicity. These creative ideas align with Pinterest inspiration trends focused on personalized styling.
Advanced variations may include layered sectioning or decorative detailing using minimal accessories. Experimenting with placement and structure allows for more personalized results. Straight hair provides a stable foundation for these creative projects, making it suitable for both beginner friendly and advanced styling exploration. This progression encourages continuous improvement in DIY hairstyling skills.


Leave a Reply