Introduction
Warm lighting transforms a kitchen into a functional yet inviting space where everyday tasks feel more comfortable and visually pleasing. This Pinterest-inspired guide focuses on practical lighting ideas that enhance atmosphere while supporting daily use. Readers will learn how to apply warm lighting effectively using simple, accessible approaches that fit different kitchen layouts and styles.

This article explains how to combine lighting placement, materials, and design concepts to create a cohesive aesthetic. Each idea includes a clear step by step approach, making it suitable for beginners. The goal is to help readers achieve a balanced kitchen environment that blends comfort, usability, and modern design using creative ideas and thoughtful planning.
Why This Idea Is Trending or Useful
Warm lighting continues to gain popularity in Pinterest ideas because it creates a calming and welcoming atmosphere that contrasts with harsh white lighting often used in kitchens. This approach supports both functionality and aesthetic appeal, making it suitable for cooking, dining, and social interaction. The visual softness of warm tones enhances textures such as wood, stone, and matte finishes, which are common in modern design trends.
Another reason for its popularity is accessibility. Many warm lighting solutions are beginner friendly and do not require complex installation. Simple DIY upgrades, such as changing bulbs or adding under-cabinet strips, can significantly improve the overall look. These ideas also align with budget ideas, allowing homeowners to refresh their kitchen without major renovation. The combination of practicality, affordability, and aesthetic improvement makes warm lighting a consistent source of inspiration.
Materials and Preparation
Before starting any warm lighting project, it is important to gather the correct materials and plan the layout carefully. Common materials include warm LED bulbs, light strips, pendant fixtures, dimmer switches, adhesive clips, and extension cords. Tools may involve a screwdriver, measuring tape, mounting brackets, and basic electrical safety equipment. Choosing the correct color temperature, typically between 2700K and 3000K, ensures the desired warm aesthetic.
Preparation begins with evaluating the kitchen layout and identifying key areas that need lighting, such as countertops, cabinets, and dining spaces. Planning involves deciding whether the lighting will be layered, accent-based, or task-oriented. Measuring dimensions ensures accurate placement and avoids uneven distribution. Proper planning reduces installation errors and supports a smooth step by step process, making the project efficient and beginner friendly.
Idea 1: Under-Cabinet Glow Lighting
How to Create
Under-cabinet lighting is a practical and aesthetic solution that enhances both visibility and ambiance in the kitchen. This idea focuses on placing warm LED strips beneath upper cabinets to illuminate countertops. The soft glow reduces shadows during food preparation while adding a modern design element. It also highlights textures such as backsplashes and countertops, contributing to a clean and minimalist style.
To create this setup, start by measuring the length of each cabinet section. Cut LED strips to match the measurements and attach them using adhesive backing or mounting clips. Connect the strips to a power source and ensure proper cable management for a neat finish. Testing the lighting before final placement helps avoid repositioning later. This easy project requires minimal tools and offers immediate visual improvement.

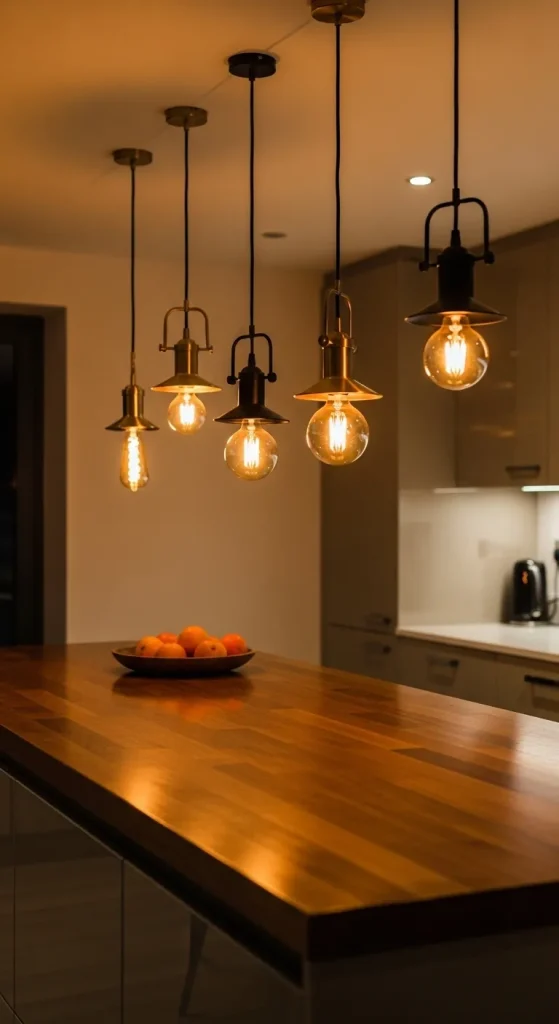
Idea 2: Warm Pendant Cluster Lighting
Step-by-Step Guide
Pendant cluster lighting introduces a focal point above kitchen islands or dining areas. This idea uses multiple small pendant lights grouped together to create a layered lighting effect. Warm bulbs enhance the visual warmth of the space, making it suitable for both cooking and social gatherings. The clustered design adds depth and aligns with trending ideas in modern kitchen aesthetics.
To execute this design, select pendant fixtures with compatible mounting systems. Install a central ceiling mount that supports multiple cords. Adjust each pendant to varying heights to create visual balance. Use warm bulbs to maintain consistency in lighting tone. This setup requires basic electrical installation and careful spacing to avoid overcrowding. The result is a balanced combination of function and decoration.
Idea 3: Soft Shelf Lighting Accents
How to Make
Shelf lighting adds subtle illumination to open kitchen shelving, enhancing both storage visibility and decoration. This concept involves placing warm LED strips along the underside or back of shelves. The lighting emphasizes displayed items such as dishes or jars while maintaining a clean aesthetic. It works well in minimalist style kitchens where simplicity is key.
To create this effect, clean the shelf surface before attaching LED strips. Position the strips toward the back edge to produce indirect lighting. Secure wiring along hidden edges to maintain a neat appearance. Connect to a power source and test brightness levels. This DIY approach is simple and requires minimal tools, making it ideal for beginners seeking a quick upgrade.

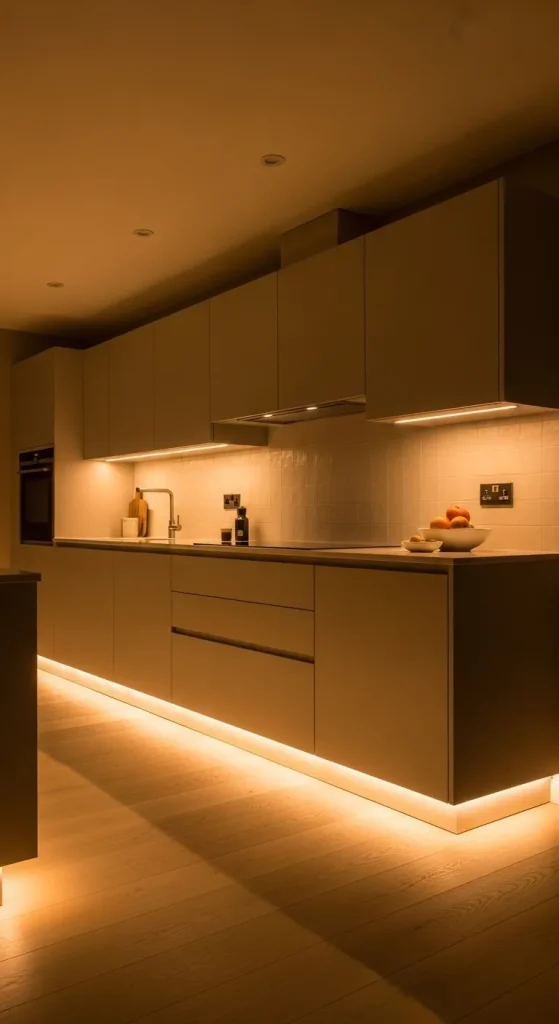
Idea 4: Toe-Kick Ambient Lighting
Execution Process
Toe-kick lighting involves placing warm LED strips along the base of kitchen cabinets near the floor. This technique creates a floating effect and adds depth to the overall design. It also improves nighttime visibility without the need for overhead lights, making it both practical and visually appealing.
Installation begins by measuring the base of cabinets and cutting LED strips accordingly. Attach the strips using adhesive backing, ensuring they remain hidden from direct view. Route wires discreetly along cabinet edges and connect to a power source. Testing ensures even light distribution. This idea is efficient, cost-effective, and enhances both safety and aesthetic appeal.
Idea 5: Warm Recessed Ceiling Lights
Setup Method
Recessed ceiling lights provide consistent illumination across the kitchen while maintaining a clean and uncluttered appearance. Using warm bulbs in these fixtures softens the overall lighting effect and creates a balanced environment. This approach supports both task lighting and general ambiance, making it a versatile choice.
To install, mark ceiling positions evenly to avoid dark spots. Cut openings and secure recessed fixtures according to manufacturer guidelines. Insert warm bulbs and test alignment. For better control, consider adding dimmer switches. This method requires basic electrical knowledge but delivers a polished result that complements modern home decor.

Idea 6: Glass Cabinet Interior Lighting
How to Create
Lighting inside glass-front cabinets highlights stored items and adds visual depth to the kitchen. Warm lighting enhances the appearance of dishes and glassware while maintaining a soft aesthetic. This idea works well in kitchens that prioritize both organization and decoration.
To implement, place small LED strips along the inner frame of the cabinet. Ensure wiring is hidden and secure. Use motion sensors or switches for convenience. Test brightness levels to avoid glare. This setup is simple and transforms cabinets into decorative elements without significant cost.

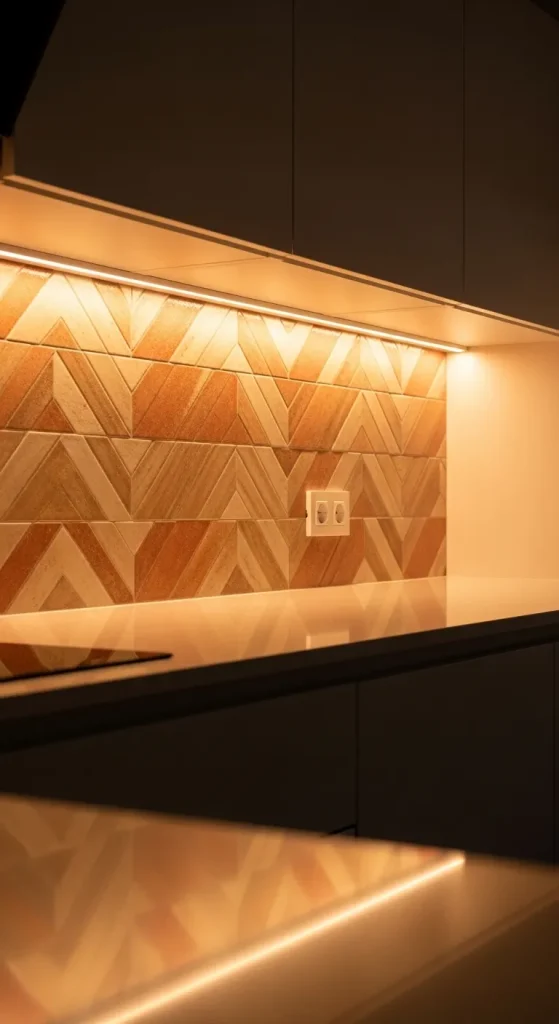
Idea 7: Warm Strip Lighting Behind Backsplash
Step-by-Step Guide
Backsplash lighting adds a unique glow that enhances texture and depth. This idea involves placing warm LED strips behind or along the edges of the backsplash to create indirect lighting. The effect is subtle yet visually impactful, aligning with aesthetic kitchen trends.
Begin by measuring the backsplash area and cutting LED strips accordingly. Install strips along edges or behind panels if possible. Secure wiring and connect to power. Testing ensures consistent brightness. This creative project enhances visual appeal while maintaining practicality.
Idea 8: Vintage-Style Bulb Fixtures
How to Make
Vintage-style bulbs provide a warm and nostalgic lighting effect that complements various kitchen styles. These bulbs often feature visible filaments and emit a soft glow that enhances ambiance. They work well in both modern and rustic kitchens.
To create this look, select fixtures that expose the bulb design. Install warm vintage bulbs and position them above key areas such as islands or dining spaces. Ensure proper spacing and alignment. This approach combines decoration with functionality, creating a distinctive visual style.
Idea 9: Dimmer-Controlled Lighting System
Execution Process
Dimmer-controlled lighting allows users to adjust brightness levels based on activity. Warm lighting combined with dimmers creates a flexible environment suitable for cooking, dining, or relaxing. This system enhances energy efficiency and user control.
To install, replace standard switches with compatible dimmer switches. Ensure bulbs support dimming functionality. Connect wiring carefully and test different brightness levels. This setup provides adaptability and improves overall lighting experience.

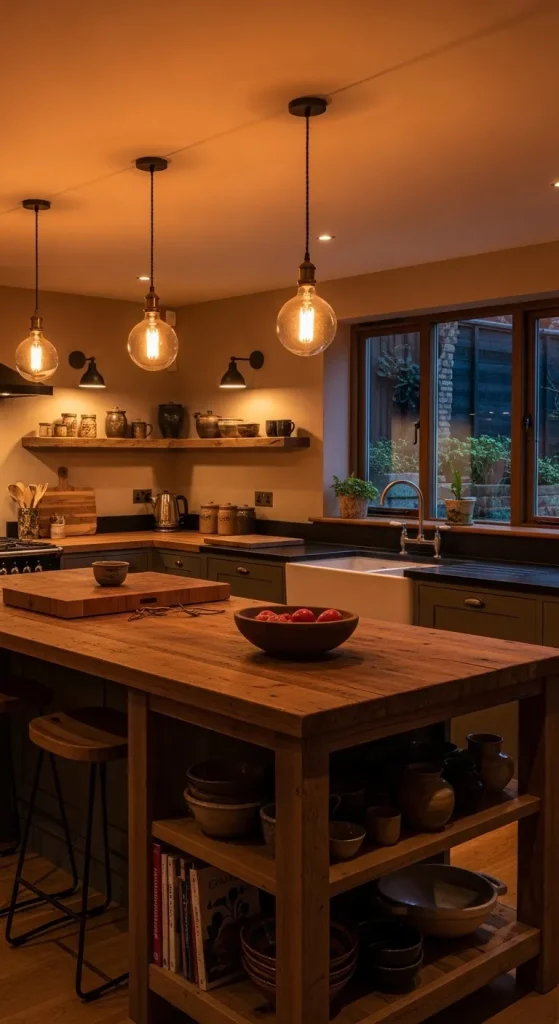
Idea 10: Layered Lighting Combination
How to Create
Layered lighting combines multiple sources such as under-cabinet, ceiling, and accent lighting to create a balanced environment. Warm tones unify the layers, ensuring consistency across the kitchen. This approach supports both functionality and aesthetic appeal.
Start by identifying key lighting zones. Install each lighting type separately, ensuring proper spacing and alignment. Use consistent color temperature across all fixtures. Testing ensures harmony between layers. This method requires planning but delivers a comprehensive and professional result.

Common Beginner Mistakes and How to Avoid Them
A common mistake is using mixed color temperatures, which creates an inconsistent look. Always choose warm lighting within the same range to maintain harmony. Another issue is poor placement, leading to uneven lighting or shadows. Careful planning and measurement prevent this problem. Overloading circuits or improper wiring can also cause safety concerns, so basic electrical guidelines should be followed.
Practical Tips for Better Results
Use dimmers to control brightness and adapt lighting to different activities. Choose high-quality LED strips for durability and consistent output. Test lighting placement before final installation to avoid repositioning. Keep wiring organized for a clean finish. Combining multiple lighting sources improves both function and design.
Styling, Presentation, or Organization Ideas
Arrange lighting to highlight key kitchen features such as countertops, shelves, and islands. Keep fixtures aligned with the overall design theme. Use hidden lighting for a minimalist style and exposed fixtures for decorative impact. Consistent spacing and symmetry improve visual balance.
Budget or Time Planning
Start with small upgrades such as bulb replacement or LED strips before moving to complex installations. Set a clear budget and prioritize high-impact areas. Allocate time for planning, installation, and testing. Simple projects can be completed within a few hours, while larger setups may require a full day.
Creative Expansion and Advanced Inspiration
Advanced ideas include integrating smart lighting systems for automation and remote control. Adding motion sensors improves efficiency and convenience. Experimenting with layered lighting designs enhances depth and dimension. Combining warm lighting with natural materials creates a cohesive and modern kitchen aesthetic.


Leave a Reply