Introduction
Wall frame arrangements are one of the most effective Pinterest ideas for adding structure, personality, and visual balance to any room. They transform empty walls into organized displays that combine artwork, photographs, prints, and decorative elements. These designs work in living rooms, bedrooms, hallways, offices, and dining spaces, making them a practical home decor solution for both large and small interiors.
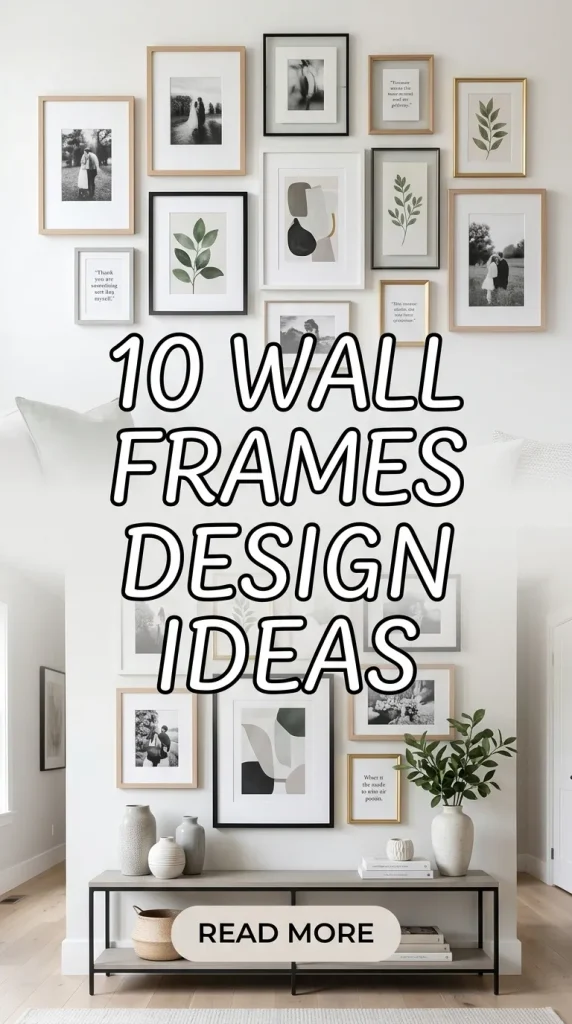
This article provides 10 wall frames design ideas with clear step by step instructions, materials, planning tips, and creative inspiration. Readers will learn beginner friendly DIY methods, layout strategies, and modern design techniques that make each project easy to execute. From minimalist style grids to handmade gallery walls, these aesthetic and budget ideas offer practical ways to create stylish wall decoration with lasting visual impact.
Why This Idea Is Trending or Useful
Wall frame designs continue to trend on Pinterest because they combine functionality with creative expression. Modern interiors often use clean walls and open layouts, which creates more opportunities for decorative frame arrangements. A carefully planned wall display improves organization, adds texture, and creates a strong focal point without requiring major renovation. These ideas are also highly adaptable because they work with many styles including minimalist style, modern design, rustic interiors, and contemporary home decor themes.
Another reason these creative ideas remain popular is their accessibility for beginners. Most frame projects require simple materials, basic measuring tools, and easy project planning. Many arrangements can also be completed with budget ideas by reusing old frames, printable artwork, or handmade decoration elements. Pinterest users frequently search for DIY inspiration that combines affordable materials with aesthetic results, and wall frame displays meet both needs effectively. Their flexibility allows homeowners, renters, and apartment residents to personalize spaces without complex construction or advanced design experience.
Materials and Preparation
Preparing properly before starting a wall frame project helps create a balanced and organized final result. Common materials include wall frames, printed artwork, photographs, canvas prints, measuring tape, adhesive strips, wall hooks, nails, screws, level tools, painter’s tape, and protective backing materials. Choosing frames with similar finishes creates visual consistency, while mixing sizes introduces depth and variation. Lightweight frames are usually easier for beginners because they require fewer mounting tools and less wall reinforcement.
Planning is an important part of the execution process. Begin by measuring the wall area and sketching the frame arrangement on paper before installation. Many DIY tutorials recommend placing frames on the floor first to test spacing and layout balance. Using painter’s tape to outline frame positions on the wall can help prevent alignment mistakes. Lighting conditions should also be considered because natural light affects how artwork and decorative elements appear throughout the day. Careful planning improves symmetry, reduces installation errors, and creates a more professional final presentation.
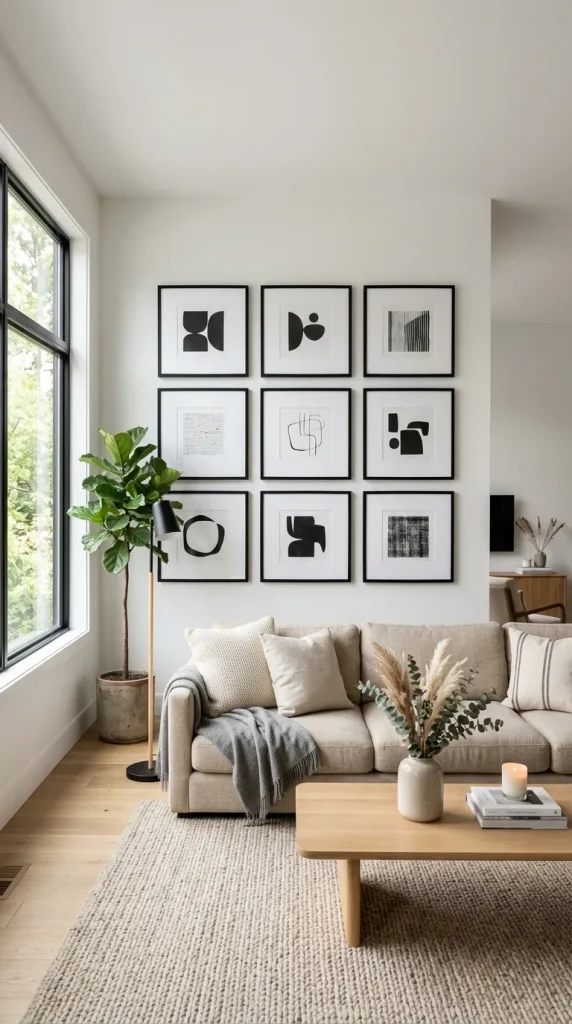
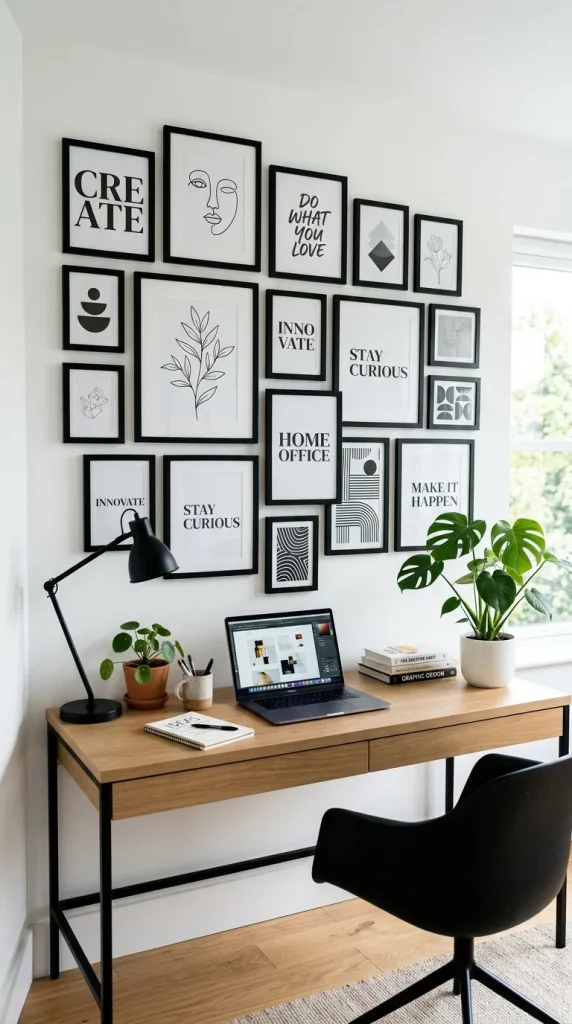
Idea 1: Minimalist Black Frame Grid
How to Create
A minimalist black frame grid creates a clean and organized visual structure that works well in modern design interiors. This arrangement usually features matching black frames placed in evenly spaced rows and columns. The simplicity of the layout allows photographs, abstract prints, typography art, or line illustrations to stand out without making the wall appear overcrowded. Pinterest inspiration often highlights this style because it supports both aesthetic decoration and functional organization. It works especially well in living rooms, offices, and bedrooms where balanced wall styling is important.
The uniformity of a grid design creates visual harmony while maintaining flexibility for different artwork themes. Neutral color palettes, white backgrounds, and monochrome prints are commonly used because they reinforce the minimalist style. This easy project is beginner friendly because the repeated frame structure simplifies alignment decisions. It also adapts easily to large or small walls by increasing or reducing the number of frames. Consistent spacing between frames creates a professional appearance and prevents visual clutter.
To create this arrangement, begin by selecting frames with identical sizes and finishes. Measure the wall carefully and determine the center point before installation. Use painter’s tape to outline each frame location while maintaining equal spacing between all sides. A level tool helps ensure the grid remains straight throughout the entire setup process. Lightweight frames can be installed using adhesive strips, while heavier materials may require wall anchors or screws.
Choose artwork that follows a consistent theme such as botanical prints, black and white photography, architectural sketches, or modern typography. Print materials on similar paper finishes to maintain a cohesive look. Start hanging frames from the center row before expanding outward because this improves balance during installation. After placement, step back and examine spacing adjustments under natural lighting. This step by step process creates a structured wall display that feels modern, organized, and visually calm.
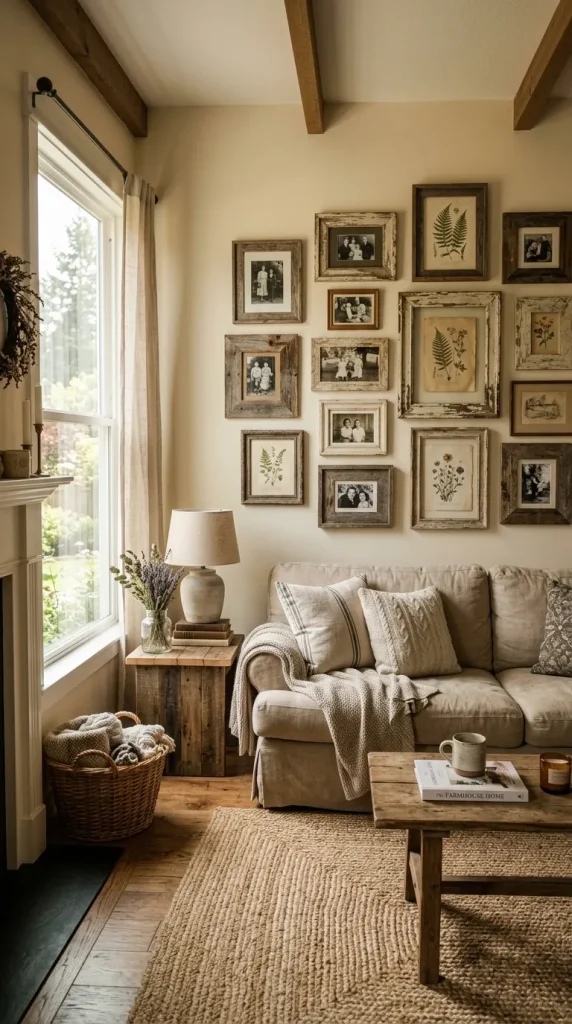
Idea 2: Rustic Wooden Gallery Wall
Step-by-Step Guide
A rustic wooden gallery wall combines natural textures with warm decorative elements to create a comfortable and inviting atmosphere. This Pinterest style arrangement often uses distressed wood frames, vintage photographs, landscape prints, handwritten quotes, and handmade decorative accents. The design works particularly well in farmhouse interiors, cozy living rooms, dining spaces, and hallway decoration areas. Unlike symmetrical layouts, rustic gallery walls usually feature varied frame sizes and relaxed spacing that creates a collected and personalized appearance.
Natural wood tones help soften the visual effect of framed artwork while adding texture to plain walls. Many Pinterest ideas combine reclaimed wood finishes with neutral color palettes, woven materials, and earthy decorative accessories. This creative project allows flexibility because frames do not need to match perfectly. Combining rectangular, square, and oval frames creates depth and layered visual interest. Rustic layouts are also practical for displaying family photographs, travel memories, and handmade artwork without requiring highly formal organization.
Start by gathering wooden frames with different sizes and finishes. Arrange the frames on the floor before installation to experiment with layout combinations. Larger frames should usually anchor the center of the arrangement, while smaller pieces fill surrounding gaps. Use kraft paper templates taped to the wall to test positioning before making permanent holes. This preparation method helps avoid unnecessary wall damage and improves overall planning accuracy.
Select artwork that complements rustic aesthetics such as nature photography, antique maps, botanical sketches, or handwritten typography prints. Mixing materials like wooden signs, metal accents, and woven decorations adds variety while maintaining a cohesive appearance. Install the center frame first and gradually expand outward while checking spacing consistency. Slightly uneven arrangements can still appear balanced when colors and textures remain coordinated. This DIY tutorial creates a warm and authentic gallery wall that feels collected over time rather than overly staged.
Idea 3: Floating Shelf Frame Display
How to Make
A floating shelf frame display combines wall frames with layered shelf styling to create a flexible and modern home decor arrangement. Instead of mounting every frame directly onto the wall, this design places artwork on narrow floating shelves where pieces can overlap slightly for a relaxed and curated appearance. Pinterest inspiration frequently features this setup in minimalist style interiors because it allows frequent updates without repeated wall drilling. It works especially well in apartments, offices, and creative workspaces.
This design also supports easy seasonal decoration changes because artwork can be replaced without removing hardware. Layering different frame heights creates dimension while keeping the wall visually organized. Neutral frames paired with ceramic accessories, small plants, candles, or books help create balanced shelf styling. Floating shelves are practical because they combine storage and decoration in one structure. They are also beginner friendly since fewer wall measurements are required compared to large gallery walls.
To create this setup, install sturdy floating shelves using anchors appropriate for the wall material. Measure shelf spacing carefully to ensure larger frames fit comfortably without overcrowding. Narrow shelves with sufficient depth provide support while maintaining a sleek appearance. Position larger frames toward the back and smaller pieces in front to create layered depth. Lightweight artwork is usually easier to rearrange and safer for shelf displays.
Choose coordinated artwork themes such as abstract prints, typography posters, or black and white photography. Mix horizontal and vertical frame orientations for visual variation while maintaining consistent color palettes. Decorative accessories should remain minimal to avoid distracting from the frames themselves. Rearranging the layout occasionally keeps the display fresh and adaptable for changing trends or seasonal inspiration. This easy project provides a clean and flexible solution for modern wall decoration.

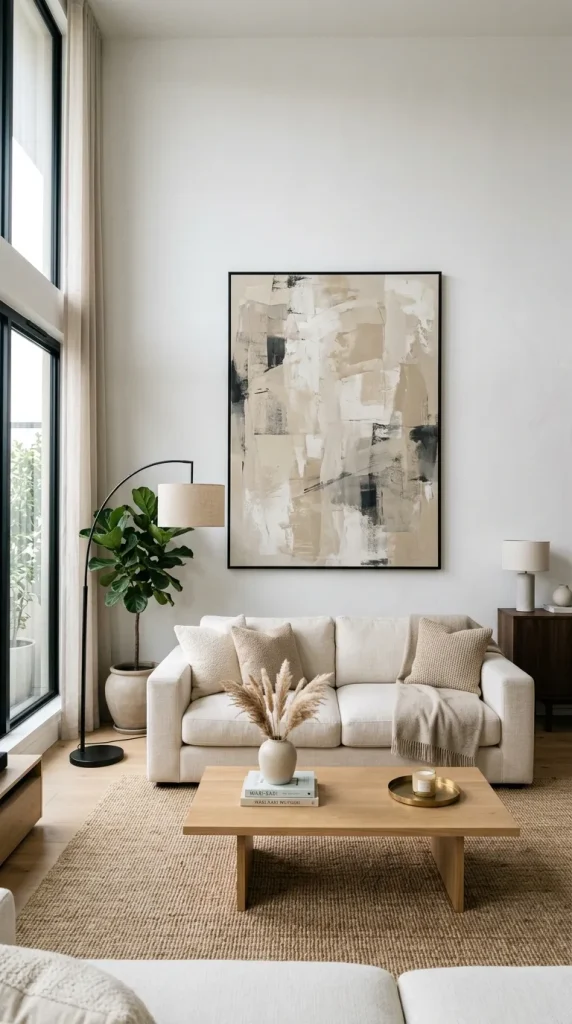
Idea 4: Oversized Statement Frame Arrangement
Execution Process
An oversized statement frame arrangement focuses on one or two large-scale pieces that dominate the wall and create a strong visual focal point. This design approach is popular in modern interiors because it simplifies decoration while maintaining dramatic impact. Large artwork frames work particularly well in spacious living rooms, dining areas, staircases, and entryways where smaller frames might appear visually disconnected. Pinterest ideas often highlight oversized frames because they combine simplicity with strong architectural presence.
Using fewer frames also helps create a cleaner and more organized appearance compared to heavily layered gallery walls. Oversized artwork allows detailed photography, abstract paintings, or typography prints to become central design elements within the room. Neutral frames support minimalist style interiors, while bold frame finishes create stronger decorative contrast. This arrangement is useful for homeowners seeking aesthetic decoration without overcrowding their walls with multiple smaller objects.
Begin by selecting a large wall area with sufficient open space around the frame. Measure carefully to determine ideal placement height, which is typically near eye level for balanced viewing. Oversized frames are heavier than standard wall decoration pieces, so strong wall anchors or screws are necessary for safe installation. Using a second person during installation improves stability and positioning accuracy.
Artwork selection should reflect the room’s overall color palette and design style. Large-scale abstract art, landscape photography, or monochrome prints work particularly well because they create visual depth without overwhelming the space. Maintain enough empty wall space around the frame to preserve the statement effect. Additional decoration should remain minimal so the oversized artwork remains the focal point. This step by step setup method creates a sophisticated wall feature with clean and modern visual structure.
Idea 5: Geometric Frame Layout
Setup Method
A geometric frame layout uses structured shapes and angled positioning to create an artistic and modern wall display. Unlike traditional rows or symmetrical grids, this arrangement relies on triangular spacing, diagonal alignments, or asymmetrical balance to produce visual movement. Pinterest inspiration frequently showcases geometric wall frames in creative studios, contemporary apartments, and modern offices because they add energy and architectural interest to otherwise plain walls.
This design style works well with abstract artwork, line drawings, modern typography, and minimalist photography. Geometric arrangements can include hexagonal layouts, staircase patterns, or angular clusters that guide the eye across the wall. Despite their artistic appearance, these setups can remain beginner friendly when planned carefully. Using repeated frame colors or consistent artwork themes helps maintain organization even when the layout itself is unconventional.
To begin, sketch several layout concepts on paper before installation. Measure the wall carefully and mark frame positions with painter’s tape to visualize spacing. Geometric layouts often depend on balance rather than symmetry, so checking the arrangement from multiple angles helps improve visual consistency. Use a level tool for frames intended to align diagonally or horizontally. Maintaining proportional spacing between frames is essential for creating a polished result.
Choose lightweight frames and coordinated artwork that support modern design aesthetics. Black, white, or metallic frames are commonly used because they highlight the geometric structure effectively. Begin installation with the central anchor frame and gradually add surrounding pieces. After mounting, examine the arrangement from a distance to ensure the shapes feel visually balanced. This creative project transforms simple wall frames into an artistic decorative composition with strong visual movement.
Idea 6: Botanical Nature Frame Collection
How to Create
A botanical nature frame collection introduces organic textures and calming visual elements into interior spaces. This wall frame concept typically includes pressed leaves, plant illustrations, floral sketches, landscape photography, and greenery-inspired prints. Pinterest users often save these creative ideas because they support aesthetic home decor while creating a peaceful atmosphere. Botanical frame collections work especially well in bedrooms, reading corners, dining spaces, and entryways where soft natural decoration enhances the environment.
Neutral backgrounds combined with green, beige, and earthy tones create a balanced and refreshing appearance. Wooden or white frames are commonly used because they complement natural materials without overpowering the artwork. This DIY tutorial is beginner friendly because botanical prints are widely available and easy to coordinate. Handmade pressed leaf art or dried flower arrangements can also be incorporated for a more personalized decorative effect.
Start by selecting botanical artwork with a consistent color palette and illustration style. Arrange frames on the floor first to experiment with combinations before hanging them on the wall. Mixing vertical and horizontal frames creates variety while maintaining visual harmony. If using real pressed plants, place them behind protective glass to preserve their appearance and prevent moisture damage over time.
Use measuring tape and painter’s tape to establish spacing guidelines before installation. Botanical collections often appear best with slightly relaxed spacing rather than tightly packed arrangements. Incorporate small decorative accents nearby such as woven baskets, ceramic planters, or natural wood furniture to strengthen the organic theme. Proper lighting enhances the visibility of leaf textures and artwork details throughout the day. This setup method creates a calming wall display inspired by nature and modern Pinterest trends.

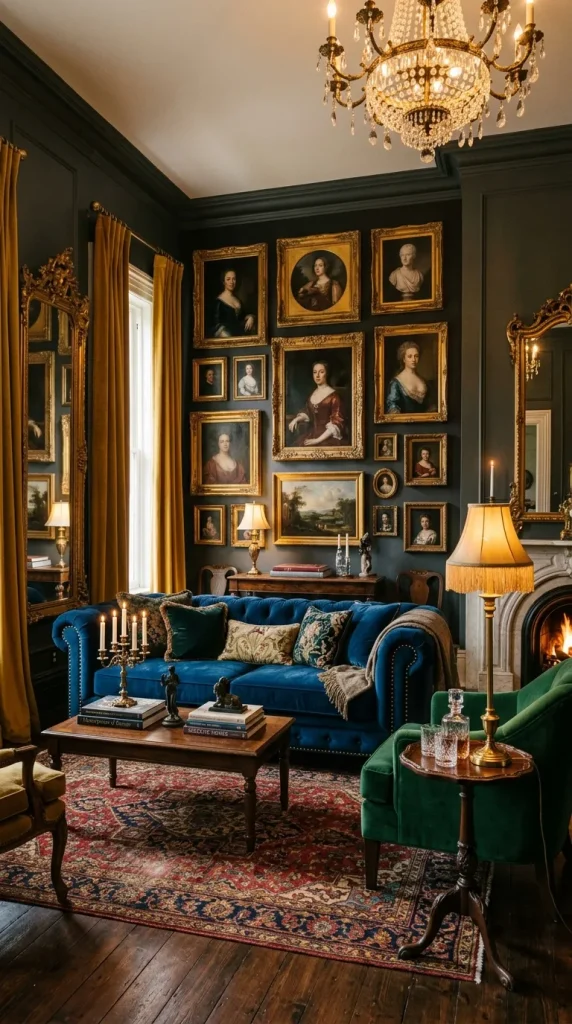
Idea 7: Vintage Gold Frame Wall
Step-by-Step Guide
A vintage gold frame wall combines decorative elegance with layered visual texture. This style often features ornate gold frames paired with antique-inspired artwork, black and white portraits, classical paintings, or vintage typography prints. Pinterest inspiration frequently uses this arrangement in traditional interiors, eclectic spaces, and luxurious home decor settings because the metallic finish reflects light and creates visual richness.
Gold frames add warmth and sophistication while creating contrast against neutral or dark-colored walls. Mixing different frame sizes and ornate detailing introduces character without requiring complex wall construction. This aesthetic decoration style can also combine mirrors, handwritten art, and vintage photographs for additional depth. Despite its decorative appearance, the project remains accessible because secondhand frames and printable artwork can support budget ideas effectively.
Begin by collecting gold frames with varied textures and shapes. Clean and repaint older frames if necessary to create a more unified finish. Arrange the layout on the floor first to determine spacing balance and visual hierarchy. Larger frames usually work best near the center, while smaller decorative pieces fill surrounding areas. Painter’s tape templates help refine positioning before installation.
Choose artwork with muted colors, historical themes, or classic illustration styles to strengthen the vintage atmosphere. Maintain consistent spacing to prevent the arrangement from appearing cluttered. Soft lighting nearby can enhance the reflective qualities of metallic frames and improve the room’s overall warmth. Combining decorative mirrors with framed prints adds depth and brightness to smaller spaces. This execution process creates a sophisticated gallery wall inspired by timeless decorative traditions.
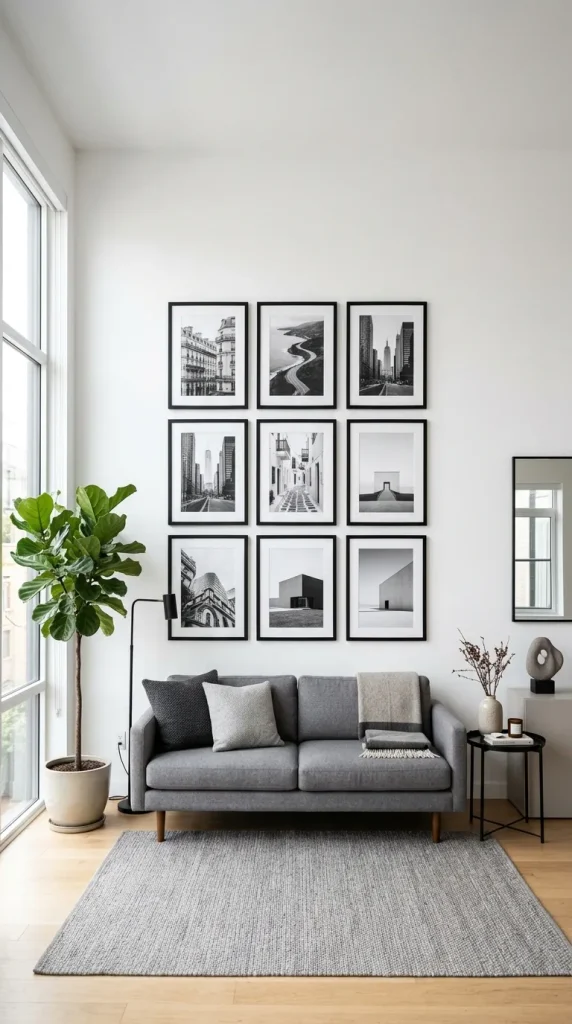
Idea 8: Black and White Photography Wall
How to Make
A black and white photography wall creates a timeless and organized visual display that complements many interior styles. This Pinterest favorite focuses on monochrome photography arranged in coordinated frame layouts that emphasize contrast, emotion, and simplicity. Black and white photography works particularly well in minimalist style interiors because the limited color palette reduces visual distraction while enhancing image details.
This wall frame concept is highly versatile because it can showcase travel photography, architectural images, portraits, urban landscapes, or nature scenes. Matching black or white frames maintain visual consistency, while mixed frame sizes introduce variation. The monochrome theme also simplifies artwork selection because images naturally coordinate with each other regardless of subject matter. This easy project supports modern design trends while remaining practical for beginners.
Start by selecting high-resolution photographs with strong lighting and contrast. Print all images using similar paper finishes to maintain consistency across the arrangement. Plan the layout on the floor before installation to determine the best balance between horizontal and vertical frames. Grid arrangements create a cleaner appearance, while asymmetrical layouts produce a more artistic effect.
Use measuring tools and level guides during installation to ensure alignment accuracy. Frames should remain evenly spaced to preserve the organized aesthetic. Position the display where natural light can enhance image clarity without causing glare on the glass surfaces. Avoid overcrowding surrounding decoration so the photography remains the central focal point. This step by step process creates a sophisticated and visually balanced wall display suitable for many modern interiors.
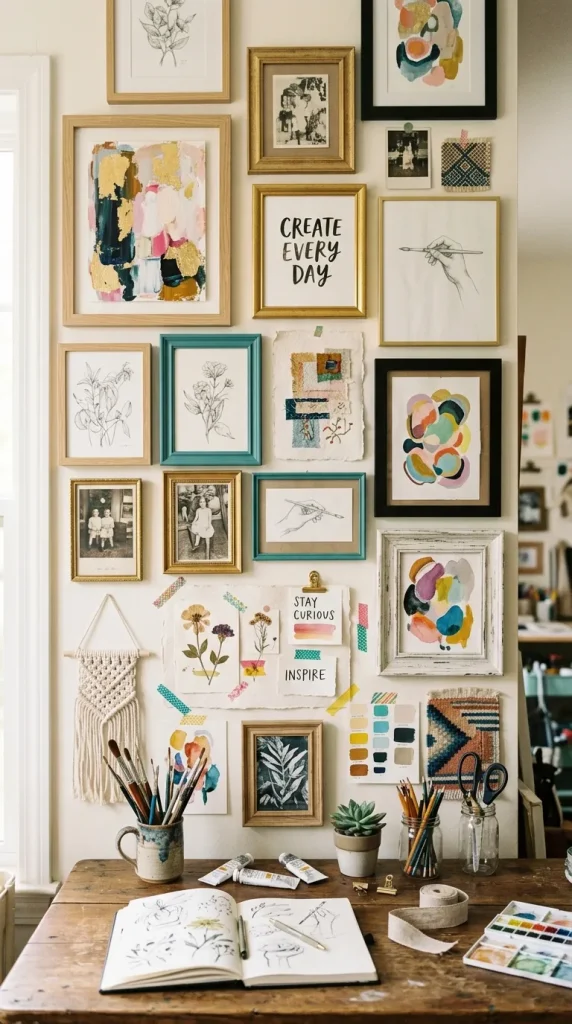
Idea 9: Mixed Media Art Frame Display
Execution Process
A mixed media art frame display combines multiple artistic materials and textures within one coordinated wall arrangement. This design style often includes paintings, fabric art, sketches, typography, textured paper, woven elements, and handmade decorative pieces. Pinterest ideas featuring mixed media displays are popular because they create depth, personality, and creative variation while maintaining organized wall styling.
The combination of different textures helps the arrangement feel dynamic and visually layered. Neutral backgrounds often work best because they allow varied materials to stand out clearly. Mixed media displays are highly adaptable for creative workspaces, bedrooms, and modern living rooms where artistic expression is encouraged. This project also supports DIY creativity because handmade elements can easily be incorporated alongside purchased artwork.
Begin by selecting a consistent color palette that connects all media types together. Arrange the pieces on the floor before hanging to evaluate spacing and balance. Larger textured pieces should anchor the composition, while smaller artwork fills surrounding areas. Mixing frame finishes can work effectively when the overall palette remains coordinated. Use lightweight materials whenever possible to simplify installation.
Secure heavier textured artwork with strong anchors to prevent movement over time. Maintain sufficient spacing between pieces so individual textures remain visible and distinct. Decorative fabric panels, woven accents, or layered paper art can add visual softness to traditional framed prints. Periodically adjusting the arrangement keeps the display adaptable and fresh. This setup method creates a highly personalized wall design that blends artistic creativity with organized presentation.
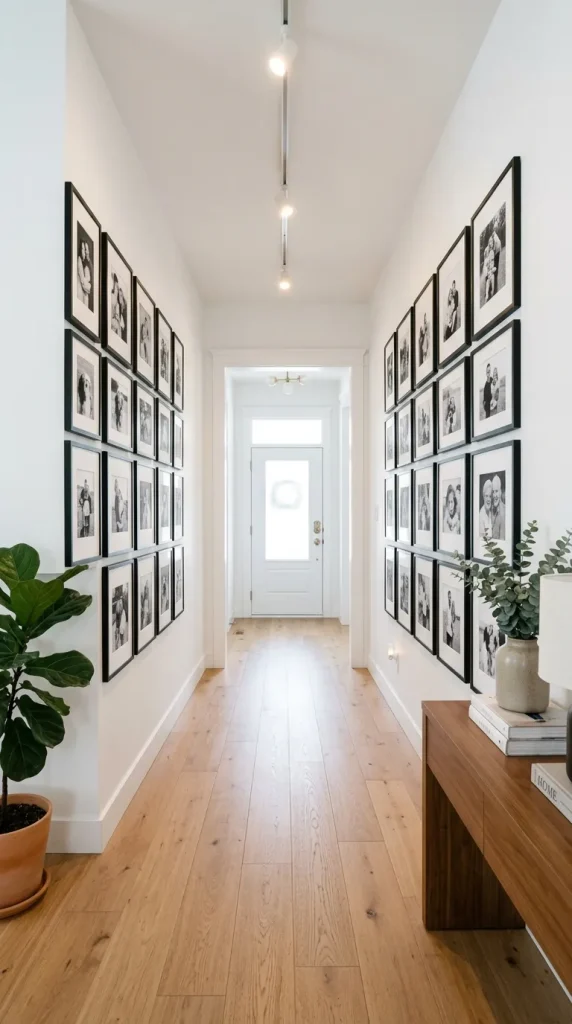
Idea 10: Symmetrical Hallway Frame Arrangement
Setup Method
A symmetrical hallway frame arrangement creates structure and visual continuity in narrow transitional spaces. Hallways often lack decorative focus, making wall frame organization an effective solution for improving flow and balance. Pinterest inspiration frequently highlights symmetrical hallway displays because they make long corridors appear more polished, organized, and visually connected.
Matching frames positioned in evenly spaced rows create rhythm and consistency along the hallway walls. Family photographs, travel images, typography art, or architectural sketches are commonly used because they provide visual interest without overwhelming the space. Symmetrical arrangements are especially beginner friendly because the repeated layout simplifies planning and measurement. This project also supports minimalist style interiors where clean organization is important.
Start by measuring the hallway length and determining the ideal spacing between each frame. Consistent frame sizes usually create the strongest symmetrical effect. Use painter’s tape to mark frame positions before installation and ensure all frames align horizontally. Narrow hallways often benefit from lighter frame colors and bright artwork because they help reflect available light.
Install frames at consistent eye-level height to maintain visual flow while walking through the hallway. Use identical spacing between all frames for a clean and professional appearance. Additional decorative elements should remain minimal to avoid overcrowding narrow areas. Proper lighting placement above or beside the arrangement can improve visibility and enhance the hallway’s overall atmosphere. This easy project transforms unused wall space into a cohesive decorative feature with organized visual appeal.
Common Beginner Mistakes and How to Avoid Them
Many beginners make the mistake of hanging frames without measuring the wall properly first. This often leads to uneven spacing, poor alignment, and visually unbalanced arrangements. Another common issue is overcrowding the wall with too many frames, which reduces the impact of individual artwork pieces and creates clutter. Choosing frames with unrelated styles or inconsistent color palettes can also make the display appear disorganized. Skipping preparation steps such as floor layout testing or painter’s tape positioning increases the risk of installation errors.
These problems can be avoided through careful planning and organized execution. Measuring the wall and sketching the arrangement beforehand improves spacing consistency and overall balance. Maintaining a unified theme through coordinated frame finishes or artwork colors creates stronger visual harmony. Beginners should also avoid hanging frames too high because this disrupts natural viewing comfort. Using level tools, protective wall hardware, and lightweight materials simplifies the process and improves final results. Thoughtful preparation creates cleaner, more professional wall decoration.
Practical Tips for Better Results
Creating a successful wall frame arrangement depends heavily on balance, spacing, and consistency. One practical tip is to maintain equal spacing between frames because this immediately improves visual organization. Using paper templates before installation helps identify layout problems early and reduces unnecessary wall damage. Another effective method is to start with the center frame and gradually expand outward, which improves symmetry and alignment throughout the setup process.
Lighting also plays an important role in presentation quality. Natural light enhances photography and artwork details, while soft artificial lighting can highlight textures and decorative depth. Choosing coordinated artwork themes creates stronger visual continuity even when frames vary in size. Rotating seasonal prints or replacing artwork occasionally keeps the arrangement fresh without requiring major redesign. Budget ideas such as printable art, reused frames, or handmade decoration pieces can also produce professional results when arranged thoughtfully. Consistent planning and careful execution improve both functionality and visual appeal.
Styling, Presentation, or Organization Ideas
Styling wall frames effectively requires coordination between artwork, furniture, lighting, and surrounding decorative elements. Neutral furniture often works well with bold frame arrangements because it prevents visual competition within the room. Minimal decorative accessories nearby help maintain focus on the wall display itself. Layering textures through woven baskets, ceramic accents, wooden furniture, or soft textiles can strengthen the overall aesthetic while preserving balance.
Organization is equally important for maintaining a clean presentation. Frames grouped by color palette, photography theme, or artwork style create stronger visual cohesion. Symmetrical layouts usually support minimalist style interiors, while asymmetrical arrangements work better for artistic and eclectic spaces. Floating shelves provide flexibility for rearranging artwork without repeated wall drilling. Hallways, staircases, and entryways can benefit from consistent frame spacing that guides movement through the space. Thoughtful styling transforms simple wall decoration into a coordinated and visually polished design feature.
Budget or Time Planning
Effective budget and time planning helps make wall frame projects more manageable and accessible. One practical approach is to begin with smaller arrangements before expanding into larger gallery walls. Reusing existing frames, repainting old materials, or printing digital artwork at home can significantly reduce project costs. Many DIY tutorials also recommend purchasing frames gradually instead of completing large installations in one stage.
Time planning improves efficiency and reduces installation mistakes. Preparing all materials, measuring tools, and artwork before starting prevents interruptions during setup. Floor layout testing saves time because it allows adjustments before wall installation begins. Lightweight frames and adhesive mounting strips can speed up the process for renters or beginners. Organizing artwork by size and style before hanging also simplifies decision-making during execution. Careful planning creates a smoother workflow while maintaining aesthetic and organizational quality.
Creative Expansion and Advanced Inspiration
Once basic wall frame arrangements are complete, additional creative expansion can introduce more advanced visual effects. Combining mirrors with artwork creates depth and improves light reflection in smaller rooms. Integrating floating shelves, sculptural wall decor, or layered textiles can transform standard gallery walls into multidimensional decorative features. Seasonal artwork rotation also keeps arrangements visually fresh while allowing experimentation with new Pinterest inspiration trends.
Advanced layouts may include oversized statement frames combined with smaller supporting artwork, or mixed media compositions that incorporate fabric, wood, and textured materials. Smart lighting installations can further enhance frame displays by highlighting focal pieces and creating atmospheric effects during evening hours. Creating themed wall collections based on travel photography, botanical art, typography, or architectural sketches also strengthens visual storytelling within a space. These advanced creative ideas allow homeowners to continuously evolve their wall decoration while maintaining organized and aesthetic design principles.


Leave a Reply