Introduction
Backyard golf ideas DIY projects focus on creating compact, functional golf practice areas at home using simple layouts, recycled materials, and structured design planning. These setups allow putting, chipping, and short-game practice without requiring large professional courses or expensive installations. The concept combines home decor creativity with sports functionality, making it suitable for small and large outdoor spaces.

This type of creative project supports beginners and enthusiasts by offering flexible layouts that can be adapted to gardens, lawns, or patios. It emphasizes practical construction, accessible materials, and step-by-step planning, helping users build a personal practice environment aligned with modern Pinterest ideas and DIY inspiration.
Why Backyard Golf DIY Ideas Are Trending and Useful
Backyard golf DIY concepts are gaining attention because they combine recreational activity with home improvement in a practical way. Many homeowners are focusing on functional outdoor spaces that support relaxation, skill development, and family activities. A backyard golf setup fits into this trend by offering a structured yet flexible design that can be adapted to different space sizes and budgets.
These projects also align with modern Pinterest ideas that emphasize minimalist style, creative project planning, and easy construction methods. Instead of requiring professional installation, users can build customized layouts using simple materials and step-by-step tutorial approaches. This makes the concept highly accessible for beginners who want to explore golf practice without formal training environments.
Another reason for popularity is the increasing interest in outdoor organization and home decor integration. Backyard golf spaces can be designed to blend with landscaping elements, walkways, and garden zones. This allows users to maintain aesthetic balance while adding functional sports areas, making it both visually appealing and practical for daily use.
Materials and Preparation for Backyard Golf Setup
Before starting a backyard golf DIY project, careful preparation ensures a smooth construction process. The primary materials typically include artificial turf or short grass areas, lightweight putting cups or hole markers, wooden planks for borders, and basic measuring tools. Some setups may also include sand patches or soft ramps for chipping practice zones. These materials help define playing areas and create realistic practice conditions.
Essential tools include a measuring tape, marking paint or chalk, a small shovel for ground leveling, and a basic cutting tool for turf adjustment. Proper ground preparation is important, as uneven surfaces can affect ball movement and practice accuracy. Planning the layout beforehand ensures efficient use of space and avoids unnecessary rework during construction.
Design planning is another key step. Users should evaluate available space, sunlight exposure, and drainage conditions. Mapping out zones for putting, chipping, and target practice helps create a balanced structure. This preparation stage supports budget ideas and ensures that the final setup remains functional, durable, and easy to maintain over time.
MAIN IDEAS SECTION
Idea 1: Compact Putting Green Corner Design
How to Create
A compact putting green corner is designed for small outdoor areas where space efficiency is the main requirement. This concept focuses on creating a smooth, level surface that allows controlled ball movement for short-distance putting practice. The design typically uses a rectangular or square layout positioned in a corner of the backyard, making it ideal for urban homes or limited garden spaces. The structure emphasizes simplicity, with clearly defined boundaries and a single or multiple hole system to simulate real putting conditions. This setup aligns with modern DIY tutorial approaches that prioritize functionality over complexity while still maintaining a clean and organized appearance.
The visual structure of this idea is based on minimalist style principles. A flat green surface, subtle edge borders, and simple target placement create a focused practice zone without overwhelming the surrounding environment. The concept supports creative ideas by allowing users to adjust difficulty levels through hole positioning or slight slope adjustments. It integrates naturally into home decor landscaping by blending with grass, gravel, or paved areas, ensuring that the installation remains aesthetically balanced and practical for regular use.
Step-by-Step Guide
The construction process begins with selecting a flat corner area and clearing any debris or uneven ground. The surface is then leveled using basic tools to ensure consistent ball movement. After leveling, a base layer is prepared using compact soil or sand, followed by the installation of artificial turf or short-cut grass to create a smooth playing surface. Edging materials such as wood or stone can be added to define boundaries and prevent turf movement over time. This preparation ensures stability and long-term usability.
Once the base is complete, hole placements are marked and installed using simple cups or markers. The layout can include one central hole for beginners or multiple positions for advanced practice. Final adjustments involve testing ball roll consistency and making minor surface corrections if needed. This step by step method ensures a beginner friendly setup that is both functional and easy to maintain while supporting consistent practice sessions.

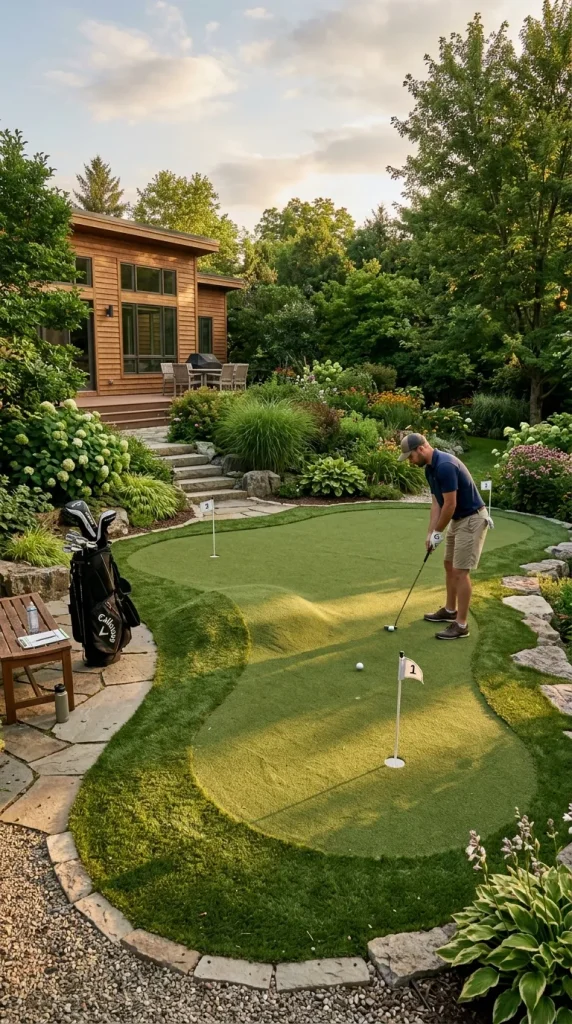
Idea 2: Multi-Zone Backyard Golf Practice Layout
How to Create
A multi-zone backyard golf practice layout divides the outdoor space into different functional sections, each designed for a specific skill area such as putting, chipping, and target accuracy. This concept transforms a simple backyard into a structured training environment that simulates real golf course conditions. Each zone is planned with clear separation, allowing users to switch between different practice types without interference. The design supports creative project planning and is ideal for those seeking a more advanced DIY setup that still remains beginner friendly.
The visual organization of this layout is based on structured landscaping principles. Zones are defined using subtle borders such as grass lines, wooden frames, or stone pathways. This creates a balanced flow across the backyard while maintaining a clean and modern design. The concept also supports home decor integration, as each zone can be styled differently while maintaining overall cohesion. It allows flexibility in design while keeping the space functional and visually organized for daily use.
Step-by-Step Guide
The construction process begins with dividing the backyard into three or more sections based on available space. Each section is measured carefully to ensure proportional balance. The putting zone is typically the smallest, featuring a smooth flat surface, while the chipping zone requires slightly more open space with soft landing areas. The target practice zone can include markers or vertical targets placed at varying distances to improve accuracy training.
After layout marking, each zone is prepared individually using leveling techniques and base material installation. Artificial turf is applied where necessary, while some zones may include sand or soft grass for varied practice conditions. Final steps involve testing transitions between zones and ensuring smooth movement across the entire layout. This structured method creates a realistic and efficient backyard golf training environment suitable for consistent skill improvement.

Idea 3: Mini Sloped Green Challenge Course
How to Create
A mini sloped green challenge course introduces elevation changes into backyard golf practice, creating a more realistic and skill-based environment. This design focuses on subtle slopes that affect ball speed and direction, helping users develop better control and accuracy. The layout is typically compact but includes carefully engineered gradients that simulate natural course conditions. It is suitable for users looking to advance from basic flat surfaces to more dynamic practice setups.
The aesthetic structure of this concept follows modern minimalist style principles combined with functional landscaping. Gentle slopes are integrated into the backyard terrain without disrupting overall design balance. Grass or artificial turf is applied uniformly across the surface to maintain consistency while allowing natural ball movement variations. This idea enhances backyard golf ideas DIY projects by introducing controlled complexity while maintaining visual simplicity and accessibility for beginners.
Step-by-Step Guide
The construction begins with planning slope direction and intensity based on available space. Soil is reshaped using basic tools to create gradual elevation changes rather than steep inclines. The goal is to maintain smooth transitions that affect ball movement without making the course too difficult. Once the slope structure is formed, the surface is compacted to ensure stability and durability.
After shaping, a leveling layer of sand or fine soil is applied to refine the surface. Artificial turf or natural grass is then installed over the sloped structure. Hole placement is adjusted based on slope direction to create varied challenge levels. Final testing ensures consistent ball roll behavior across different angles, completing a functional and engaging practice course.
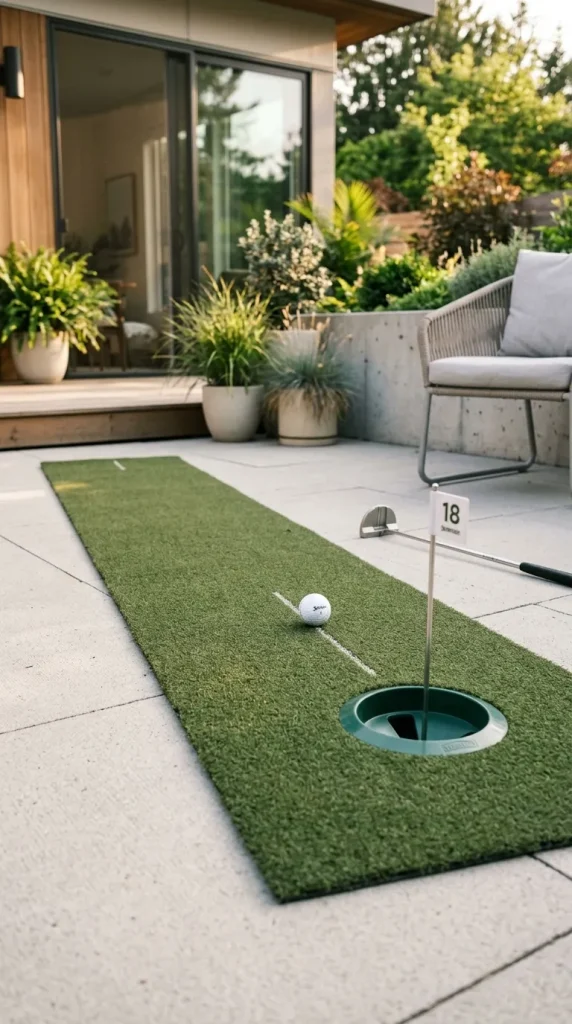
Idea 4: Portable Roll-Up Putting Mat System
How to Create
A portable roll-up putting mat system is designed for flexibility and mobility, allowing users to practice golf in different areas of the backyard or even indoor spaces. This concept focuses on a lightweight surface that can be rolled out when needed and stored easily afterward. It is particularly suitable for compact living environments where permanent installations are not possible. The design emphasizes convenience while still maintaining effective practice functionality.
The visual appearance of this system is simple and streamlined, aligning with modern DIY and minimalist style preferences. The mat provides a smooth and consistent rolling surface that simulates real putting conditions. It can be placed on grass, concrete, or patio areas without requiring permanent modifications. This makes it a practical solution for users who want easy project execution without extensive construction work or long-term setup commitments.
Step-by-Step Guide
The setup process begins with selecting a flat base area where the mat will be used. The surface should be cleaned and leveled to ensure smooth performance. The roll-up mat is then placed on the prepared surface and adjusted to eliminate any folds or uneven sections. Lightweight markers can be added to define hole positions and target zones.
To enhance functionality, small elevation pads can be placed under sections of the mat to simulate slope variations. This adds complexity to practice sessions without requiring permanent installation. After use, the mat is rolled up and stored, making it a highly efficient and beginner friendly backyard golf solution.
Idea 5: Backyard Chipping Net Target Zone
How to Create
A backyard chipping net target zone is designed to improve short-game accuracy by focusing on controlled chip shots into designated targets. This setup typically includes one or multiple nets placed at varying distances, allowing users to practice precision and trajectory control. The design is highly functional and requires minimal space, making it suitable for small and medium-sized backyards.
The structure is visually simple and practical, often integrated into garden or lawn areas without major modifications. Nets are positioned at different heights or angles to simulate real gameplay conditions. This setup supports creative training routines and is widely used in DIY backyard golf ideas due to its low complexity and high effectiveness.
Step-by-Step Guide
The installation begins with selecting a clear area free from obstacles. Net frames are positioned securely using stable supports to ensure safety and consistency. Distances between the player position and target nets are measured based on skill level and available space.
Once installed, ground markers are added to define standing positions and shot zones. Optional turf mats can be placed to create consistent hitting surfaces. The final system allows repeated practice of chipping techniques with adjustable difficulty levels.

Idea 6: Garden Path Golf Integration Layout
How to Create
A garden path golf integration layout combines walking pathways with golf practice zones, creating a seamless blend between landscaping and sport functionality. This concept uses existing garden paths as part of the gameplay structure, allowing users to practice putting or short shots along curved or straight routes. It enhances backyard aesthetics while adding interactive movement.
The design follows structured landscaping principles where pathways are not only decorative but also functional. Grass edges, stone walkways, and natural garden elements are incorporated into the layout. This creates a visually appealing environment that aligns with modern home decor and outdoor organization trends.
Step-by-Step Guide
The process begins by mapping existing garden paths and identifying suitable practice points along the route. Small target holes or markers are placed at intervals to create practice stations. Surface adjustments are made where necessary to ensure smooth ball movement.
Additional design elements such as border trimming and surface leveling are applied to improve functionality. The final layout allows continuous movement-based practice, combining walking and golfing in one integrated system.

Idea 7: Adjustable Backyard Golf Ramp Course
How to Create
An adjustable ramp course introduces elevation-based challenges using simple ramp structures that can be modified for different difficulty levels. This setup focuses on controlled ball elevation changes, helping users practice precision shots and distance control. It is a dynamic addition to backyard golf ideas DIY projects.
The design is flexible and modular, allowing ramps to be repositioned or adjusted based on practice requirements. Materials are kept simple and lightweight to support easy modification. This ensures that the system remains beginner friendly while offering progressive difficulty options.
Step-by-Step Guide
The construction begins with building basic ramp structures using stable boards or similar materials. Each ramp is positioned securely on flat ground and tested for stability. Surface coverings are added to ensure smooth ball movement.
Ramp angles are adjusted gradually to create different challenge levels. Final setup includes target placement beyond ramps to complete the practice system.

Idea 8: Backyard Golf Mini Obstacles Course
How to Create
A mini obstacles course adds variety to backyard golf practice by introducing simple barriers and directional challenges. This concept enhances coordination and control by requiring players to navigate around obstacles while maintaining accuracy.
The design is structured but flexible, allowing obstacles to be rearranged or modified. It supports creative project development and adds engagement to standard practice routines.
Step-by-Step Guide
Obstacles are placed strategically across the practice area using lightweight materials. Spacing is adjusted based on difficulty level. The surface is prepared to ensure smooth ball movement between obstacles.
Final adjustments ensure balanced challenge distribution across the course.

Idea 9: Night Practice Glow Golf Setup
How to Create
A night practice glow golf setup focuses on visibility and nighttime usability. This concept uses illuminated markers to create a functional practice space after sunset, extending usage hours.
The design emphasizes visibility and contrast while maintaining simple layout structure. It supports modern backyard enhancement trends.
Step-by-Step Guide
Markers are placed across the practice area to define zones. Lighting elements are positioned safely around the course. Surface preparation ensures clear visibility during nighttime use.

Idea 10: Family-Friendly Backyard Golf Game Zone
How to Create
A family-friendly golf game zone focuses on casual play and shared interaction. The layout includes multiple simple targets and scoring zones suitable for all age groups.
The design emphasizes accessibility and engagement, making it ideal for social outdoor activities.
Step-by-Step Guide
The area is divided into multiple game stations. Each station includes simple targets and scoring markers. The surface is prepared for safe and easy play.

Common Beginner Mistakes and How to Avoid Them
Many beginners overlook surface leveling, which leads to inconsistent ball movement. Another common issue is overcrowding the layout with too many features, reducing usability. Proper planning and spacing ensure better performance and long-term durability.
Practical Tips for Better Results
Consistent surface maintenance improves performance. Simple layouts often provide better training efficiency. Gradual complexity addition helps users improve skills effectively over time.
Styling, Presentation, or Organization Ideas
Backyard golf setups can be visually enhanced using clean borders, natural landscaping integration, and structured zones. Maintaining symmetry improves both functionality and aesthetic appeal.
Budget or Time Planning
Most backyard golf DIY projects can be completed using basic materials and phased construction. Starting with a simple layout and expanding gradually helps manage both cost and time effectively.
Creative Expansion and Advanced Inspiration
Advanced setups can include automated scoring systems, extended multi-zone layouts, and hybrid training areas. Expanding gradually allows continuous improvement while maintaining usability.


Leave a Reply