Introduction
Bun hairstyles are a timeless hair styling technique that continues to evolve through modern trends and social media inspiration. On platforms such as Pinterest, bun hairstyles are widely shared because they combine practicality, style, and versatility. A bun hairstyle gathers hair into a secured knot or coil, usually positioned at the top, middle, or lower section of the head. In recent years, the “baddie” aesthetic has introduced bold, confident, and polished variations of bun hairstyles that focus on clean lines, sleek finishes, and creative structure. These styles often highlight facial features while maintaining an organized and fashionable appearance. Pinterest ideas frequently showcase bun hairstyles as both everyday styling solutions and statement looks for events, photoshoots, and social content creation.

This article explores ten detailed bun hairstyle ideas inspired by the baddie aesthetic. Readers will learn how each hairstyle works, how it is structured, and how to recreate it through clear step-by-step guidance. Each idea includes practical explanations that focus on preparation, technique, and styling structure. The goal is to provide beginner friendly inspiration that can be adapted for different hair lengths, textures, and occasions while maintaining a clean, modern design suitable for trending Pinterest hair inspiration.
Why This Idea Is Trending or Useful
Bun hairstyles remain one of the most shared Pinterest ideas because they offer a combination of style efficiency and visual impact. A bun hairstyle gathers hair into a controlled structure, which helps maintain organization while still allowing creative styling options. The baddie aesthetic has contributed to the growing popularity of buns by introducing sharper, sleeker designs that emphasize symmetry, polished edges, and intentional placement. These features make bun hairstyles visually appealing for photography, social media posts, and everyday styling inspiration.
Another reason bun hairstyles trend consistently is their accessibility. Many bun styles require minimal materials and basic hair tools. This makes them an easy project for beginners exploring DIY hair styling techniques at home. The process typically involves simple preparation steps such as brushing, sectioning, and securing hair with elastic bands or pins. Pinterest tutorials often highlight these methods through step by step visuals, which helps users recreate trending ideas with confidence.
Bun hairstyles also adapt well to different aesthetics. They can appear minimalist, elegant, dramatic, or playful depending on placement and structure. This flexibility allows users to incorporate bun hairstyles into everyday routines, formal events, or fashion-focused looks. The baddie aesthetic specifically focuses on sleek styling, strong silhouette, and confident presentation, making bun hairstyles an ideal foundation for modern hair inspiration.
Materials and Preparation
Creating bun hairstyles successfully begins with proper preparation and the right materials. Although bun designs vary in complexity, most styles require a small set of basic tools that help maintain structure and smoothness throughout the hairstyle. Preparing hair properly ensures that the bun appears clean, balanced, and visually polished, which is an important element of modern Pinterest hairstyle inspiration.
The most common materials used for bun hairstyles include hair elastics, hairpins or bobby pins, a smoothing brush, a fine-tooth comb for sectioning, and styling clips. These tools help secure the bun and maintain a controlled shape. Additional materials such as edge brushes or styling combs may be used to refine the hairline and create sleek edges, which are commonly associated with the baddie aesthetic.
Preparation begins by brushing the hair thoroughly to remove tangles and create a smooth base. Hair can then be separated into sections depending on the chosen bun design. For example, high buns require hair to be gathered at the crown, while low buns focus on the nape of the neck. Planning the placement beforehand helps maintain symmetry and balance. In many Pinterest tutorials, preparation also includes lightly securing the hair into a ponytail first, which acts as the base structure for forming the bun shape.
MAIN IDEAS
Idea 1: Sleek High Baddie Bun
How to Create
A sleek high bun is one of the most recognizable baddie hairstyles featured in Pinterest inspiration boards. This hairstyle gathers the hair at the highest point of the head, creating a structured and elevated bun that highlights facial features and maintains a polished silhouette. The sleek high bun works well for both casual and formal styling because it keeps the hair organized while still appearing bold and fashionable. In modern design inspiration, the sleek finish is essential. Smooth hair surfaces reflect light evenly and create a clean aesthetic that aligns with minimalist style trends often seen in beauty and fashion content.
The sleek high bun also emphasizes balance. When positioned at the crown, the bun draws attention upward and frames the face. This effect enhances the overall structure of the hairstyle and supports the confident visual tone associated with baddie aesthetics. Many Pinterest tutorials present this hairstyle as an easy project because it does not require complex braiding or sectioning. Instead, it focuses on precise gathering and careful shaping. The result is a compact and symmetrical bun that remains secure throughout the day while maintaining a refined appearance suitable for photos, events, or everyday styling inspiration.
To create the sleek high bun, begin by brushing the hair upward toward the crown of the head. Use a smoothing brush to ensure the hair lies flat without bumps or loose strands. Once gathered, secure the hair into a tight high ponytail using a strong elastic band. This ponytail becomes the base of the bun structure. After securing the ponytail, twist the length of the hair gradually while wrapping it around the base in a circular motion. Continue wrapping until the entire ponytail forms a compact coil.
Secure the bun by inserting bobby pins evenly around the wrapped hair. Position the pins underneath the bun to maintain a clean appearance from the outside. After the bun is secured, use a fine-tooth comb to smooth the hairline and adjust the surface for a sleek finish. Some Pinterest tutorials recommend lightly tightening the bun by gently pulling sections inward with additional pins. This step ensures the bun remains structured while preserving its round, balanced shape. The final result is a polished high bun that reflects modern design aesthetics and practical styling methods.

Idea 2: Double Space Buns Baddie Style
Step-by-Step Guide
Double space buns are a playful yet structured hairstyle frequently shared as trending Pinterest ideas. This design divides the hair into two symmetrical sections, forming a bun on each side of the head. The placement usually sits slightly above ear level or closer to the crown depending on the desired visual balance. The space bun concept originated from festival and street style aesthetics but has evolved into a modern baddie hairstyle through sleeker finishes and more defined shapes.
The appeal of double space buns lies in their visual symmetry. Two balanced buns create a bold hairstyle that draws attention while maintaining a structured appearance. This style also works well with various hair textures and lengths because the buns can be adjusted in size depending on available hair volume. In Pinterest hairstyle tutorials, double space buns are often categorized as beginner friendly because the technique simply repeats the bun creation process on each side of the head.
To create double space buns, start by dividing the hair into two equal sections using a straight center part. Use a fine-tooth comb to ensure the part line is clean and precise. Secure each section into a high ponytail using separate elastic bands. Once both ponytails are positioned evenly, twist each ponytail individually while wrapping it around its base to form a circular bun. Maintain consistent tension so both buns appear similar in size.
After wrapping each ponytail into a bun shape, secure them with bobby pins placed underneath the coils. Adjust the shape gently to ensure symmetry between the two buns. Smooth the surrounding hair using a brush to maintain the sleek baddie aesthetic. The final hairstyle should feature two evenly spaced buns with balanced structure and clean lines, creating a playful yet polished look often highlighted in Pinterest hair inspiration.

Idea 3: Low Sleek Baddie Bun
How to Make
The low sleek bun is a classic hairstyle that continues to appear in Pinterest inspiration boards because of its minimalist design and elegant structure. Unlike high buns that sit at the crown, the low bun rests at the nape of the neck. This placement creates a smooth horizontal silhouette that pairs well with both casual outfits and formal styling. In the context of the baddie aesthetic, the low bun emphasizes sleek hair surfaces, sharp part lines, and balanced symmetry.
This hairstyle is particularly useful for individuals seeking a refined appearance while keeping the styling process simple. Many Pinterest tutorials describe the low sleek bun as a practical everyday hairstyle because it holds hair securely while maintaining a polished look. The bun’s position also reduces tension on the scalp compared with high buns, making it comfortable for longer wear. Because of its understated structure, the low sleek bun aligns well with minimalist style trends often featured in modern design inspiration.
To create this hairstyle, begin by brushing the hair downward toward the nape of the neck. Create a straight middle part or side part depending on the desired design. Gather the hair into a low ponytail positioned just above the neckline and secure it with an elastic band. Once the ponytail is secured, twist the length of the hair slowly while wrapping it around the base in a circular pattern.
Continue wrapping until the ponytail forms a compact bun shape. Insert bobby pins around the base to hold the bun securely in place. Use a smoothing brush to refine the surface of the hair and ensure the style appears sleek and balanced. Adjust any loose strands carefully so the bun maintains a clean silhouette. The finished hairstyle presents a polished low bun that reflects modern Pinterest hairstyle inspiration while remaining practical for everyday styling.

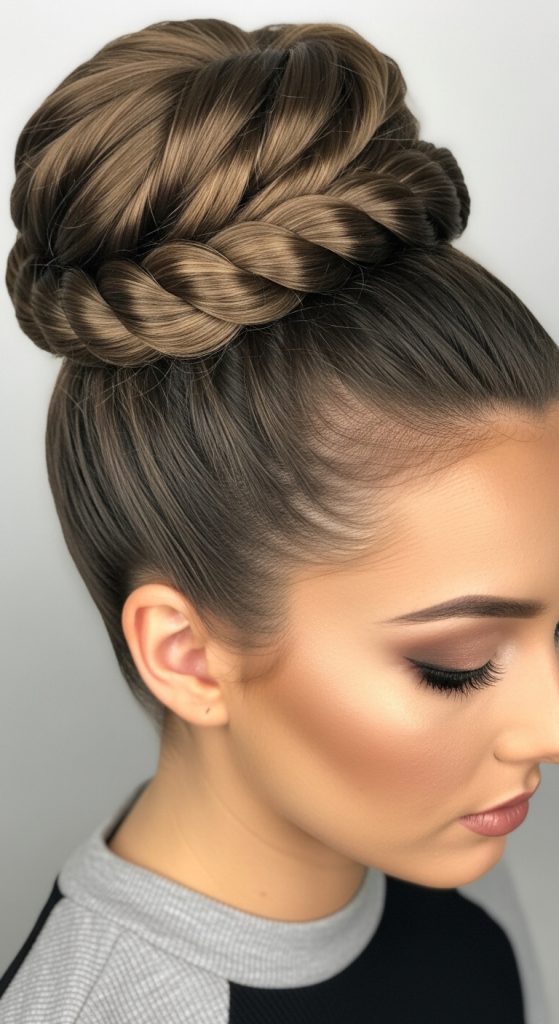
Idea 4: Braided Crown Bun
How to Create
The braided crown bun combines two classic hair styling elements: braiding and bun formation. This hairstyle creates a layered visual structure where braids frame the head before gathering into a central bun. Pinterest hairstyle boards frequently feature braided crown buns because they offer detailed texture while maintaining a controlled shape. The design highlights craftsmanship and creativity, making it a popular choice for individuals exploring DIY hairstyle tutorials.
In a braided crown bun, the braid acts as both decoration and support structure. The braid outlines the upper portion of the hairstyle, forming a circular crown effect. This design enhances the bun by adding depth and visual contrast between the braided texture and the smooth bun surface. The result is a hairstyle that appears complex but can be created using straightforward braiding techniques.
To build this hairstyle, begin by separating a section of hair near the front hairline. Braid this section along the perimeter of the head, following a curved path toward the back. The braid should remain close to the scalp to create the crown effect. Continue braiding until the section reaches the back of the head, then temporarily secure it with a clip.
Next, gather the remaining hair into a ponytail at the center back of the head. Twist the ponytail and wrap it around the base to form a bun. Secure the bun with pins, then wrap the braided section around the bun base to complete the crown effect. Adjust the braid so it sits smoothly around the bun while maintaining a balanced shape. The finished hairstyle features a structured bun enhanced by a decorative braid, creating a layered and visually detailed design.

Idea 5: Messy Textured Baddie Bun
Execution Process
The messy textured bun offers a relaxed interpretation of the baddie hairstyle while maintaining intentional design. Unlike sleek buns that focus on smooth surfaces, this hairstyle introduces controlled texture and loose structure. Pinterest inspiration boards frequently highlight messy buns because they create an effortless appearance while still maintaining a fashionable silhouette. The texture allows natural hair movement to become part of the hairstyle’s aesthetic.
In the messy textured bun, volume and spacing are essential. Instead of compressing the hair tightly, the bun maintains a slightly expanded shape that gives the hairstyle a fuller appearance. This structure works well for individuals with layered hair or natural texture because it allows the hair to contribute to the final design. The messy bun remains organized enough to stay secure but intentionally avoids perfect symmetry.
To create this hairstyle, begin by gathering the hair into a loose ponytail positioned at the back or top of the head. Do not tighten the ponytail completely; slight looseness helps create texture. Twist the ponytail gently while wrapping it around the base to form a bun shape. Instead of compressing the bun, allow small loops of hair to remain visible.
Secure the bun with pins placed loosely around the base. After the bun is secured, gently pull small sections outward to increase volume and texture. This technique creates the characteristic messy appearance. Adjust the surrounding hair carefully so the bun maintains balance while preserving its relaxed structure. The final result is a textured bun that blends casual styling with modern Pinterest hairstyle inspiration.

Idea 6: Bubble Bun Hairstyle
Setup Method
The bubble bun is a creative variation of traditional bun hairstyles that introduces segmented structure. Instead of forming one continuous bun coil, the bubble bun divides the ponytail into rounded sections that resemble bubbles. Pinterest hairstyle inspiration frequently features this design because it adds visual interest while remaining beginner friendly. The structured bubbles create a distinctive silhouette that stands out in photos and fashion styling.
The concept behind the bubble bun relies on evenly spaced elastic bands placed along a ponytail. Each section between the elastics forms a rounded bubble shape when gently pulled outward. When these sections are wrapped together into a bun, they create layered volume. The design is especially effective for medium to long hair because longer lengths allow more bubbles to form.
To create the bubble bun, begin by securing the hair into a high ponytail. Place additional elastic bands down the length of the ponytail at equal intervals. Once the elastics are positioned, gently pull the hair between each band outward to create rounded bubble shapes. After shaping the bubbles, twist the segmented ponytail and wrap it around the base of the ponytail.
Secure the bun with bobby pins placed underneath the bubble layers. Adjust the bubbles slightly to maintain even spacing and consistent volume. The finished hairstyle displays a layered bun with rounded segments that create a bold and modern look often highlighted in Pinterest hair tutorials.

Idea 7: Half-Up Baddie Bun
Step-by-Step Guide
The half-up bun hairstyle combines two popular styling techniques: leaving part of the hair loose while securing the upper section into a bun. This design creates contrast between the structured bun and the flowing hair underneath. Pinterest inspiration boards frequently feature half-up bun hairstyles because they balance casual styling with organized design.
In the baddie aesthetic, the half-up bun typically appears sleek and symmetrical. The upper bun sits near the crown, while the lower hair remains straight or softly textured. This structure frames the face and creates vertical balance in the hairstyle. The half-up bun also works well for individuals who prefer partial hair control without fully tying their hair back.
To create this hairstyle, begin by separating the top section of the hair from the lower portion. Use a comb to create a clean horizontal part across the head. Gather the upper section into a ponytail positioned at the crown. Secure the ponytail with an elastic band to form the base of the bun.
Twist the ponytail and wrap it around its base to create a compact bun. Secure the bun with pins while ensuring it remains centered. Brush the lower section of hair to maintain smoothness and adjust the bun placement if necessary. The final hairstyle features a balanced combination of loose hair and structured bun styling.

Idea 8: Twisted Rope Bun
How to Create
The twisted rope bun introduces a distinctive texture created by twisting two sections of hair together before forming the bun. This method creates a rope-like pattern that adds visual depth to the hairstyle. Pinterest hairstyle tutorials frequently showcase rope buns because they are simple to create yet visually striking.
The rope twist technique works by twisting two strands in the same direction and then wrapping them together in the opposite direction. This method locks the strands into a tight spiral pattern. When wrapped into a bun, the rope twist forms a structured design with visible texture. The bun appears more intricate than a traditional twist while requiring only basic styling steps.
To create the twisted rope bun, begin by gathering the hair into a ponytail at the desired height. Divide the ponytail into two equal sections. Twist both sections individually in the same direction. After twisting them, wrap the two strands around each other in the opposite direction to form a rope pattern.
Once the rope twist is formed, wrap it around the base of the ponytail to create a bun. Secure the bun with pins inserted beneath the twist layers. Adjust the rope structure slightly to maintain even spacing. The finished hairstyle presents a textured bun that reflects creative Pinterest hair inspiration.
Idea 9: Side Swept Bun
Execution Process
The side swept bun is a variation that shifts the bun away from the center of the head. Instead of placing the bun directly at the back, the hairstyle gathers the hair toward one side near the nape. This placement introduces asymmetry, which is a common element in modern hairstyle design.
Side buns appear frequently in Pinterest hairstyle inspiration because they create a soft yet structured look. The off-center placement highlights the neckline and adds visual movement to the hairstyle. This design is particularly effective for formal styling or photography because the bun becomes visible from the front profile.
To create the side swept bun, begin by brushing the hair toward one side of the head. Gather the hair into a low side ponytail positioned just behind the ear. Secure the ponytail with an elastic band. Once secured, twist the ponytail and wrap it around its base to form a bun.
Insert bobby pins evenly around the bun to hold the structure in place. Smooth the surrounding hair and adjust the bun’s position to ensure it sits comfortably against the head. The result is a balanced side bun that combines elegance with modern Pinterest hairstyle inspiration.

Idea 10: Knotted Bun Hairstyle
How to Make
The knotted bun introduces a creative structural design where sections of hair are tied into knots before forming the bun. This method creates layered folds that add depth and texture to the hairstyle. Pinterest hairstyle boards often feature knotted buns as advanced creative ideas because they appear complex while still being achievable with simple techniques.
The design relies on tying sections of hair together similarly to fabric knots. These knots form the base texture of the bun. When arranged carefully, the knots create a sculpted appearance that stands out compared with standard twisted buns. The style works particularly well for medium to long hair where knots can form clearly.
To create the knotted bun, begin by gathering the hair into a ponytail. Divide the ponytail into two or three sections depending on hair thickness. Tie the sections into loose knots, ensuring they remain close to the base. Continue knotting until the hair length forms layered folds.
Once the knots are formed, wrap the remaining hair around the base to create a bun shape. Secure the bun with pins inserted beneath the knot layers. Adjust the knots slightly to maintain balance and structure. The final hairstyle features a textured bun with sculptural detail that reflects creative Pinterest hairstyle inspiration.

Common Beginner Mistakes and How to Avoid Them
One of the most common mistakes when creating bun hairstyles is uneven hair gathering. When the hair is not brushed or sectioned properly before forming the ponytail, bumps can appear on the surface of the hairstyle. These bumps disrupt the sleek appearance that many Pinterest ideas aim to achieve. To avoid this issue, hair should be brushed thoroughly and gathered gradually while smoothing the surface with a brush or comb.
Another frequent mistake involves placing the bun at an incorrect height or position. Bun placement affects the entire silhouette of the hairstyle. A bun placed too high or too low may distort facial balance. Planning the bun location before securing the ponytail helps maintain symmetry and design consistency.
Overusing hairpins is another problem beginners encounter. Excessive pins can create visible bulk around the bun and reduce comfort. Instead, pins should be placed strategically underneath the bun where they remain hidden. Using a few well-positioned pins provides sufficient support without affecting the overall appearance.
Practical Tips for Better Results
Achieving polished bun hairstyles requires careful attention to structure and balance. One effective technique involves using a mirror or camera preview to check the hairstyle from multiple angles. This helps identify uneven sections that may not be visible from the front. Adjustments can then be made before finalizing the bun.
Another helpful tip involves controlling hair tension during the wrapping process. Twisting the hair too tightly can compress the bun and reduce volume, while twisting too loosely may cause the bun to unravel. Maintaining moderate tension helps create a bun that is both secure and visually balanced.
Hair sectioning also plays an important role in bun styling. Dividing the hair evenly ensures that the bun forms a symmetrical shape. For styles involving braids or twists, consistent section sizes help maintain uniform texture throughout the design. These small adjustments significantly improve the overall appearance of bun hairstyles.
Styling, Presentation, or Organization Ideas
Bun hairstyles can be styled in various ways depending on the desired aesthetic. Clean hairlines and defined partings create a polished appearance that aligns with modern minimalist style trends. A middle part combined with a sleek bun often produces a balanced and symmetrical look frequently featured in Pinterest hair inspiration.
Another presentation method involves combining bun hairstyles with complementary hair textures. For example, a sleek bun paired with straight hair strands or soft waves can add contrast and visual depth. This approach highlights the bun while maintaining a dynamic hairstyle.
Hair accessories can also enhance bun presentation when used carefully. Decorative pins or minimalist hair clips can frame the bun without overwhelming the hairstyle. Placement should remain subtle to maintain the clean structure of the bun. Thoughtful styling choices allow bun hairstyles to transition easily between casual and formal settings.
Budget or Time Planning
Bun hairstyles are considered efficient styling options because they require minimal materials and relatively short preparation time. Most bun styles can be created using basic hair tools that are commonly available. Elastic bands, pins, and a brush are typically sufficient to build the structure of the hairstyle.
Time planning depends on the complexity of the bun design. Simple styles such as sleek buns or low buns may take only a few minutes to create. More detailed styles involving braids or knots require additional preparation time. Planning the hairstyle in advance helps ensure that all materials are available before starting the styling process.
Practicing bun techniques also improves efficiency. Repeating the same styling method allows individuals to develop familiarity with twisting, wrapping, and pin placement. Over time, this practice reduces styling time while improving the final result. Bun hairstyles therefore remain a practical choice for individuals seeking quick yet fashionable hair inspiration.
Creative Expansion and Advanced Inspiration
Once basic bun techniques are mastered, there are many ways to expand bun hairstyles into more advanced creative projects. Combining multiple techniques can produce unique designs that stand out in Pinterest hairstyle inspiration. For example, braided sections can be integrated into twisted buns to add texture and dimension.
Another creative approach involves experimenting with bun placement. Buns positioned diagonally, stacked vertically, or arranged in pairs create visually dynamic hairstyles that go beyond traditional designs. These variations maintain the core bun structure while introducing new aesthetic possibilities.
Hair color and highlighting techniques can also influence bun styling. When hair contains color variations, twists and braids become more visually defined within the bun structure. This enhances the overall design and adds depth to the hairstyle. Exploring these advanced ideas allows bun hairstyles to evolve from simple everyday styling into more expressive creative hair projects.


Leave a Reply