Introduction
Almond-shaped nails have become a modern favorite among nail enthusiasts for their elegant, elongated appearance. Combining this shape with a green and gold color palette creates a luxurious yet versatile look suitable for everyday wear, special occasions, or seasonal celebrations. Pinterest users are increasingly drawn to this combination because it blends bold creativity with sophistication, offering endless opportunities for personal expression. This guide explores ten distinctive green and gold designs for almond nails, providing clear, actionable instructions for each style. Readers will learn how to incorporate different techniques, materials, and finishes, ensuring a professional look without requiring advanced skills. Whether you are a beginner or an experienced nail artist, this tutorial equips you with practical methods to achieve stunning results. Understanding these designs not only enhances your aesthetic choices but also inspires further creative projects in nail art. Following this guide, you will gain the confidence to experiment with textures, metallic accents, and minimalist or intricate patterns, all tailored to almond-shaped nails. With careful preparation and attention to detail, these designs transform your nails into polished works of art while keeping the process accessible and enjoyable.

Why This Idea Is Trending or Useful
Green and gold nails have surged in popularity across Pinterest due to their balance of bold and elegant aesthetics. Green offers a refreshing, nature-inspired appeal, while gold adds a touch of glamour and sophistication, creating an eye-catching contrast. The combination is versatile, suiting both minimalist designs and intricate, luxurious patterns. For DIY enthusiasts, these colors are approachable yet offer significant room for experimentation with textures like metallic foils, matte finishes, or glitter. Almond-shaped nails complement the green and gold palette perfectly by providing a smooth canvas that elongates fingers and highlights design details. The trend’s accessibility makes it suitable for beginners, as even basic techniques such as simple color blocking, French tips, or foil accents produce professional-looking results. Furthermore, Pinterest users favor these designs because they are visually striking in photos, making them ideal for sharing and inspiring others. Beyond aesthetics, these nail styles encourage creativity in home projects, allowing people to explore personal color preferences, nail health practices, and seasonal variations. Overall, green and gold almond nails represent a modern, practical, and stylish choice that resonates with contemporary nail art enthusiasts.
Materials and Preparation
Before starting any green and gold almond nail project, gather essential materials to ensure a smooth process. Core supplies include a base coat, top coat, various green polishes, gold polish or foil, nail brushes, dotting tools, and a nail file suitable for shaping almond tips. Additional optional materials such as glitter, rhinestones, or stamping plates allow for more advanced designs. Preparing your nails is crucial for longevity and polish adhesion. Begin by trimming and filing nails into a gentle almond shape, smoothing edges to avoid breakage. Push back cuticles and remove excess skin to create a clean base. Lightly buff the nail surface for better polish grip and apply a base coat to protect nails from staining. Organize your workspace with all materials within reach to avoid interruptions mid-design. Planning your design in advance helps maintain symmetry, color balance, and coordination with any additional decorative elements. By ensuring proper preparation and material readiness, you set the foundation for successful execution, whether you are following beginner-friendly steps or attempting more intricate almond nail designs with green and gold accents.
Idea 1: Emerald Base with Gold Foil Accent
How to Create
This design focuses on a rich emerald green base enhanced by gold foil accents for a luxurious, textured effect. The concept combines simplicity with high-impact detailing, ideal for almond-shaped nails. The emerald base provides depth and richness, creating a striking contrast with metallic gold. Foil pieces can be applied irregularly for a natural, organic aesthetic or strategically placed for geometric elegance. This style is beginner-friendly yet allows room for creative adjustments, such as gradient foils or layering matte and glossy finishes. The design highlights the almond shape, drawing attention to the elongated tips while keeping the color scheme balanced and visually cohesive.
Step-by-Step Guide
Begin by applying a base coat to protect nails and allow it to dry completely. Paint nails with two coats of emerald green polish, ensuring full opacity and smooth coverage. While the polish is still slightly tacky, use tweezers or a small brush to place small pieces of gold foil onto the nail surface. Press gently to adhere, creating a random yet balanced pattern. Seal the design with a top coat to protect the foil and enhance shine. Optional step: add a fine brush stroke of gold near the nail tip to emphasize the almond shape. Allow nails to dry completely before handling to prevent smudging. This method provides a professional, magazine-ready finish with minimal tools, making it accessible to DIY enthusiasts and Pinterest-inspired creators.

Idea 2: Gradient Green Ombre with Gold Tips
How to Make
A gradient ombre design offers a smooth transition between shades of green, culminating in subtle gold-tipped edges for a sophisticated effect. This approach uses shading to elongate almond nails visually, creating depth and a high-end finish. The ombre technique allows for customization, ranging from soft pastel greens to deep forest hues. Gold tips add a metallic accent that catches light and draws attention, creating a refined, polished look without overwhelming the nail surface. This design works well for both casual and formal occasions, providing a versatile Pinterest-ready style.
Execution Process
Start with a base coat, then apply a light green shade to the entire nail as a foundation. Use a sponge or brush to blend darker green tones from the middle toward the cuticle or tip, creating a smooth ombre gradient. Ensure each layer is dry before adding the next to prevent smearing. For gold tips, use a thin nail art brush or striping tape to define the edge and apply gold polish precisely. Finish with a glossy top coat to seal the gradient and metallic tips. Optional: add a matte finish over the ombre while leaving gold tips glossy for texture contrast. This step-by-step process ensures a professional-looking result while remaining beginner-friendly and suitable for home execution.

Idea 3: Matte Green with Gold Leaf Accent
How to Create
Matte green nails provide a contemporary, understated backdrop, making gold leaf accents stand out vividly. This design emphasizes contrast and texture, showcasing creativity through minimalist yet impactful styling. Matte polish reduces shine, focusing attention on the metallic elements. Gold leaf can be applied in abstract shapes, linear patterns, or delicate fragments to complement the almond shape. This style allows for experimentation with placement and intensity, offering a unique visual appeal for each nail. Matte finishes are especially popular on Pinterest due to their modern aesthetic and compatibility with both simple and intricate designs.
Step-by-Step Guide
Begin with a base coat to protect nails. Apply two layers of matte green polish, allowing each to dry fully. Tear small pieces of gold leaf and carefully position them on the nail using tweezers or a fine brush. Press gently and lightly dab a matte top coat around the foil to avoid losing its metallic sheen. Avoid coating the gold leaf directly with matte polish to retain contrast. Optionally, seal the edges with clear gloss for durability. This approach creates a contemporary, minimalist design that emphasizes almond-shaped nails while remaining simple enough for beginners to achieve at home.

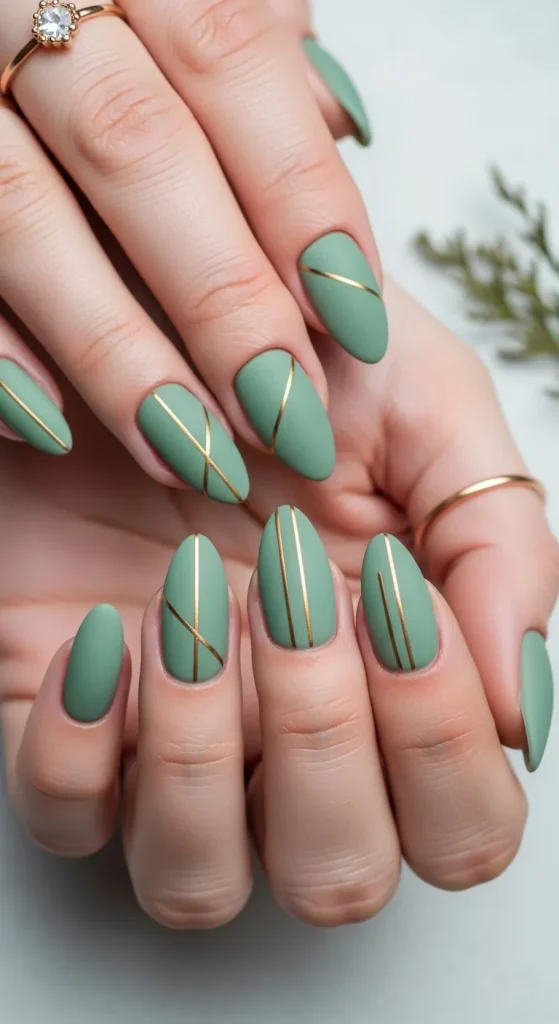
Idea 4: Forest Green with Gold Stripes
How to Create
Using thin gold stripes over a forest green base combines structure with elegance. The concept is inspired by modern geometric trends, offering a minimalist aesthetic with high visual impact. Stripes can vary in thickness, orientation, and placement, creating either symmetry or a dynamic look. This design emphasizes almond nails’ elongated shape, directing the eye along the nail length. The combination of deep green and metallic gold is versatile for seasonal looks and Pinterest boards, aligning with contemporary DIY trends.
Step-by-Step Guide
Apply a base coat and paint nails with two coats of forest green polish. Once dry, use nail striping tape or a fine brush to outline the desired gold stripes. Paint over the tape or freehand thin gold lines, ensuring precision. Allow lines to dry before carefully removing tape if used. Finish with a glossy top coat to seal the stripes and enhance shine. Optional: alternate matte green and glossy stripes for texture contrast. This method provides a modern, professional appearance while remaining beginner-friendly and easy to replicate.

Idea 5: Olive Green Marble with Gold Veins
How to Create
Olive green marble nails with gold veining create a sophisticated, organic aesthetic. The marble effect adds natural texture, while metallic veins highlight contours and create a luxurious appearance. This design is highly adaptable, allowing each nail to have a unique pattern while maintaining cohesion through color consistency. Marble nails are visually dynamic, ideal for Pinterest tutorials and DIY inspiration, and complement almond shapes by emphasizing length and curvature.
Step-by-Step Guide
Apply a base coat, then a layer of olive green polish. On a separate palette, mix a lighter green and a touch of white polish. Using a fine brush or toothpick, swirl the lighter color over the base to create a marbled effect. Allow drying, then carefully add thin gold lines following natural veins using a metallic polish or foil pen. Seal with a glossy top coat to enhance depth and shine. Optional: matte finish over green while leaving gold veins glossy for contrast. This process produces a realistic marble effect suitable for beginners with patience and careful layering.

Idea 6: Dark Green Glitter Fade with Gold Accents
How to Create
A dark green glitter fade incorporates subtle sparkle, perfect for almond nails that catch light elegantly. Adding gold accents enhances glamour while maintaining balance. This design combines texture and shine, appealing to DIY enthusiasts and Pinterest users who enjoy decorative yet manageable styles. Glitter fades allow creative freedom, adjusting density and gradient direction based on nail length. Gold accents can be dots, tips, or foil fragments, complementing the glitter without overcrowding the design.
Step-by-Step Guide
Start with a base coat, followed by dark green polish. While nails are slightly tacky, apply glitter gradually from the tip, fading downward for a gradient effect. Use a fan brush to remove excess glitter. Add small gold accents using foil, dots, or thin stripes as desired. Finish with a top coat to seal glitter and metallic details, ensuring smooth texture and long-lasting wear. Optional: add a matte layer over green before glitter to emphasize sparkle contrast. This approach creates an elegant, eye-catching finish suitable for Pinterest tutorials and home DIY projects.

Idea 7: Sage Green Matte with Gold Minimalist Lines
How to Create
Sage green matte nails offer a soft, modern aesthetic. Adding minimalist gold lines emphasizes almond nails’ shape while maintaining subtle elegance. This design is inspired by Scandinavian and minimalist trends, popular on Pinterest for their clean, versatile appeal. Gold lines can run horizontally, vertically, or diagonally, creating geometric patterns without overwhelming the nail. The matte base enhances metallic contrast, resulting in a contemporary look suitable for everyday wear.
Step-by-Step Guide
Apply a base coat, then two layers of sage green matte polish. Use a fine brush or striping tape to create thin gold lines in the desired pattern. Ensure precision and symmetry where needed, allowing gold polish to dry fully before top coating. Seal the design with a matte-friendly top coat, preserving the matte texture while protecting metallic lines. Optional: create varying line thickness across nails for dynamic visual interest. This design is beginner-friendly, requiring minimal tools while producing a professional, Pinterest-ready aesthetic.
Idea 8: Jade Green French Tips with Gold Outline
How to Create
A modern twist on the classic French manicure uses jade green tips with a fine gold outline. This approach balances tradition and creativity, making almond nails appear elegant and refined. The gold outline highlights the nail shape and adds sophistication without overpowering the base. French tip variations suit diverse occasions and allow easy experimentation with color and metallic accents, appealing to DIY enthusiasts seeking Pinterest inspiration.
Step-by-Step Guide
Start with a base coat and nude or soft green base color. Using nail guides or freehand, paint jade green tips along the natural curve of almond nails. Allow drying, then outline the tips with a fine gold brush or metallic striping polish. Seal with a glossy top coat to protect lines and enhance shine. Optional: add a thin vertical gold stripe near the cuticle for added modernity. This method creates a polished look suitable for beginners while ensuring elegant, professional results.

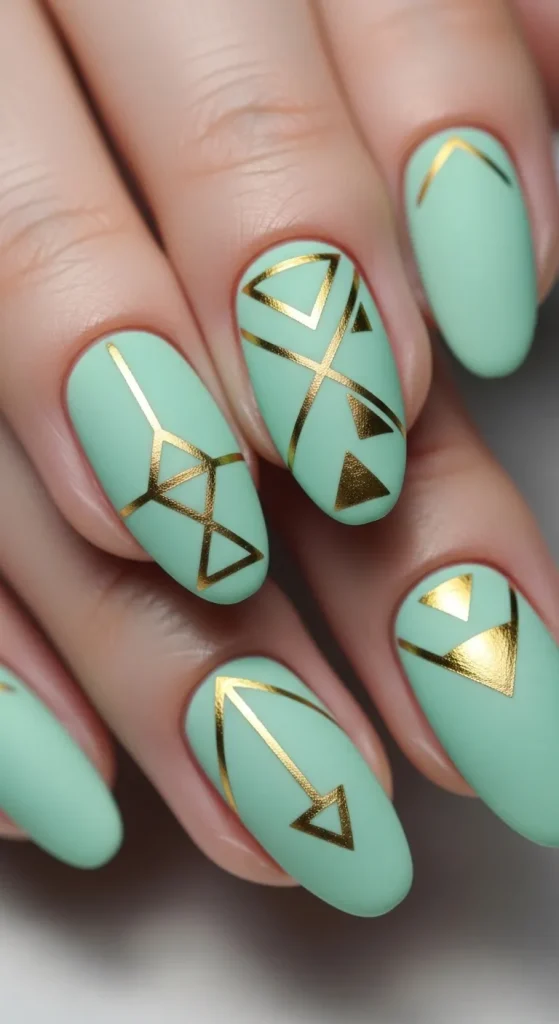
Idea 9: Mint Green Matte with Gold Geometric Shapes
How to Create
Mint green matte nails provide a fresh, understated base for geometric gold shapes. This design emphasizes structure and style, highlighting almond nails’ elegance. Shapes such as triangles, lines, or angular patterns create modern, aesthetic appeal. Combining mint green with gold maintains balance, offering a stylish look suitable for Pinterest DIY projects. Geometric patterns allow experimentation while remaining manageable for beginners.
Step-by-Step Guide
Apply base coat, then two layers of mint green matte polish. Use striping tape, fine brushes, or stencils to paint gold geometric shapes on each nail. Ensure clean edges and balanced composition across all nails. Allow gold to dry, then seal with a top coat compatible with matte finishes. Optional: alternate matte and glossy mint sections to emphasize shapes further. This technique produces professional-looking almond nail designs while being beginner-friendly and highly customizable.
Idea 10: Dark Forest Green with Gold Foil Accent Half Moon
How to Create
This style emphasizes a half-moon design at the base of almond nails using gold foil against a dark forest green background. The concept combines elegance and creativity, creating a bold visual contrast. The half-moon technique highlights the nail bed while allowing almond tips to shine. Gold foil adds glamour, ensuring a striking Pinterest-ready result. This design is accessible to beginners and suitable for seasonal or festive occasions.
Step-by-Step Guide
Apply a base coat, followed by dark forest green polish, leaving the half-moon area near cuticles clear. Use a small brush or sticker guides to define the half-moon shape. Apply gold foil within the half-moon area, pressing gently to adhere. Seal with a top coat to protect the design and enhance shine. Optional: add subtle green gradient near the half-moon for added dimension. This approach creates a professional, creative design while remaining beginner-friendly and easy to execute at home.

Common Beginner Mistakes and How to Avoid Them
Many beginners struggle with uneven polish, smudging, and improper foil placement. Common mistakes include applying thick layers, resulting in long drying times and bubbles. Another frequent error is inconsistent almond shaping, which affects design symmetry. Foil or metallic accents often peel if the base is too dry or top coat application is delayed. To prevent these issues, apply thin, even polish layers, allow adequate drying time, and maintain a clean, organized workspace. Use proper tools for shaping, such as a fine nail file for almond tips, and always seal foil or metallic accents with a top coat immediately after placement. Planning your design layout in advance ensures symmetry and color balance. Beginners should practice freehand techniques on one nail or a practice tip before committing to the full hand. Maintaining patience and precision helps avoid rushed mistakes. Correct preparation and execution reduce errors and improve overall results, ensuring a Pinterest-ready aesthetic.
Practical Tips for Better Results
Achieving professional-looking almond nails requires attention to detail and proper techniques. Always start with clean, dry nails and push back cuticles to prevent polish from pooling. Use quality brushes or tools for precise designs, especially for foils, stripes, or geometric shapes. Layer colors gradually to avoid smudging and maintain opacity. When using metallic or foil accents, press firmly and seal immediately with a top coat. Experiment with matte and glossy combinations to add depth. Regularly clean brushes and tools for consistent application. Allow sufficient drying time between layers to prevent streaking or dents. For ombre or gradient effects, a makeup sponge ensures smooth blending. Keeping a steady hand and working in a well-lit environment improves precision. Planning the design before starting enhances symmetry and reduces errors. By applying these practical tips, your almond nails will maintain professional quality, durability, and visual appeal suitable for Pinterest inspiration boards.
Styling, Presentation, or Organization Ideas
Almond nails with green and gold designs can be styled to complement outfits, jewelry, and overall personal aesthetic. For cohesive looks, match the shade of green to seasonal tones or wardrobe colors. Pair metallic accents with gold jewelry for harmony. Organize nail designs across hands by creating symmetry or alternating patterns to maintain visual balance. Matte and glossy finishes can be alternated for texture contrast. Display nails in a flat lay with props like gemstones, fabrics, or greenery for social media photos or Pinterest boards. Consider the occasion: subtle designs for casual wear and bold foil or geometric patterns for formal events. Organizing nail care and materials for DIY projects in labeled containers ensures efficiency. Proper presentation of finished nails emphasizes craftsmanship and aesthetic appeal, making your designs visually striking and inspirational.
Budget or Time Planning
Creating green and gold almond nails at home is achievable with careful budget and time planning. Essential materials such as base and top coats, green polishes, gold accents, and basic tools are affordable and reusable. Allocate specific time blocks for shaping, painting, drying, and adding details to prevent rushed or uneven results. For beginners, a single nail session may take 60–90 minutes, while advanced designs can require up to two hours. Purchasing multipurpose tools like fine brushes, dotting tools, and striping tape reduces overall costs. Prioritize designs based on complexity to manage time efficiently. Preparing materials and workspace beforehand minimizes interruptions. Budget-friendly alternatives include homemade sponges for ombre effects or foil substitutes for metallic shine. Proper planning ensures high-quality nails without overspending or time stress, making the project practical for regular DIY sessions and Pinterest sharing.
Creative Expansion and Advanced Inspiration
Once familiar with basic green and gold almond designs, explore advanced variations to expand creativity. Introduce textures such as glitter gradients, layered foils, or 3D embellishments like gems or studs. Experiment with seasonal shades of green and metallics, combining pastel greens for spring and deep forest tones for winter. Integrate geometric patterns, floral motifs, or marbling techniques to elevate designs. Layer matte and glossy finishes strategically for depth and dimension. Combine almond shapes with other nail shapes, such as stiletto or coffin tips, for hybrid Pinterest-inspired projects. For social media impact, create mini-tutorials or step-by-step photo sequences showcasing progress. Regularly experimenting with new materials, gradients, or metallic accents keeps designs fresh and engaging. Expanding into advanced techniques builds skill, inspires creativity, and produces highly shareable, aesthetically pleasing nails suitable for personal projects or professional inspiration boards.


Leave a Reply