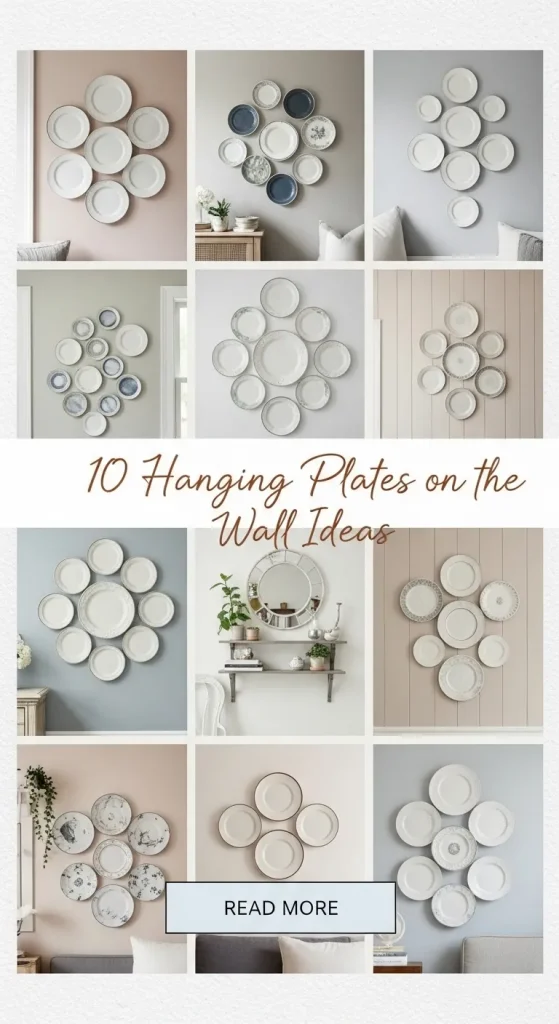
Introduction
Hanging plates on the wall is a practical and visually structured approach to enhancing interior spaces using simple decorative elements. This concept transforms everyday dishware into a form of wall art, making it a strong option within modern home decor and Pinterest ideas. Plates offer a wide range of textures, colors, and patterns, allowing flexible combinations that suit both traditional and contemporary environments. This approach is commonly used in living rooms, dining areas, kitchens, and hallways where blank wall space needs purposeful design.
This article explains how to use plates effectively as wall decoration through clear, step by step methods and structured layouts. It focuses on DIY, beginner friendly solutions that require minimal tools and manageable materials. Each idea is designed to be practical, achievable, and adaptable to different room sizes and styles. Readers will learn how to plan layouts, select plate types, and create visually balanced arrangements that align with modern design, minimalist style, or more detailed decorative themes. The goal is to provide structured guidance that helps turn simple plates into a cohesive and intentional decorative feature.
Why This Idea Is Trending or Useful
Wall-mounted plate displays are widely used because they combine creative ideas with accessibility and low cost. This method fits well into current trending ideas on Pinterest, where users look for ways to repurpose existing household items into decorative features. Plates are commonly available in different homes, making this an effective budget ideas solution without requiring specialized purchases. The ability to mix patterns, colors, and sizes allows for highly customizable results, which is a key factor in its growing popularity.
This approach also supports organization by turning unused dishware into purposeful decoration instead of storage clutter. It aligns with the increasing interest in handmade and aesthetic interiors, where personal expression is emphasized. From a design perspective, plate arrangements can create symmetry, focal points, or layered visual depth, depending on the chosen layout. The process is also suitable as an easy project for beginners, requiring only basic tools and simple planning. Its flexibility makes it adaptable for different interior themes, including rustic, vintage, or minimalist style, ensuring long-term relevance across various design preferences.
Materials and Preparation
Before starting a wall plate arrangement, proper planning and preparation ensure a clean and stable result. The primary materials include decorative plates of varying sizes, plate hangers or adhesive wall mounts, measuring tape, a pencil for marking, and a level to maintain alignment. Optional tools include painter’s tape for layout testing and paper templates cut to match plate sizes. These templates help visualize placement before committing to wall installation.
Preparation begins by selecting a consistent theme or color scheme that aligns with the room’s overall decoration. This ensures the final arrangement looks intentional rather than random. Next, measure the wall area and determine the layout structure, whether symmetrical, linear, or clustered. Using paper templates, position each plate on the wall to test spacing and balance. This step prevents unnecessary adjustments later. Ensure the wall surface is clean and suitable for mounting hardware. Choosing the right hanger type is essential for weight support and long-term stability. Proper preparation simplifies the execution process and ensures the final display remains secure, aligned, and visually cohesive.
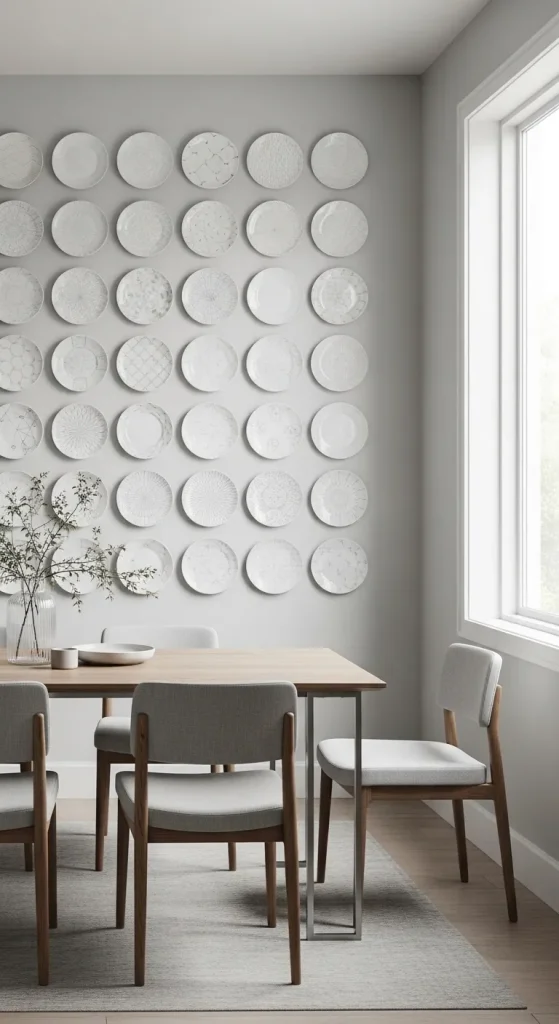
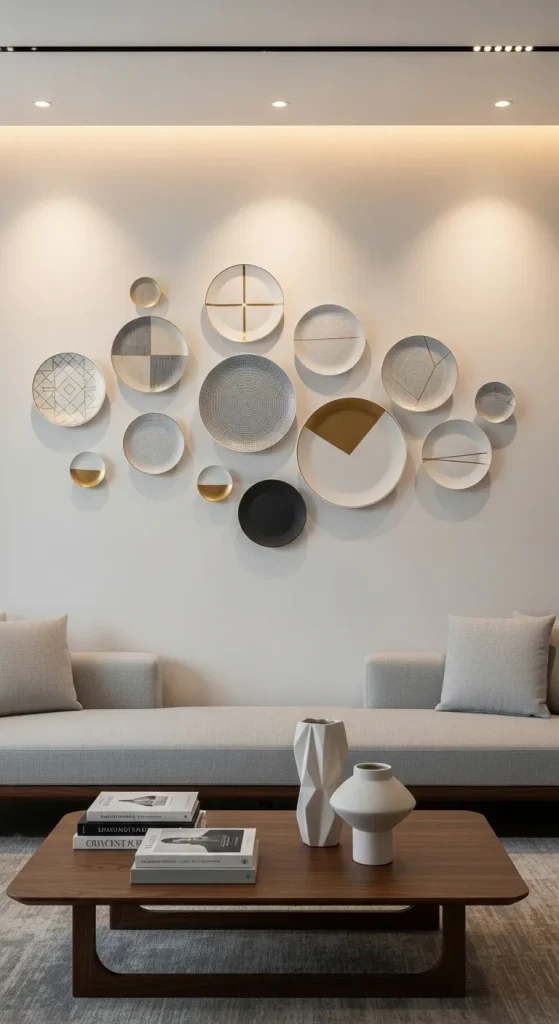
Idea 1: Symmetrical Grid Plate Layout
How to Create
A symmetrical grid layout focuses on precision and balance, making it suitable for structured interiors and modern design spaces. This method uses plates of similar size and design, arranged in evenly spaced rows and columns. The goal is to create a clean, organized visual pattern that enhances the wall without overwhelming it. This layout works well in dining rooms or above furniture where alignment is important. Consistency in spacing and plate selection is key to achieving a polished result. Neutral tones or repeating patterns help maintain a cohesive appearance, while subtle variations can add depth without disrupting symmetry.
To execute this step by step, begin by measuring the wall and dividing it into equal sections based on the number of plates. Mark placement points lightly using a pencil and confirm alignment with a level. Install plate hangers securely, ensuring each plate sits at the same height. Start mounting from the center and work outward to maintain balance. Maintain equal spacing between each plate, typically two to three inches. This method ensures a consistent grid pattern that is visually stable. The result is a structured creative project that enhances wall space through repetition and alignment.
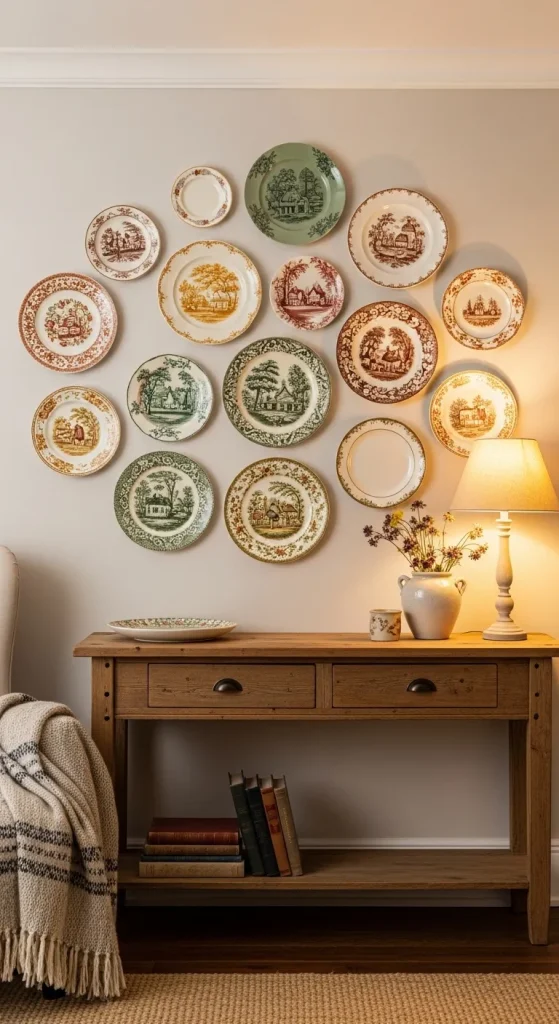
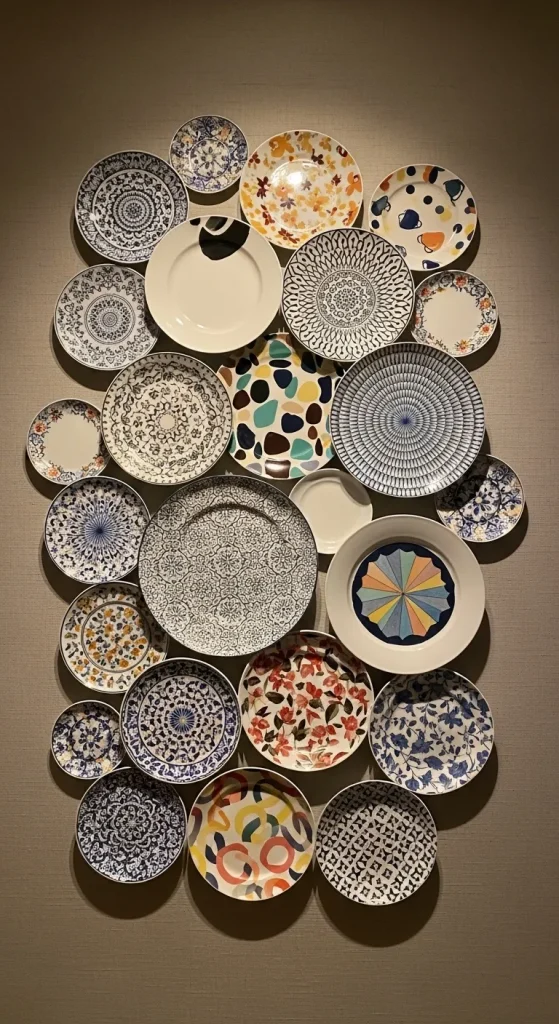
Idea 2: Mixed Vintage Plate Gallery
How to Create
A mixed vintage gallery arrangement emphasizes variety and texture, making it a strong choice for aesthetic and layered home decor. This idea uses plates with different patterns, colors, and sizes to create a visually rich display. Unlike symmetrical layouts, this approach focuses on controlled randomness, where variation is intentional but still balanced. Floral patterns, intricate borders, and antique finishes are commonly used to achieve a vintage effect. This design suits traditional interiors and spaces that benefit from added character.
To create this layout, collect plates with diverse designs while maintaining a unifying color palette. Arrange them on the floor first to test combinations and balance. Use paper templates to transfer the layout onto the wall. Begin installation from the center and expand outward, adjusting spacing as needed to maintain visual flow. Use secure plate hangers suitable for varying sizes. Avoid placing similar patterns too close together to maintain contrast. This DIY tutorial allows flexibility while ensuring the final arrangement remains cohesive and intentional.
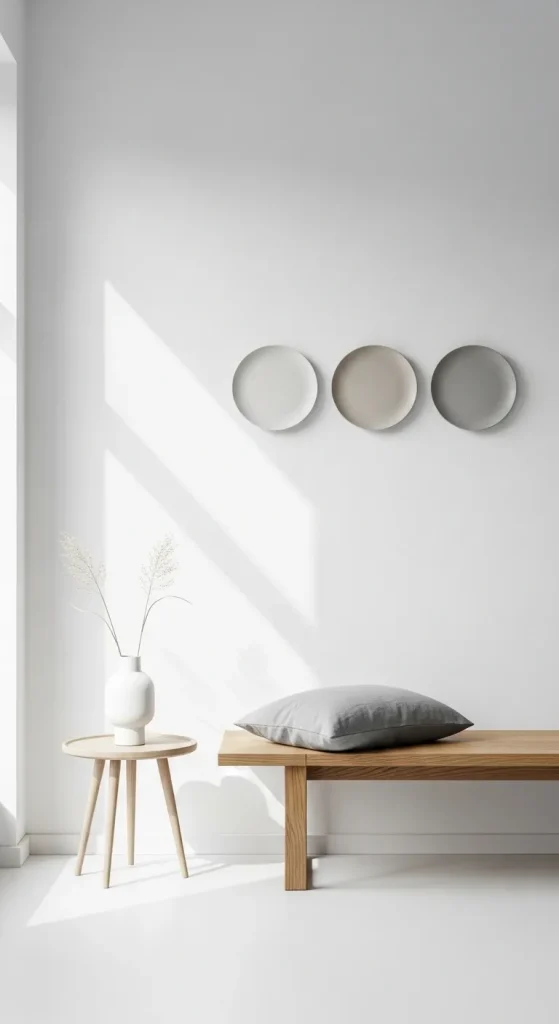
Idea 3: Minimalist Single-Line Display
How to Create
A single-line plate display is a clean and simple solution aligned with minimalist style. This approach uses a horizontal or vertical line of plates, typically in uniform sizes or subtle variations. The focus is on simplicity, making it suitable for modern interiors where clutter is minimized. Neutral or monochrome plates work best to maintain a calm and balanced appearance. This idea is ideal for narrow walls or areas above furniture where space is limited.
To execute this easy project, measure the wall and mark a straight line using a level. Determine equal spacing between each plate to maintain consistency. Install hangers carefully to ensure alignment remains precise. Begin mounting from one end and continue in sequence, checking alignment after each placement. Maintain consistent height and spacing to avoid visual imbalance. This approach requires minimal materials and is suitable for beginners looking for a clean, structured decorative solution.
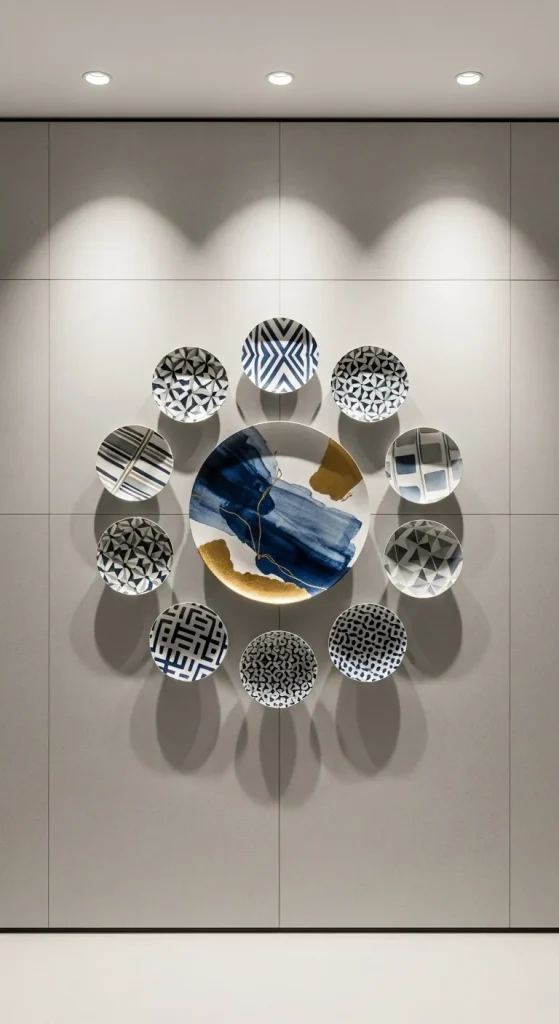
Idea 4: Circular Plate Arrangement
How to Create
A circular arrangement creates a focal point by forming a round composition of plates. This design works well as a centerpiece on large walls and adds a sense of movement and unity. Plates are arranged in a circular pattern, often with a larger plate in the center and smaller ones surrounding it. This layout enhances visual flow and creates a balanced yet dynamic effect.
To create this design, mark the center point on the wall and outline a circular guide using a measuring tool. Arrange paper templates to define placement before installation. Start by mounting the central plate, then position surrounding plates evenly along the circular outline. Maintain consistent spacing to preserve the shape. Use appropriate hangers to ensure stability. This creative project adds depth and structure while maintaining a clear visual focus.
Idea 5: Layered Overlapping Plates
How to Create
Layered plate arrangements introduce depth by partially overlapping plates. This technique creates a three-dimensional effect, making the display more dynamic. It works well with plates of varying sizes and patterns, allowing creative layering without strict alignment. This approach is suitable for feature walls where visual interest is desired.
To achieve this layout, start by selecting a mix of large and small plates. Position larger plates as the base layer, then add smaller plates slightly overlapping them. Use strong mounting solutions to ensure stability. Plan the arrangement carefully before installation to avoid imbalance. This method allows flexibility and encourages experimentation, making it a practical DIY option.
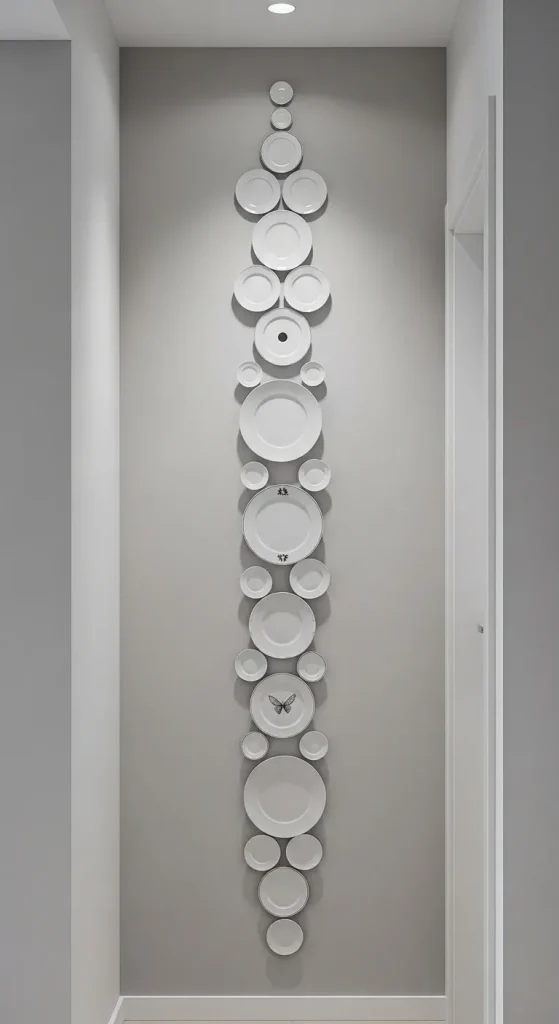
Idea 6: Vertical Plate Column
How to Create
A vertical column arrangement is ideal for narrow spaces such as hallways or corners. This design uses a straight vertical line of plates to draw the eye upward, enhancing the perception of height. Plates can vary in size while maintaining alignment along a central axis.
To execute this design, mark a vertical line using a level. Determine spacing between plates based on wall height. Install hangers sequentially from top to bottom, ensuring alignment remains straight. This layout is simple and effective, making it a strong beginner friendly option.
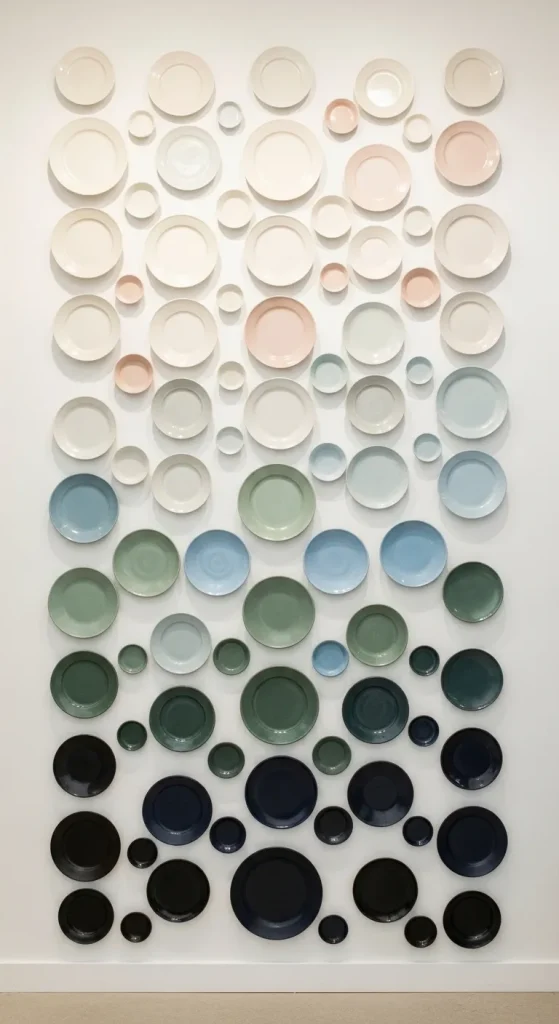
Idea 7: Color-Coordinated Plate Display
How to Create
A color-coordinated display focuses on grouping plates based on color tones. This approach creates harmony and visual consistency while allowing variation in patterns. It works well in spaces where color plays a key role in decoration.
To create this layout, group plates by color families and arrange them to form a gradient or balanced distribution. Use templates to test placement before installation. Maintain consistent spacing and alignment. This method enhances cohesion while allowing creative variation.
Idea 8: Asymmetrical Modern Layout
How to Create
An asymmetrical layout uses irregular placement to create a contemporary look. Plates are arranged without strict symmetry but still maintain visual balance. This approach is common in modern design interiors.
To execute this, arrange plates in a scattered pattern while maintaining spacing consistency. Start with a focal plate and build around it. Use templates to refine placement before mounting. This approach allows flexibility while maintaining structure.
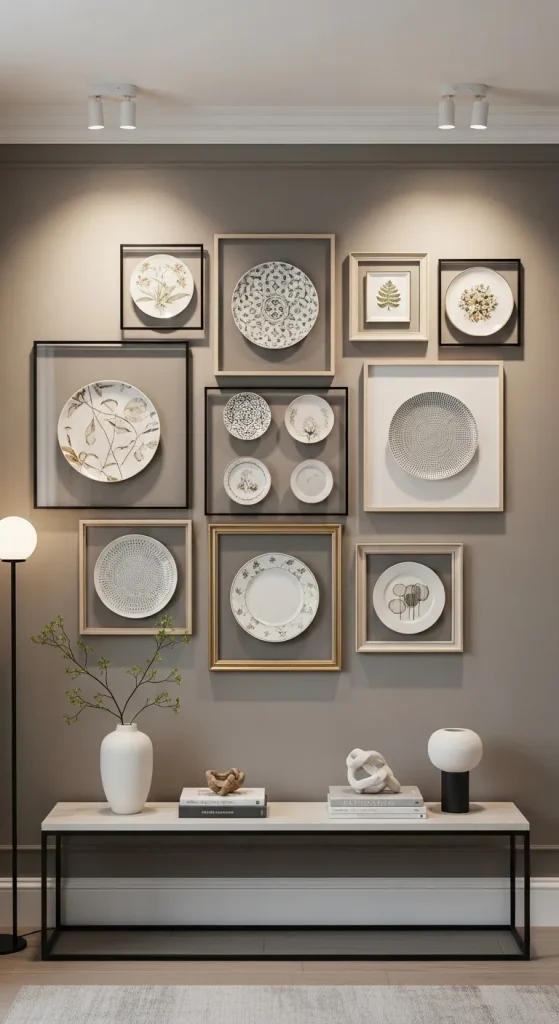
Idea 9: Framed Plate Display
How to Create
Framing plates combines wall art with decorative dishware. Plates are placed within frames or shadow boxes, adding structure and protection. This method works well for delicate or collectible plates.
To create this display, select frames that match the interior style. Secure plates inside using appropriate supports. Arrange frames on the wall using a grid or gallery layout. This approach adds depth and refinement to the display.
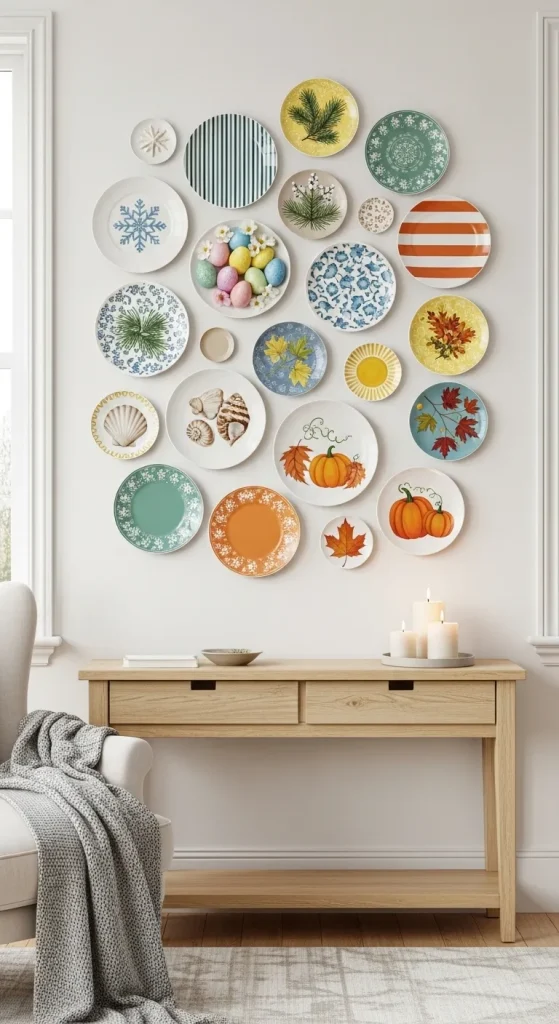
Idea 10: Seasonal Plate Rotation Wall
How to Create
A seasonal rotation wall allows plates to be changed periodically based on themes or occasions. This keeps the display dynamic and adaptable. Plates can reflect seasonal colors or patterns, making the wall continuously updated.
To implement this, use easy-to-remove mounting solutions. Store alternate plates safely and rotate them as needed. Maintain a consistent layout while changing designs. This method supports ongoing creative ideas and keeps the space visually engaging.
Common Beginner Mistakes and How to Avoid Them
A common mistake is improper spacing, which leads to uneven layouts and visual imbalance. This can be avoided by using templates and measuring tools before installation. Another issue is using incorrect mounting hardware, resulting in unstable plates. Selecting appropriate hangers based on weight ensures safety and durability. Overcrowding is also frequent, where too many plates reduce clarity. Maintaining consistent spacing helps preserve visual structure. Skipping the planning stage often leads to misalignment, which can be prevented by testing layouts beforehand.
Practical Tips for Better Results
Use paper templates to visualize arrangements before installation. Always check alignment with a level to maintain precision. Select plates that complement the room’s color scheme for a cohesive result. Use strong mounting hardware for durability. Start installation from a central point to maintain balance. These steps improve overall execution and ensure a professional finish.
Styling, Presentation, or Organization Ideas
Combine plate displays with surrounding decor such as shelves or artwork for a layered look. Maintain consistency in spacing and alignment for a clean presentation. Use lighting to highlight the arrangement and enhance its visual impact. Keep nearby elements minimal to avoid distraction from the plate display.
Budget or Time Planning
This project is cost-effective because it uses existing plates or affordable options. Planning the layout in advance reduces installation time. Using simple tools and materials keeps the process efficient. Completing the project in stages allows better control and reduces errors.
Creative Expansion and Advanced Inspiration
Advanced variations include combining plates with other wall decor elements such as mirrors or artwork. Experimenting with textures and materials adds depth to the design. Expanding the display across multiple walls creates continuity. These ideas allow the project to evolve into a larger decorative concept while maintaining structure and clarity.


Leave a Reply