Introduction
Striped nails with stars combine clean lines and playful detail to create a balanced, eye-catching manicure. This Pinterest-inspired topic focuses on simple techniques that transform basic nail art into stylish, modern design looks suitable for everyday wear or special occasions.
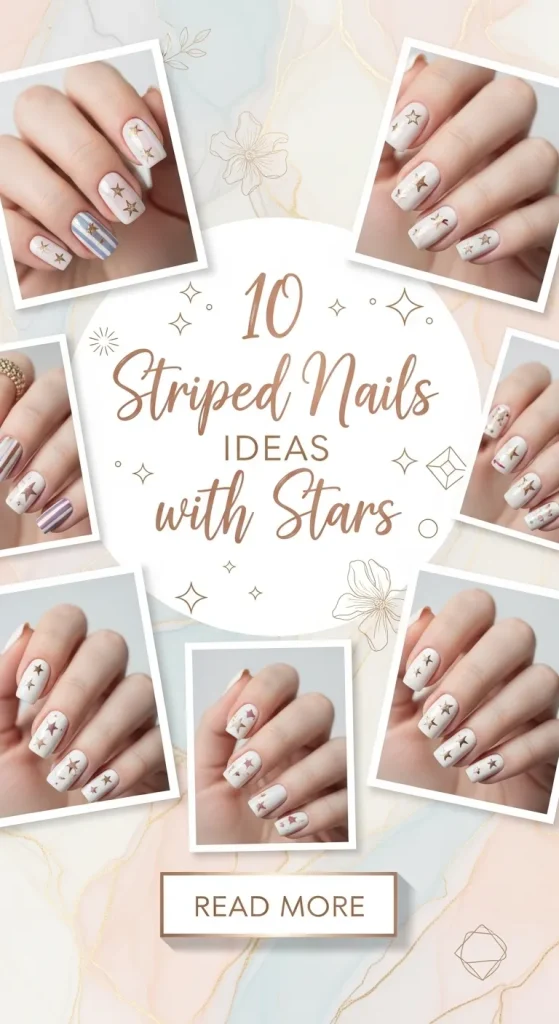
This article explains practical methods, materials, and step by step techniques to create ten unique striped nail designs with star elements. Each idea is beginner friendly, uses accessible tools, and supports creative expression through DIY nail decoration.
Why This Idea Is Trending or Useful
Striped nails paired with star accents are widely shared across Pinterest ideas because they combine structure with creativity. The straight lines offer a clean and organized visual base, while stars introduce a focal point that adds personality without overwhelming the design. This balance fits well within modern design trends, especially minimalist style aesthetics that rely on contrast and precision rather than heavy decoration. The combination also allows flexibility in color choices, making it suitable for seasonal themes, casual looks, or more polished styles.
Another reason for its popularity is accessibility. These designs can be completed as an easy project at home without professional tools. Basic materials such as nail tape, thin brushes, and dotting tools are enough to achieve detailed results. The DIY aspect makes it appealing for beginners who want to practice control and technique while still producing visually appealing results. It also supports budget ideas, as the same tools and polishes can be reused across multiple creative projects. This makes striped star nails both practical and adaptable for personal style experimentation.
Materials and Preparation
Before starting any striped nail design with stars, preparation ensures clean and consistent results. Begin with standard nail care by shaping nails, pushing back cuticles, and applying a base coat. This creates a smooth surface and helps polish adhere properly. For materials, prepare two to four nail polish colors, including one base shade, one contrasting stripe color, and a star accent color. A thin nail art brush or striping tape is essential for straight lines, while a dotting tool or fine brush is useful for creating stars.
Additional tools include a top coat for sealing the design and optional nail guides for beginners who want extra precision. Planning the design before application is important. Decide the direction of stripes, placement of stars, and color combinations to avoid mistakes during the process. Allow each layer of polish to dry completely before adding details to prevent smudging. Working in thin layers improves control and reduces drying time. This preparation stage supports a smooth workflow and helps maintain consistency across all nails, which is essential for achieving a polished and professional look in any handmade nail decoration.
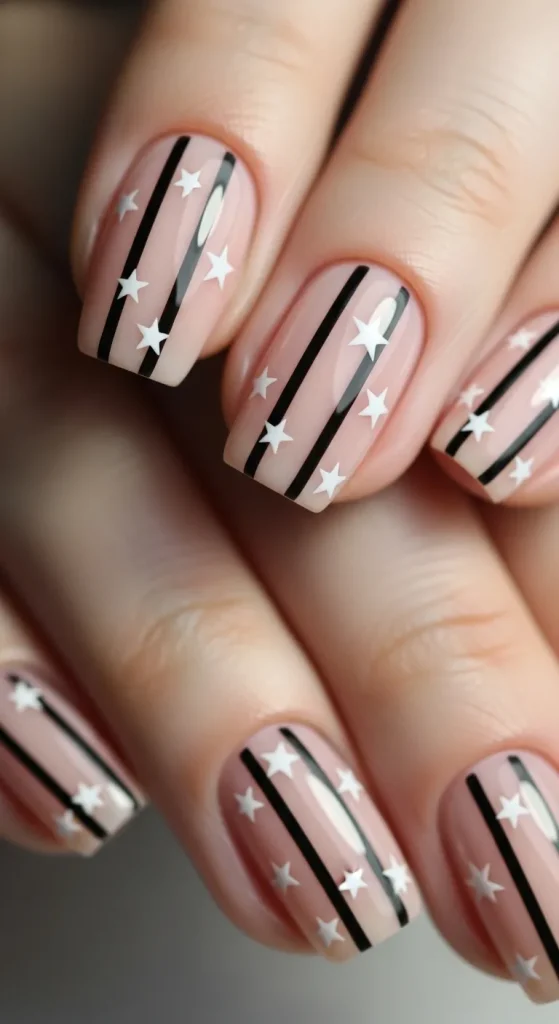
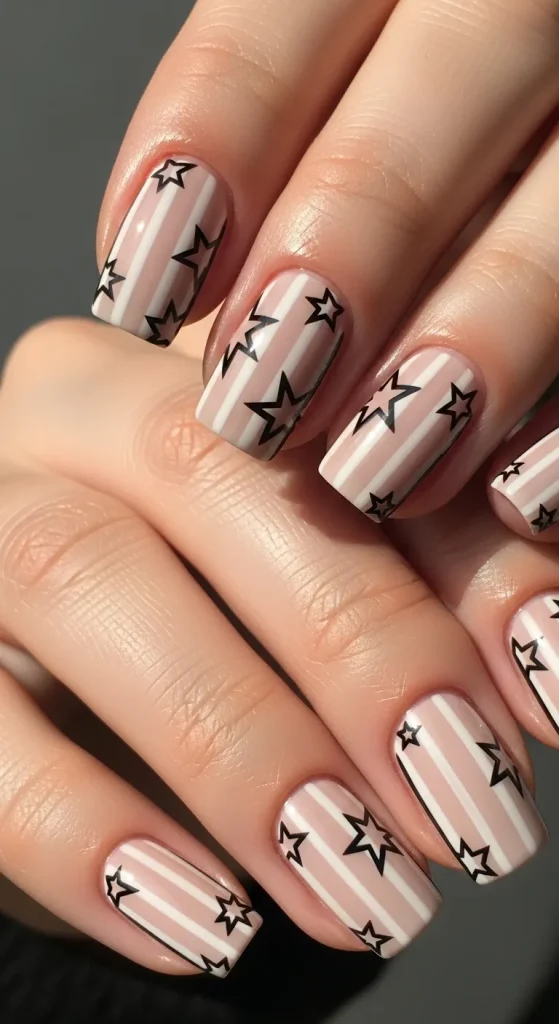
Idea 1: Minimalist Black Stripes with White Stars
How to Create
This design focuses on a minimalist style using high contrast between black stripes and white stars. The base color is typically nude or light beige, which allows the black lines to stand out clearly. The stripes are thin and evenly spaced, creating a structured appearance that aligns with modern design principles. Small white stars are added sparingly to maintain balance and prevent visual clutter. This approach works well for those who prefer subtle yet defined nail art that fits both casual and professional settings.
To create this design, apply a nude base coat and allow it to dry completely. Use striping tape or a fine brush to draw thin black lines vertically or diagonally across each nail. Ensure consistent spacing for a clean look. Once the stripes dry, use a dotting tool or thin brush to create small white stars between or along the stripes. Keep the stars simple with five-point shapes. Finish with a clear top coat to seal the design. This step by step process ensures precision while remaining beginner friendly and practical.
Idea 2: Pastel Stripes with Gold Star Accents
Step-by-Step Guide
This design uses soft pastel tones combined with metallic gold stars to create a gentle and aesthetic finish. The stripes can include colors such as light pink, mint green, and lavender, which blend harmoniously without overwhelming the design. Gold stars act as highlights, adding a refined touch without dominating the overall look. This combination is often used in Pinterest inspiration boards focused on delicate and feminine home decor themes translated into nail art.
Begin by applying a white or pastel base color. Use a thin brush to paint alternating pastel stripes across the nail, either vertically or horizontally. Allow each stripe to dry before adding the next to prevent blending. Once the striped pattern is complete, use a gold nail polish or foil to create small stars on selected areas. Placement should be intentional, such as near the cuticle or tip. Seal the design with a glossy top coat. This method ensures a smooth finish while keeping the process manageable for beginners.

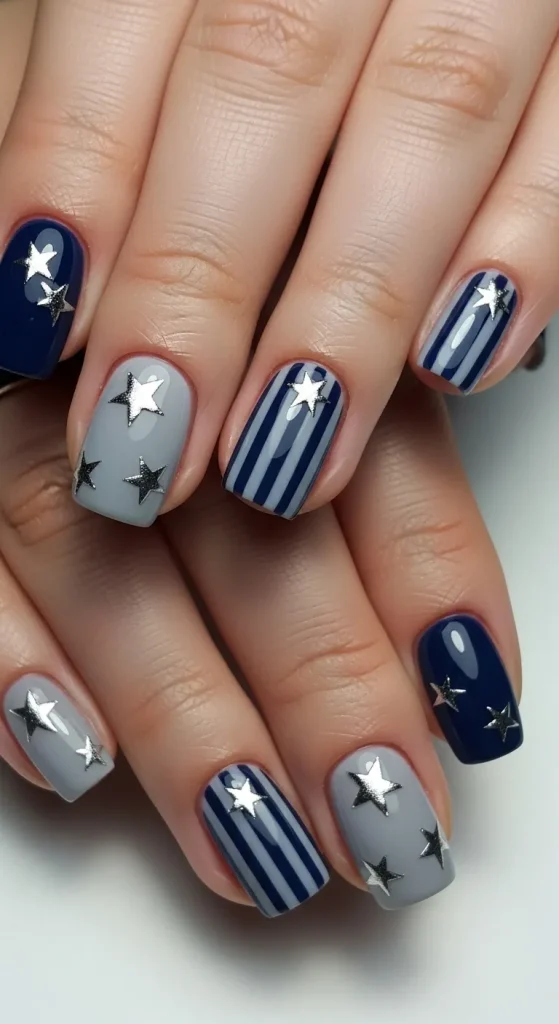
Idea 3: Navy Blue Stripes with Silver Stars
How to Make
This design introduces a darker base tone with navy blue stripes contrasted by silver star details. The overall look is bold yet controlled, making it suitable for evening styles or seasonal designs. The stripes create a structured background, while the metallic stars add brightness and contrast. This combination supports a clean aesthetic while still offering visual interest through color contrast and reflective elements.
Start with a light gray or white base coat. Use a striping brush to create navy blue lines across the nail, ensuring even thickness. Allow the stripes to dry completely before adding details. Use a silver polish or metallic pen to draw small stars along the stripes or at intersections. Keep the stars evenly spaced for a balanced look. Apply a top coat to enhance shine and durability. This execution process ensures clarity in design and long-lasting results.
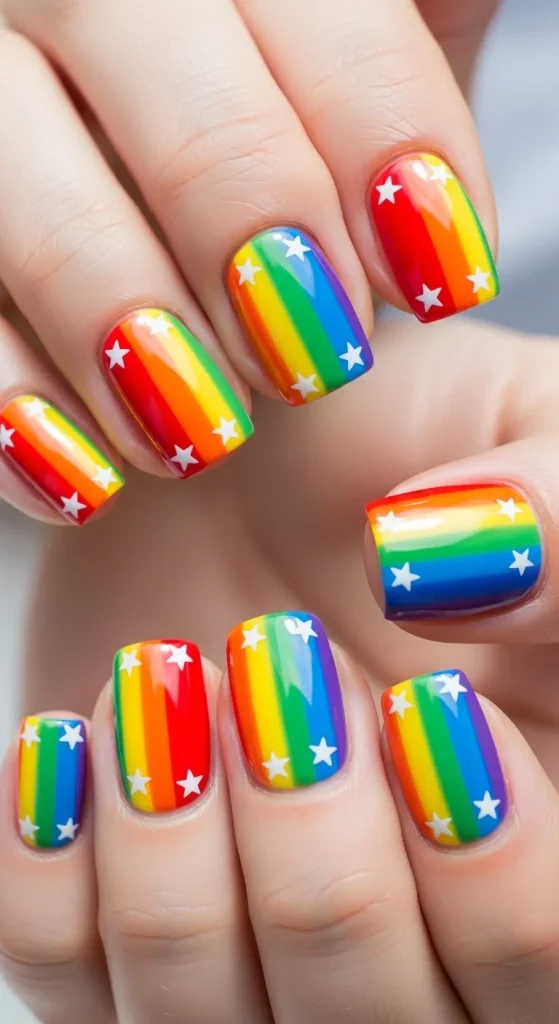
Idea 4: Rainbow Stripes with Tiny White Stars
Execution Process
This creative idea focuses on vibrant rainbow stripes combined with subtle white stars. The design uses multiple colors arranged in thin lines to create a gradient-like effect. The addition of small white stars softens the boldness of the colors and introduces a playful element. This design fits well within creative project categories and is often used for expressive and colorful nail art inspiration.
Apply a neutral base coat to allow colors to stand out. Using a thin brush, paint narrow stripes in rainbow order across each nail. Keep the lines consistent and evenly spaced. Once dry, use a fine tool to add tiny white stars across the surface. Distribute them evenly to avoid clustering. Finish with a clear top coat. This step by step tutorial emphasizes control and patience, making it suitable for beginners who want to experiment with color.
Idea 5: Horizontal Stripes with Center Star Accent
Setup Method
This design uses horizontal stripes as the main pattern, with a single star placed at the center of each nail. The stripes create a layered look, while the centered star becomes the focal point. This layout supports organization and symmetry, making it visually structured and easy to replicate. It works well with both bold and neutral color combinations.
Begin with a base color of your choice. Paint horizontal stripes using contrasting colors, ensuring clean edges. Allow each stripe to dry before proceeding. Once complete, place a star in the center using a fine brush or nail sticker. Keep the size consistent across all nails. Apply a top coat to secure the design. This method simplifies the process while maintaining a strong visual impact.

Idea 6: Diagonal Stripes with Scattered Stars
How to Create
Diagonal stripes add movement to nail designs, making them more dynamic compared to straight vertical or horizontal lines. When paired with scattered stars, the design feels less structured and more organic. This approach allows flexibility in star placement, making it ideal for beginners who prefer less rigid patterns.
Apply a base coat and let it dry. Use striping tape to guide diagonal lines, then paint over them with a contrasting color. Remove the tape carefully to reveal clean stripes. Once dry, add small stars randomly across the nail using a fine brush. Keep spacing balanced to avoid overcrowding. Finish with a top coat. This design encourages creative freedom while maintaining a cohesive appearance.

Idea 7: Matte Stripes with Glossy Star Finish
Step-by-Step Guide
This design focuses on texture contrast rather than color alone. Matte stripes provide a soft, muted base, while glossy stars create a subtle shine that stands out under light. This combination aligns with modern design trends that emphasize material variation over bold color use.
Start with a matte base polish. Paint stripes using the same or slightly darker matte shade. Once dry, use a glossy top coat or polish to draw star shapes on top of the stripes. The contrast between matte and gloss will naturally highlight the stars. Seal the design carefully to maintain texture differences. This approach is simple yet effective for achieving a refined aesthetic.

Idea 8: Neutral Stripes with Black Outline Stars
How to Make
This design uses neutral tones such as beige and taupe for stripes, combined with black outline stars for contrast. The outline style keeps the stars lightweight and prevents the design from becoming too bold. This fits well within minimalist and modern home decor inspired aesthetics.
Apply a neutral base coat and paint thin stripes using slightly darker tones. Allow them to dry completely. Use a fine black brush to outline star shapes without filling them in. Keep lines thin and consistent. Finish with a top coat to protect the design. This method focuses on precision and clean execution.
Idea 9: Glitter Stripes with Star Overlay
Execution Process
Glitter stripes introduce texture and shine, while star overlays enhance the layered effect. This design is often used for festive or statement looks. The combination of sparkle and defined shapes creates a visually engaging result without requiring complex techniques.
Start with a solid base color. Apply glitter polish in thin stripes using a brush or tape guide. Allow the glitter to set fully. Add star shapes on top using a contrasting polish. Placement should align with the stripes for consistency. Seal with a thick top coat to smooth the surface. This design emphasizes layering and careful application.

Idea 10: Monochrome Stripes with Negative Space Stars
How to Create
This design uses black and white stripes combined with negative space stars, where parts of the nail are left unpainted to form star shapes. This creates a clean and modern aesthetic that relies on contrast and precision rather than color variety.
Apply a base coat and leave sections unpainted where stars will appear. Use striping tape to create black and white lines around these areas. Carefully remove the tape to reveal clean edges. Ensure the star shapes remain clear and defined. Finish with a top coat. This method requires careful planning but produces a highly refined result.

Common Beginner Mistakes and How to Avoid Them
One common mistake is applying stripes before the base coat is fully dry, which causes smudging and uneven lines. Allowing sufficient drying time between layers prevents this issue. Another frequent problem is inconsistent stripe thickness, often caused by using too much polish on the brush. Using a thin brush and minimal polish improves control. Beginners also tend to overcrowd designs with too many stars, which reduces clarity. Limiting star placement maintains balance and supports a cleaner aesthetic.
Practical Tips for Better Results
Using striping tape can significantly improve line precision, especially for beginners. Working in thin layers ensures faster drying and reduces errors. Practicing star shapes on paper before applying them to nails helps build confidence and accuracy. Keeping tools clean during the process prevents polish buildup, which can affect detail work. These small adjustments improve overall quality and make the creative project more manageable.
Styling, Presentation, or Organization Ideas
Coordinating nail designs with outfits or seasonal themes enhances overall presentation. For example, neutral striped designs pair well with minimalist clothing styles, while colorful patterns complement casual looks. Keeping nails uniform in length and shape improves consistency. Displaying finished designs in natural lighting helps highlight details and colors effectively, which is useful for sharing Pinterest inspiration.
Budget or Time Planning
This project can be completed with a limited number of materials, making it suitable for budget ideas. Reusing tools such as brushes and tape reduces overall cost. Planning the design in advance saves time during application. Completing one hand at a time allows better focus and control. Most designs can be finished within one to two hours, depending on complexity.
Creative Expansion and Advanced Inspiration
Once basic techniques are mastered, designs can be expanded by experimenting with gradients, layered stars, or mixed textures. Adding rhinestones or combining multiple stripe directions introduces variation. Advanced users can explore asymmetrical layouts or thematic designs based on seasons or events. These creative ideas build on foundational skills and allow continuous improvement in nail art techniques.


Leave a Reply