Introduction
Air plants have become a popular subject in Pinterest ideas due to their low-maintenance nature and flexible display options. These plants do not require soil, making them ideal for creative DIY projects and modern home decor. Their adaptability allows placement in small spaces, vertical displays, and decorative arrangements.

This article explains ten practical and beginner friendly air plant display ideas. Readers will learn step by step methods, required materials, and simple planning techniques. Each idea focuses on aesthetic presentation, organization, and creative inspiration, helping transform air plants into functional and decorative elements within any living space.
Why This Idea Is Trending or Useful
Air plant display projects are trending because they combine simplicity with modern design. These plants require minimal care, making them suitable for beginners who want an easy project without complex maintenance routines. Their ability to grow without soil allows for innovative placement in areas where traditional plants cannot thrive, such as walls, glass containers, and hanging displays.
From a design perspective, air plant arrangements support minimalist style and clean aesthetics, which are widely featured in Pinterest inspiration boards. They fit easily into small apartments, workspaces, and organized interiors. DIY air plant projects also offer flexibility in budget ideas, as many displays can be created using basic materials. This accessibility makes them practical for anyone interested in creative ideas for decoration and organization without needing advanced skills.
Materials and Preparation
Before starting any air plant display project, proper preparation ensures better results and durability. Common materials include air plants, wire, glass containers, wooden boards, glue, hooks, and decorative stones. Tools such as scissors, pliers, measuring tape, and adhesive are often required depending on the design. Selecting healthy air plants is essential, as they form the foundation of the display.
Planning involves choosing the display type, location, and size. Consider lighting conditions, as air plants require indirect sunlight. Measuring the available space helps maintain balance and organization. Preparing surfaces such as walls or containers ensures stability during installation. Cleaning materials before use improves the final aesthetic. A clear step by step approach allows each project to remain structured and beginner friendly while achieving a clean and modern design.
Idea 1: Hanging Glass Orb Display
How to Create
This idea uses transparent glass orbs to create a floating visual effect. The concept focuses on minimal obstruction, allowing the natural form of the air plant to remain the central feature. Glass orbs enhance the aesthetic by reflecting light and creating depth within the space. This display works well in windows, corners, or near natural light sources, making it suitable for modern home decor and minimalist style arrangements.
To create this display, gather glass orbs with openings, air plants, and thin string or wire. Insert a small amount of decorative material such as pebbles or moss inside the orb. Carefully place the air plant so it sits securely without being compressed. Attach string or wire to the top loop of the orb and hang it from a hook or ceiling fixture. Ensure spacing between multiple orbs for visual balance. This step by step method results in an organized and clean hanging display that is easy to maintain.

Idea 2: Wooden Frame Air Plant Wall
How to Create
A wooden frame air plant wall provides structure and organization while maintaining a natural aesthetic. This idea transforms a simple frame into a vertical garden feature. The design works well for creating a focal point in living rooms or workspaces. It supports creative ideas by allowing different arrangements within a defined boundary.
Start by selecting a wooden frame and attaching wire mesh to the back. Secure the mesh using staples or small nails. Place air plants within the mesh openings, ensuring they are stable. The mesh holds the plants in position without damaging them. Mount the frame on the wall using proper hooks. This setup method creates a neat and visually balanced display that integrates well into modern design spaces.

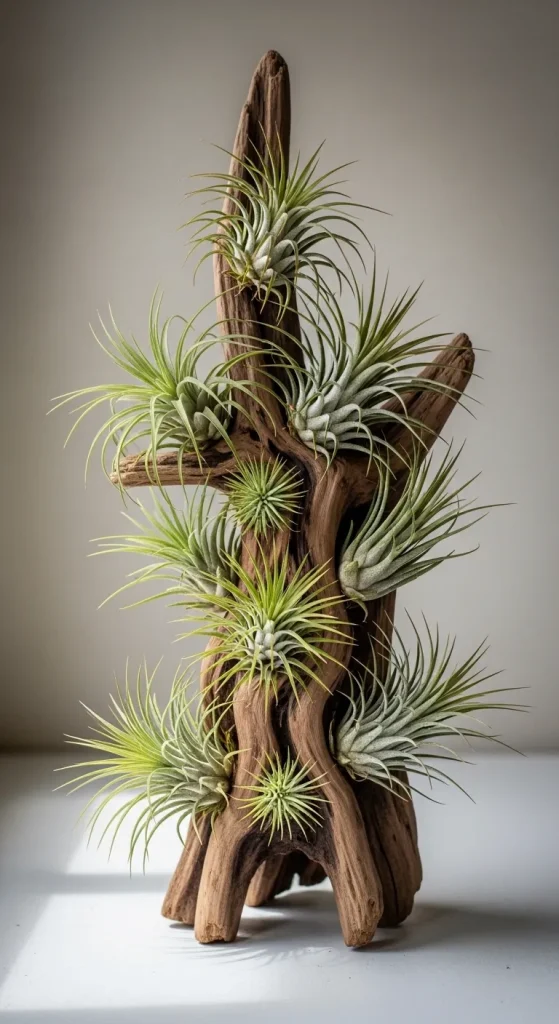
Idea 3: Driftwood Air Plant Arrangement
How to Create
Driftwood provides a natural base for displaying air plants, making it ideal for organic and aesthetic decoration. The irregular shapes of driftwood add character and variation to the display. This idea fits well into both rustic and modern interiors, offering flexible placement options.
To execute this project, select a piece of driftwood and clean it thoroughly. Position air plants along natural grooves or flat areas. Use floral wire or adhesive sparingly to secure them without restricting airflow. Arrange the plants in a balanced pattern to maintain visual harmony. This method highlights natural textures and creates a unique handmade display.
Idea 4: Magnetic Air Plant Holders
How to Create
Magnetic holders offer a compact and innovative way to display air plants on metal surfaces. This idea is ideal for small spaces and enhances organization in kitchens or offices. It combines functionality with modern design by utilizing unused vertical surfaces.
Attach small magnets to the base of lightweight holders or directly to a support piece. Place the air plant securely within the holder. Position the setup on a magnetic surface such as a refrigerator or metal board. Ensure the magnet strength supports the weight. This easy project creates a flexible display that can be rearranged as needed.

Idea 5: Hanging Macrame Air Plant Display
How to Create
Macrame designs introduce texture and softness into air plant displays. This idea blends handmade decoration with functional plant arrangement. It works well in bohemian or relaxed interior styles while remaining adaptable to modern aesthetics.
Create a simple macrame holder using cotton rope. Form knots to create a cradle that supports the air plant. Insert the plant carefully and adjust the knots to hold it securely. Hang the macrame piece from a hook or ceiling fixture. This step by step approach results in a lightweight and visually appealing display.

Idea 6: Wall-Mounted Test Tube Display
How to Create
Test tube displays offer a clean and organized way to present air plants. The transparent structure emphasizes simplicity and clarity, aligning with minimalist style. This idea is suitable for narrow spaces and modern interiors.
Attach test tubes to a wooden or metal base using holders or clips. Secure the base to the wall. Place air plants inside or at the opening of the tubes without overcrowding. Ensure proper spacing for airflow. This setup method creates a structured and balanced display.

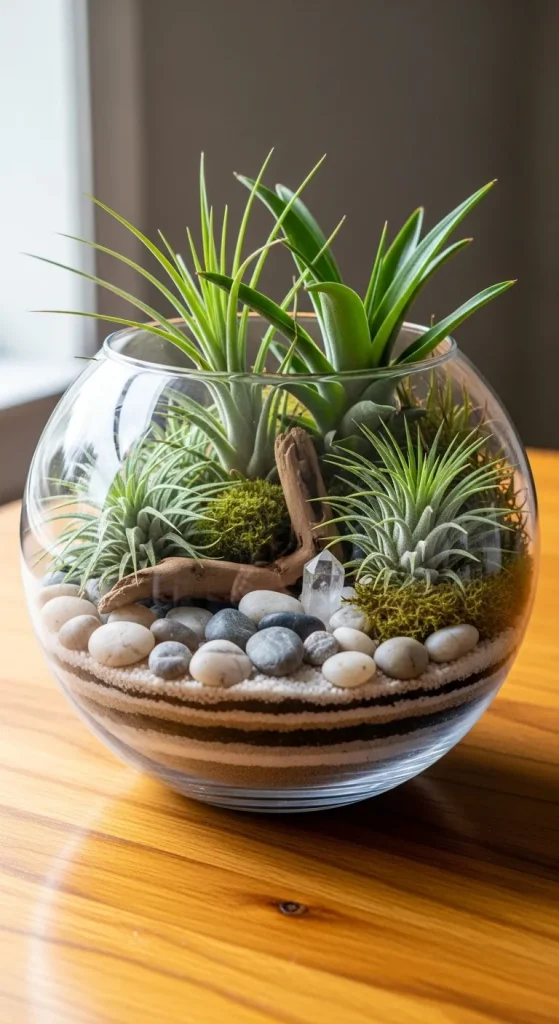
Idea 7: Air Plant Terrarium Bowl
How to Create
A terrarium bowl provides a contained environment for air plant decoration. This idea combines elements such as stones, sand, and small accents to create a layered aesthetic. It serves as a central decorative piece.
Choose a wide glass bowl and add layers of sand and stones. Position air plants on top without burying them. Arrange decorative elements around the plants to enhance the design. This method creates a stable and visually detailed arrangement.
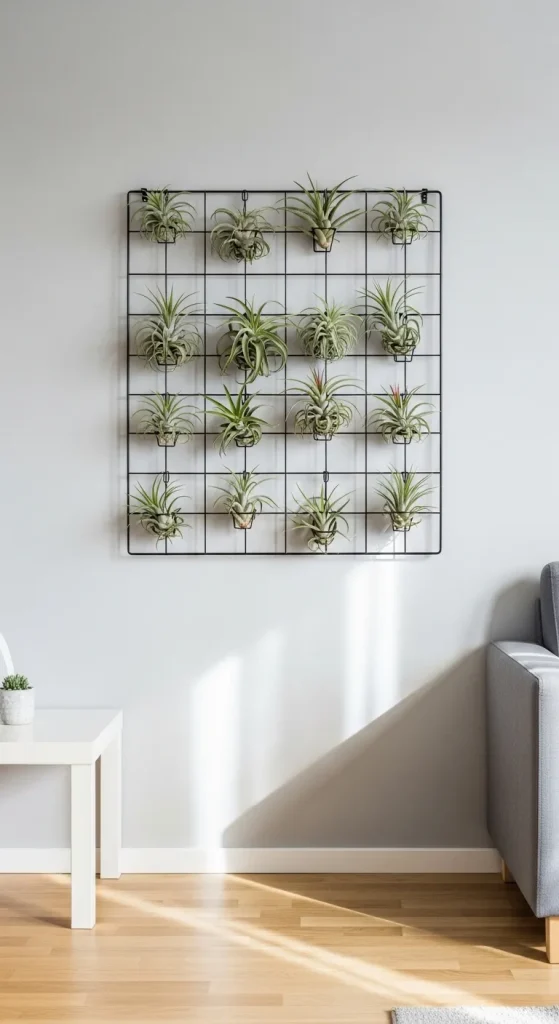
Idea 8: Vertical Hanging Wire Grid
How to Create
Wire grids offer a versatile structure for displaying multiple air plants. This idea supports organization and customization, allowing different layouts based on preference. It works well for creating a feature wall.
Mount a wire grid on the wall using hooks. Attach air plants using clips or wire. Arrange them in a pattern that maintains balance and spacing. This execution process results in a flexible and adjustable display.
Idea 9: Shell and Air Plant Combo Display
How to Create
Combining shells with air plants creates a coastal-inspired decoration. This idea uses natural elements to produce a themed aesthetic suitable for relaxed interiors. It adds variation to standard display methods.
Select large shells and clean them thoroughly. Place air plants inside the shells and secure lightly if needed. Arrange the shells on a flat surface or mount them on a board. This setup method creates a simple yet distinctive display.

Idea 10: Minimalist Floating Shelf Display
How to Create
Floating shelves provide a structured way to organize air plants while maintaining a clean appearance. This idea supports modern design and efficient use of space. It allows grouping of plants with other decorative items.
Install floating shelves on the wall using brackets. Place air plants along the shelf with adequate spacing. Combine with small decorative elements to enhance presentation. This step by step method creates a balanced and organized display.

Common Beginner Mistakes and How to Avoid Them
One common mistake is overcrowding air plants, which restricts airflow and affects their health. Proper spacing ensures each plant receives adequate light and ventilation. Another issue is placing displays in areas with insufficient lighting. Air plants require indirect sunlight, so selecting the right location is essential. Using excessive adhesive can also damage plants, so minimal support methods should be used.
Beginners may also overlook regular maintenance, such as watering routines. Even though air plants are low maintenance, they still require consistent care. Ignoring planning steps can result in unstable displays. Measuring space and preparing materials beforehand helps avoid these issues. Following a structured tutorial approach improves both the visual outcome and functionality of the project.
Practical Tips for Better Results
Maintaining consistency in design improves the overall aesthetic of air plant displays. Using similar materials or color tones creates a cohesive look. Testing the arrangement before final installation allows adjustments without difficulty. This approach helps refine the layout and ensures balance.
Cleaning materials before assembly enhances the final appearance. Using lightweight components reduces strain on hanging structures. Regularly rotating air plants ensures even exposure to light. Keeping tools organized during the process improves efficiency. These practical tips support better results and make each creative project more effective.
Styling, Presentation, or Organization Ideas
Styling air plant displays involves balancing visual elements such as shape, size, and spacing. Grouping plants in odd numbers often creates a more natural arrangement. Combining different textures, such as wood and glass, adds depth to the presentation.
Organizing displays based on location improves functionality. For example, vertical setups work well in small spaces, while tabletop arrangements suit larger areas. Maintaining a consistent theme, such as minimalist or natural style, enhances the overall look. Proper styling transforms simple arrangements into visually appealing home decor features.
Budget or Time Planning
Air plant display projects can be completed efficiently with proper planning. Many materials, such as wood pieces or containers, can be repurposed to reduce costs. Selecting simple designs helps complete projects within a short time frame.
Breaking the process into steps improves time management. Preparing materials in advance avoids delays during assembly. Choosing beginner friendly ideas reduces the need for specialized tools. Budget ideas can be implemented by focusing on essential components while avoiding unnecessary additions. This structured approach ensures the project remains practical and accessible.
Creative Expansion and Advanced Inspiration
Once basic displays are completed, more advanced variations can be explored. Combining multiple display methods, such as wall grids with hanging elements, creates layered designs. Experimenting with different materials introduces variety and enhances creativity.
Advanced inspiration can include integrating lighting elements to highlight air plants. Creating themed arrangements based on seasons or interior styles adds uniqueness. Expanding projects into larger installations transforms simple decoration into a complete design feature. Continuous experimentation supports growth in DIY skills and opens new possibilities for creative ideas.
Leave a Reply