Introduction
Creating an outdoor play area for kids is a practical way to support active play, creativity, and healthy routines. This Pinterest-inspired guide explains how to design a safe and engaging space using simple materials, clear planning, and beginner friendly DIY methods that fit different home environments and budgets.

This article presents structured ideas, step by step methods, and creative inspiration for building outdoor play zones. Readers will learn how to organize space, choose suitable materials, and apply modern design principles. Each idea focuses on functionality, safety, and aesthetic value for a balanced and useful play area.
Why This Idea Is Trending or Useful
Outdoor play areas for kids are widely shared as Pinterest ideas because they combine creativity, home decor, and practical benefits. Parents and caregivers are increasingly focusing on outdoor environments that support physical activity, reduce screen time, and improve overall well-being. A dedicated play space allows children to explore movement, imagination, and social interaction in a controlled setting. This makes the concept both functional and visually appealing for modern households.
The DIY aspect adds strong appeal because many of these setups can be built using accessible materials and simple tools. This makes the project suitable for beginners who want an easy project with long-term value. The use of minimalist style layouts, natural textures, and organized zones aligns with current design trends. These outdoor spaces also allow flexible planning, meaning they can be adapted for small backyards, patios, or larger gardens without requiring complex construction.
Materials and Preparation
Preparing for an outdoor play area requires careful planning to ensure safety, durability, and usability. Common materials include wood, sand, rubber mats, ropes, plastic containers, and weather-resistant fabrics. Basic tools such as a drill, hammer, measuring tape, and level are typically sufficient for most DIY setups. Selecting non-toxic and weather-resistant materials is essential to maintain a safe environment for children over time.
Planning begins with measuring the available space and dividing it into functional zones such as active play, quiet play, and storage. Ground preparation is important, and soft surfaces like grass, foam mats, or sand help reduce injury risks. Consider shade placement to protect children from direct sunlight. Clear organization of materials before starting helps streamline the process. A simple layout sketch can guide placement and ensure efficient use of space while maintaining a clean and modern design.
Idea 1: Backyard Mini Playground Zone
How to Create
A backyard mini playground is a structured play area that combines multiple elements such as slides, swings, and climbing sections in one compact space. This setup focuses on active movement and coordination. It works well for families looking to create a central play hub that supports physical development. The design can follow a minimalist style by keeping shapes simple and using neutral or natural colors for a clean aesthetic.
To create this setup, start by defining a safe boundary using mats or grass. Install a small slide and a sturdy swing frame using treated wood or metal. Ensure all parts are securely fixed and tested for stability. Add a soft landing surface under each structure. Position elements with enough spacing to avoid overlap. This step by step process ensures safety while maintaining an organized and functional layout.

Idea 2: Sand Play Corner
Step-by-Step Guide
A sand play corner provides sensory engagement and encourages imaginative play. It is a simple yet effective outdoor addition that supports creativity through digging, shaping, and building. This idea fits well into small spaces and can be designed using a contained wooden frame to maintain organization and cleanliness.
To build this, construct a square or rectangular wooden box and line it with a protective sheet before adding clean play sand. Place it in a shaded area to maintain comfort during use. Add basic tools such as buckets and shovels. Ensure the edges are smooth and safe. Regularly clean and cover the sand area when not in use to maintain hygiene and usability.

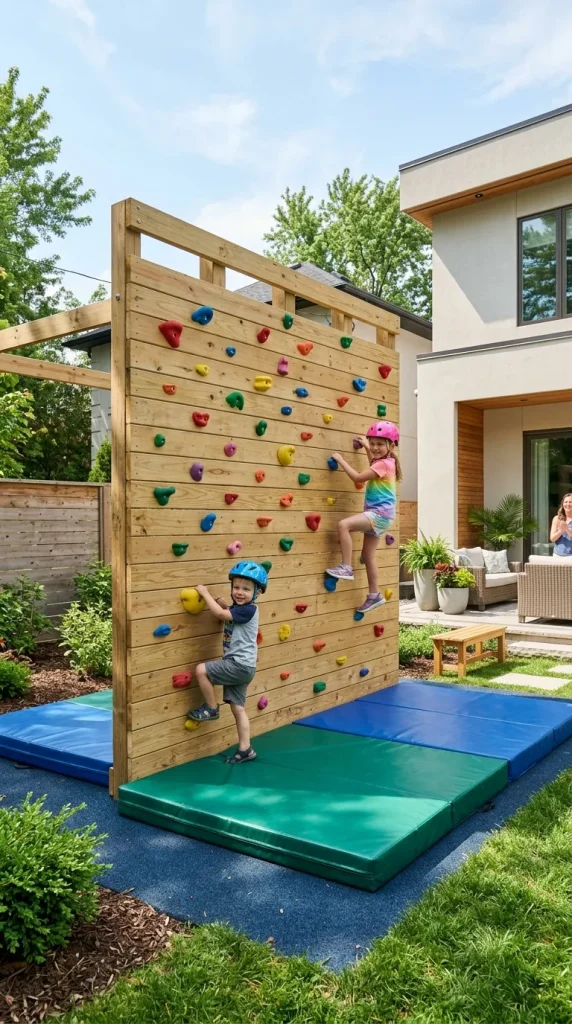
Idea 3: DIY Climbing Wall
How to Make
A DIY climbing wall encourages strength, balance, and problem-solving. It is a vertical play feature that maximizes space efficiency. This design works well for modern outdoor setups where space may be limited but activity variety is needed. The structure can be attached to an existing wall or built as a standalone panel.
To construct it, use a strong wooden board secured to a frame. Attach climbing holds evenly across the surface. Ensure all bolts are tightly fixed and safe for use. Place soft mats below the wall for safety. Start with a lower height for beginners and adjust difficulty over time. This setup method ensures a controlled and progressive play experience.
Idea 4: Outdoor Art Station
Setup Method
An outdoor art station supports creativity and quiet play. It provides a designated space for drawing, painting, and craft activities. This idea integrates well into home decor by using simple tables and storage solutions that maintain organization and accessibility.
Set up a weather-resistant table with seating. Use containers to organize art supplies such as paper, brushes, and colors. Position the station in a shaded area to protect materials. Install a board or wall panel for vertical drawing. Clean surfaces regularly and store items properly to maintain usability and safety.

Idea 5: Water Play Area
Execution Process
A water play area introduces sensory exploration and interactive fun. It is especially useful during warm weather and can be designed using simple containers and flow systems. This idea enhances engagement while remaining easy to manage.
Create this setup using tubs, buckets, and a small water table. Ensure proper drainage to prevent water accumulation. Use non-slip surfaces around the area. Supervise usage to maintain safety. This step by step setup ensures controlled play and easy maintenance.

Idea 6: Nature Exploration Zone
How to Create
A nature exploration zone introduces children to natural elements such as plants, soil, and small insects. It promotes observation and curiosity. This idea fits well into garden spaces and supports educational play.
Design this area with small garden beds, stones, and logs. Provide simple tools for digging and planting. Label plants for learning purposes. Maintain cleanliness and remove harmful elements. This setup encourages interaction with nature in a structured way.

Idea 7: Tire Obstacle Course
Step-by-Step Guide
A tire obstacle course supports physical activity and coordination. It uses recycled materials to create an engaging and eco-friendly play solution. This aligns with budget ideas and sustainable DIY practices.
Arrange tires in patterns such as lines or circles. Secure them partially into the ground for stability. Ensure spacing is safe and consistent. Add soft ground covering. This method creates a durable and interactive play path.

Idea 8: Outdoor Reading Nook
How to Make
An outdoor reading nook offers a quiet space for relaxation and learning. It balances active play areas by providing a calm zone. This idea supports organization and structured use of space.
Use a small bench or cushions under a shaded structure. Add storage for books in waterproof containers. Ensure comfort with soft materials. Keep the area clean and organized. This setup creates a peaceful environment within the play area.

Idea 9: Chalk Drawing Zone
Setup Method
A chalk drawing zone encourages creativity and expression. It is a simple and low-cost addition that works well on patios or paved areas. This idea is easy to maintain and adaptable.
Designate a flat surface for drawing. Provide washable chalk and basic tools. Clean the area regularly to refresh the space. Ensure the surface is safe and free from hazards. This setup allows repeated use without permanent changes.

Idea 10: Balance Beam Path
Execution Process
A balance beam path improves coordination and focus. It is a structured play feature that can be easily built using wood or logs. This idea fits both small and large spaces.
Place beams securely on the ground with even spacing. Ensure stability and smooth edges. Add soft ground material around the path. Guide children on safe use. This step by step setup ensures functionality and safety.

Common Beginner Mistakes and How to Avoid Them
One common mistake is overcrowding the play area with too many elements, which reduces safety and usability. Maintaining clear spacing between features ensures smooth movement and reduces risk. Another issue is using unsuitable materials that may not withstand weather conditions. Selecting durable and non-toxic materials is essential for long-term use. Poor planning can also lead to inefficient layouts, making the area difficult to navigate.
Ignoring safety surfaces is another frequent problem. Hard ground increases the risk of injury, so adding soft materials like mats or sand is necessary. Lack of maintenance can also affect usability, as worn-out components may become unsafe. Regular inspection and cleaning help maintain quality. Proper planning, correct material selection, and consistent maintenance prevent these common issues.
Practical Tips for Better Results
Using a clear layout plan improves organization and ensures each play element has a defined purpose. Keeping the design simple enhances both safety and visual appeal. Choosing neutral tones and natural materials supports a modern design aesthetic. This approach also makes the space adaptable over time.
Regular maintenance is important for long-term usability. Clean surfaces, check structures, and replace worn materials as needed. Rotating play elements occasionally keeps the area engaging. Labeling storage containers improves organization. These practical steps help maintain a functional and appealing outdoor play area.
Styling, Presentation, or Organization Ideas
Styling an outdoor play area involves balancing function and visual appeal. Use consistent color schemes to create a cohesive look. Arrange play elements in zones to maintain organization. This improves usability and makes the space visually structured.
Adding simple decorative elements such as flags or painted surfaces enhances the aesthetic without complicating the design. Storage solutions should be integrated to keep materials organized. Clean layouts and minimal clutter support a modern and minimalist style. Proper presentation improves both usability and overall appearance.
Budget or Time Planning
Planning a budget helps control costs and ensures efficient use of resources. Start with essential elements and expand gradually. Using recycled or repurposed materials reduces expenses while maintaining functionality. This approach supports budget ideas without compromising quality.
Time planning is equally important. Break the project into smaller steps and complete one section at a time. This step by step method simplifies the process and reduces workload. Prioritizing key features ensures the play area becomes usable जल्दी while allowing future improvements.
Creative Expansion and Advanced Inspiration
Once the basic play area is complete, additional features can be introduced to enhance engagement. Multi-level structures, themed zones, or interactive elements can expand the space. These creative ideas add variety and maintain long-term interest.
Advanced inspiration includes combining educational features such as number games or activity boards. Integrating lighting allows use during evening hours. Modular designs enable easy upgrades over time. This approach supports continuous improvement while maintaining a structured and organized outdoor environment.

Leave a Reply