
Introduction
Seashell wall art is a beautiful way to bring the relaxed character of the coast into your home. Whether you collect shells from beach trips or purchase decorative shells from a craft store, these natural treasures can be transformed into creative wall decorations with surprisingly simple materials. From elegant shell frames to coastal-inspired wall panels, DIY seashell artwork can suit many different decorating styles.
One of the best things about seashell crafts is their natural variation. Every shell has its own shape, texture, color, and pattern, which means even a simple project can look unique. White shells create a clean coastal aesthetic, while cream, beige, blush, tan, and pearly shells can create a softer and more sophisticated appearance. You can also combine shells with driftwood, jute, rope, beads, dried flowers, mirrors, canvas, or natural wood for additional texture.
When creating 10 DIY seashell wall art ideas, it is helpful to think about the room where the artwork will be displayed. A large shell-covered canvas can become a statement piece above a sofa, while a smaller shell frame may look beautiful in a bedroom, bathroom, entryway, or gallery wall. Seashell art can also work particularly well in beach houses, coastal interiors, boho rooms, summer-inspired spaces, and organic modern homes.
The key to successful seashell wall decor is balance. You do not necessarily need to cover every inch of a project with shells. Leaving some negative space can make the finished artwork look more elegant. Similarly, arranging shells by size and shape rather than placing them randomly can create a more intentional composition.
The following ideas range from simple beginner-friendly crafts to more elaborate statement pieces. Each project can be customized according to your preferred colors, shell collection, room size, and decorating style.
1. DIY Seashell Flower Wall Art
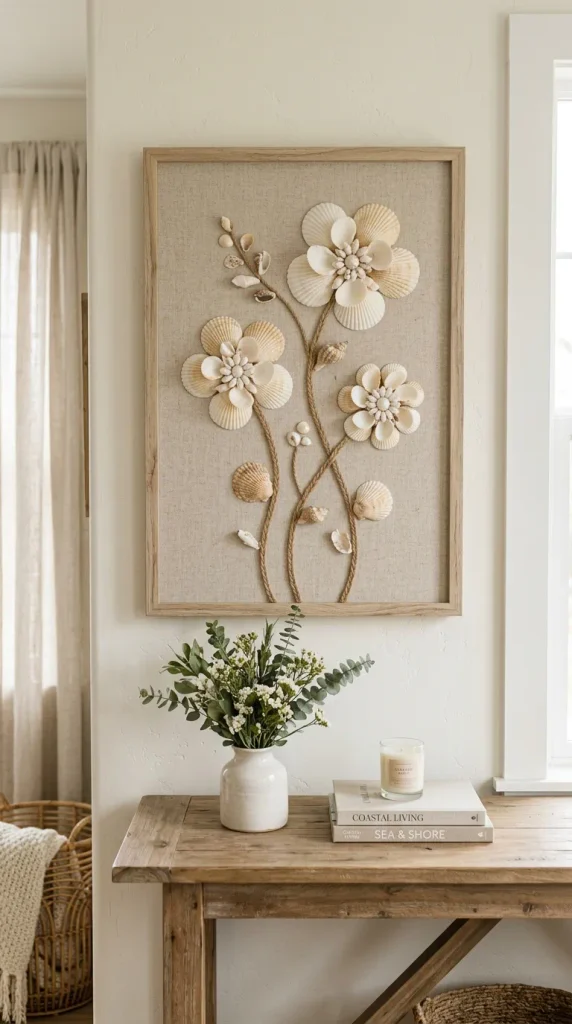
Creating flowers from seashells is one of the prettiest ways to turn simple beach finds into decorative artwork. The natural curves of shells make them ideal for forming petals, while smaller shells or beads can become the centers of the flowers.
Begin with a blank canvas or wooden board as your base. Before attaching anything, arrange the shells on the surface to determine the flower shapes and overall composition. Larger shells can form the outer petals, while smaller shells can be positioned toward the center.
For a soft coastal look, keep the shells in natural shades of white, cream, ivory, and beige. If you want a more colorful piece, introduce pale blue, blush, lavender, or soft green accents.
You can create one large seashell flower as a focal point or several smaller flowers arranged across the canvas. Add thin stems using jute rope, painted lines, or small pieces of driftwood. The background can remain white for a minimalist appearance or be painted in a muted coastal color.
Materials Used
- Blank canvas or wooden board
- Assorted seashells
- Strong craft adhesive
- Small beads or pearls
- Acrylic paint
- Jute rope
- Paintbrushes
- Pencil
- Hanging hardware
How to Make It
Arrange the shells into flower shapes first. Once you are satisfied with the composition, attach each shell carefully using a suitable craft adhesive. Allow everything to dry completely before adding stems or decorative details.
Styling Tip
Create three to five flowers in different sizes rather than making every flower identical. The variation will make the artwork feel more natural and artistic.
2. Seashell Mirror Wall Art
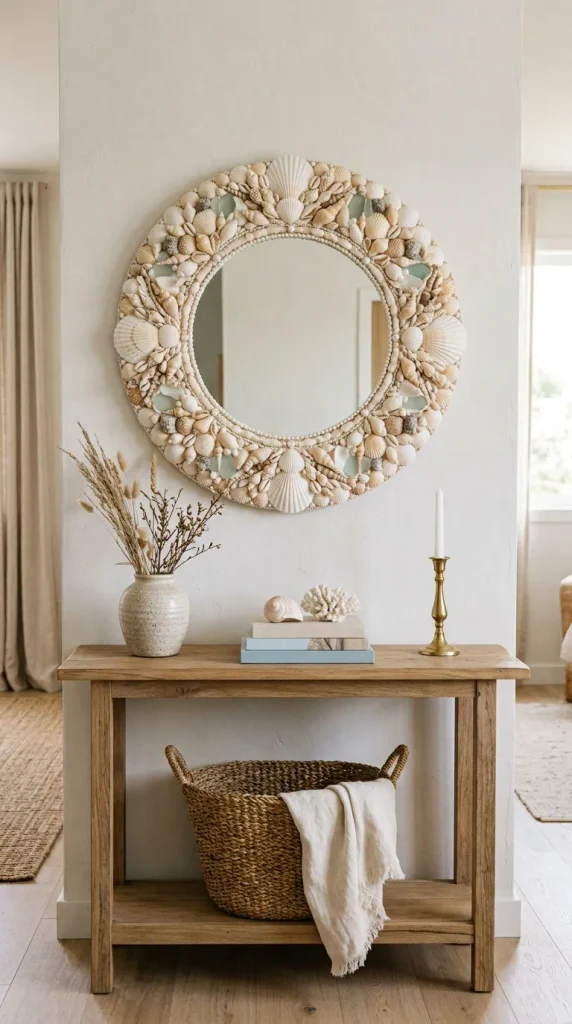
A seashell mirror combines practical function with decorative coastal style. By decorating the frame of a plain mirror with shells, you can turn an inexpensive basic piece into a beautiful statement accessory.
Choose a mirror with a relatively simple frame. A round mirror is particularly effective because the circular shape works naturally with shells arranged around the perimeter. However, rectangular, oval, and irregular mirrors can also work.
Before gluing the shells, lay them around the frame and experiment with different arrangements. Larger shells can be placed at intervals, while smaller shells can fill gaps between them. You can create a dense shell frame for a dramatic look or leave portions of the original frame visible for a more minimalist effect.
For a sophisticated appearance, combine shells with small pearls, natural beads, or tiny pieces of driftwood. Avoid using too many different colors because the natural shell tones already provide plenty of visual texture.
Materials Used
- Plain framed mirror
- Assorted seashells
- Strong adhesive
- Pearls or decorative beads
- Small pieces of driftwood
- Soft cloth
- Hanging hardware
How to Make It
Clean the mirror frame thoroughly. Arrange the shells before applying adhesive, then attach them gradually around the frame. Allow each section to dry before moving the mirror.
Styling Tip
A seashell mirror looks especially beautiful above a coastal console table, bathroom vanity, bedroom dresser, or entryway table.
3. DIY Seashell Mermaid Wall Art
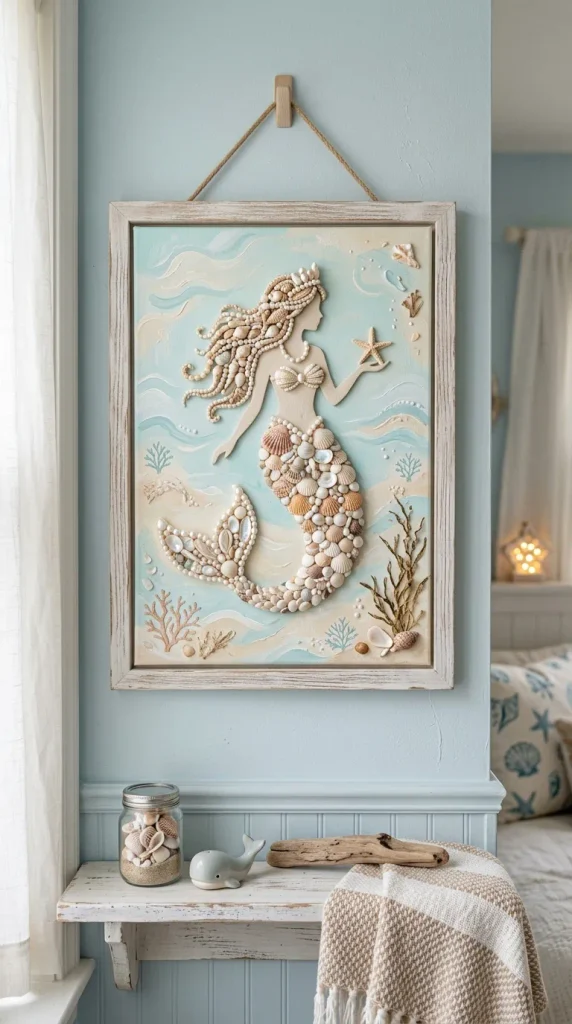
For a playful and whimsical project, create a mermaid-inspired seashell artwork. This idea is particularly suitable for bedrooms, children’s spaces, beach-themed rooms, or anyone who loves fantasy-inspired coastal decor.
Begin with a canvas or wooden panel. Sketch a simple mermaid silhouette or use a decorative template. Seashells can then be incorporated into the mermaid’s tail, hair, clothing, or surrounding ocean-inspired elements.
Small shells can create the scales of the tail, while larger shells can decorate the hair or background. Pearls and beads can provide additional sparkle.
Use a soft coastal palette of ivory, pearl white, pale blue, aqua, sandy beige, and muted lavender. If the artwork is intended for a child’s room, brighter colors can also be incorporated.
Materials Used
- Canvas or wood panel
- Assorted shells
- Pearls and beads
- Acrylic paints
- Strong craft adhesive
- Pencil
- Paintbrushes
- Decorative glitter if desired
How to Make It
Sketch your design lightly on the canvas. Paint the background and major elements first. Once the paint is completely dry, begin attaching shells to the mermaid’s tail and other decorative areas.
Styling Tip
Instead of covering the entire canvas with shells, use them selectively. This creates a more artistic composition and keeps the mermaid figure recognizable.
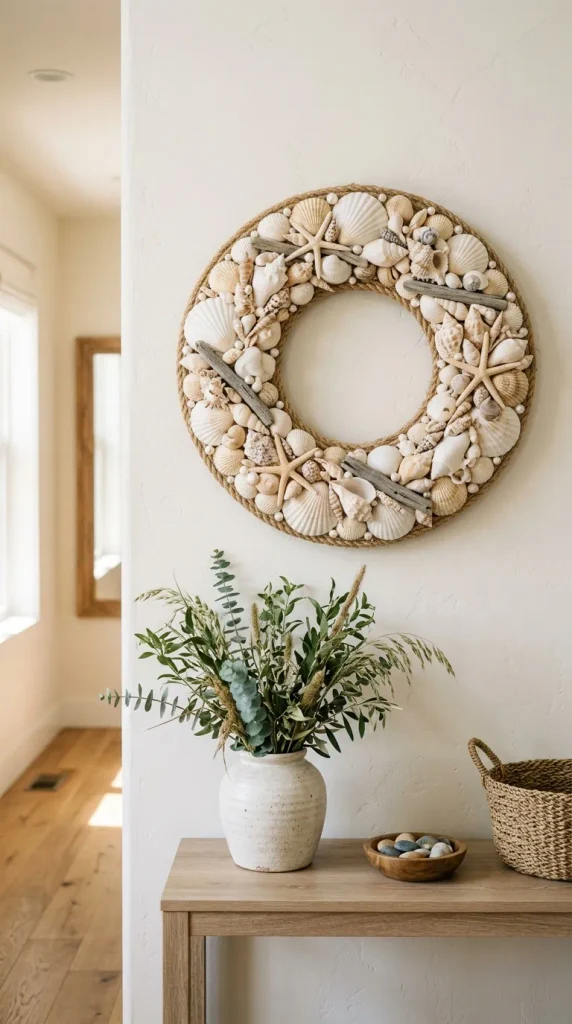
4. Seashell Coastal Wreath Wall Decor
A seashell wreath is a simple project that can create a beautiful coastal focal point. Unlike traditional seasonal wreaths, a shell wreath can remain on display throughout the year.
Start with a circular wreath base made from foam, grapevine, cardboard, or another suitable craft material. Cover the base with natural rope, jute, fabric, or a neutral material depending on your preferred style.
Arrange shells around the wreath, starting with the larger pieces. Fill smaller spaces with tiny shells, beads, starfish-shaped decorations, or pieces of driftwood.
You can create a dense shell arrangement for a bold statement or concentrate shells around one section of the wreath for a more contemporary look.
Materials Used
- Wreath base
- Seashell collection
- Jute rope
- Craft adhesive
- Small beads
- Decorative starfish
- Driftwood
- Ribbon or hanging rope
How to Make It
Wrap the wreath base if desired, then arrange your shells around the surface. Attach the largest pieces first and use smaller shells to fill the gaps.
Styling Tip
Hang the wreath on a plain white, cream, or light blue wall where the natural shell colors can stand out.
5. DIY Seashell Beach Scene Canvas
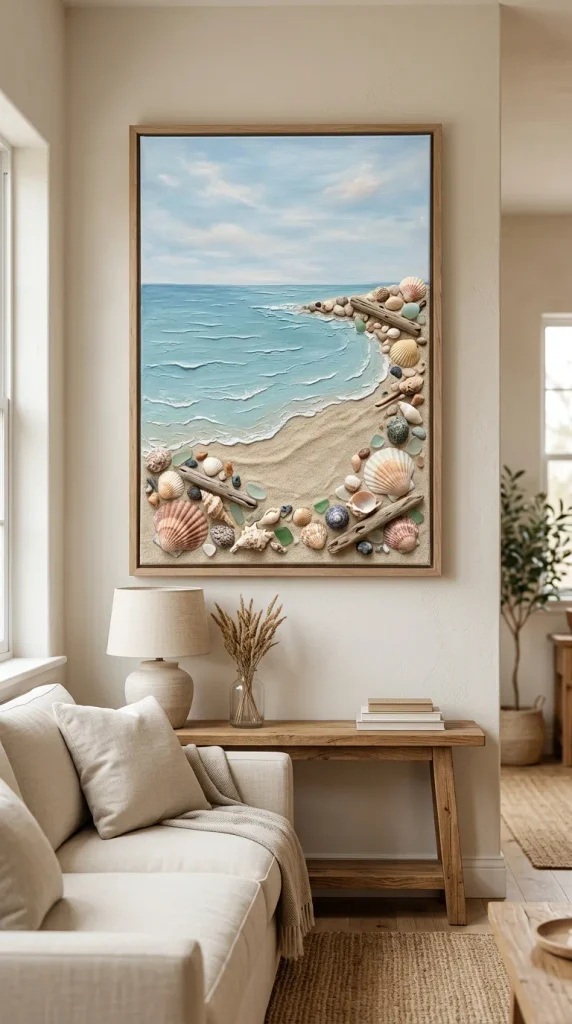
Create a miniature beach scene using seashells, sand, driftwood, and natural materials. This project allows you to create a three-dimensional coastal landscape that feels like a small piece of the beach displayed inside your home.
Start with a canvas or wooden board. Paint a simple background representing the sky and ocean. You can use soft blue, turquoise, cream, and sandy beige tones.
Once the paint dries, create a beach area using fine decorative sand. Add shells along the shoreline and use small pieces of driftwood to represent branches or beach debris.
You can create waves with textured paint or subtle white accents. A few larger shells can become the main focal points.
Materials Used
- Canvas or wood panel
- Seashells
- Decorative sand
- Driftwood
- Acrylic paints
- Paintbrushes
- Strong adhesive
- Textured medium
How to Make It
Paint the background in horizontal sections to create sky, water, and sand. Once dry, add decorative sand and attach shells and driftwood to create depth.
Styling Tip
Use subtle colors rather than extremely bright blues if you want the artwork to complement sophisticated coastal interiors.
6. DIY Seashell Letter Wall Art
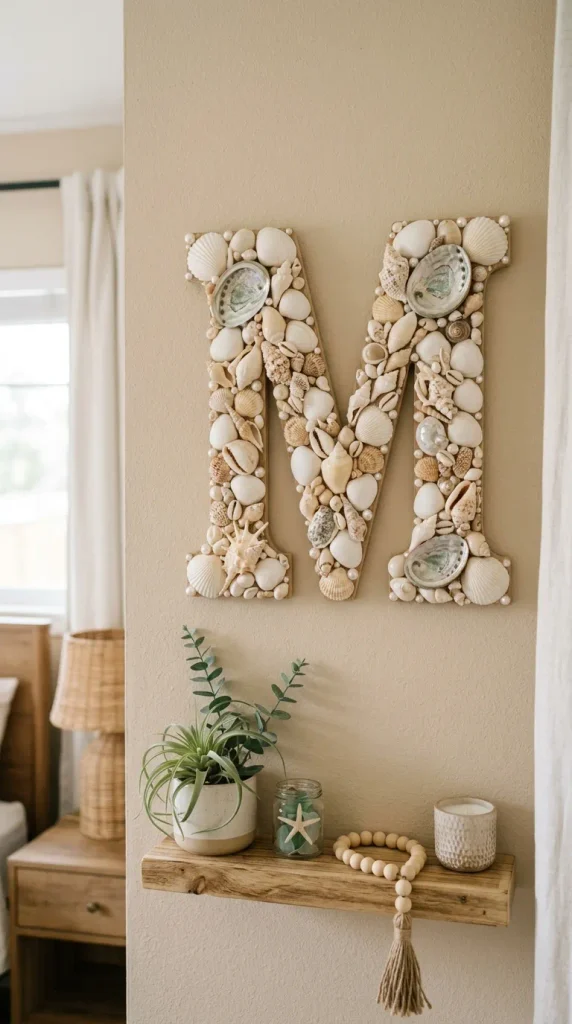
Personalized wall art is always a wonderful decorating idea, and seashells can turn a simple initial or word into a beautiful coastal statement.
Choose a large wooden letter or create one from sturdy cardboard. Paint the base white, cream, beige, or a color that matches your room.
Arrange shells across the letter. You can completely cover the surface for a dramatic appearance or create a more open design where sections of the painted background remain visible.
This project works especially well for bedrooms, nurseries, vacation homes, beach houses, and entryways. You can create a single initial or spell out a short word such as “SEA,” “HOME,” or “LOVE.”
Materials Used
- Wooden or cardboard letter
- Seashells
- Craft adhesive
- Acrylic paint
- Small pearls
- Decorative beads
- Hanging hardware
How to Make It
Paint the letter and allow it to dry completely. Arrange the shells according to size, then attach them from the largest pieces to the smallest.
Styling Tip
For a sophisticated look, use shells in one color family. White, ivory, cream, and pearl tones create an elegant monochromatic effect.
7. Seashell Sunburst Wall Art
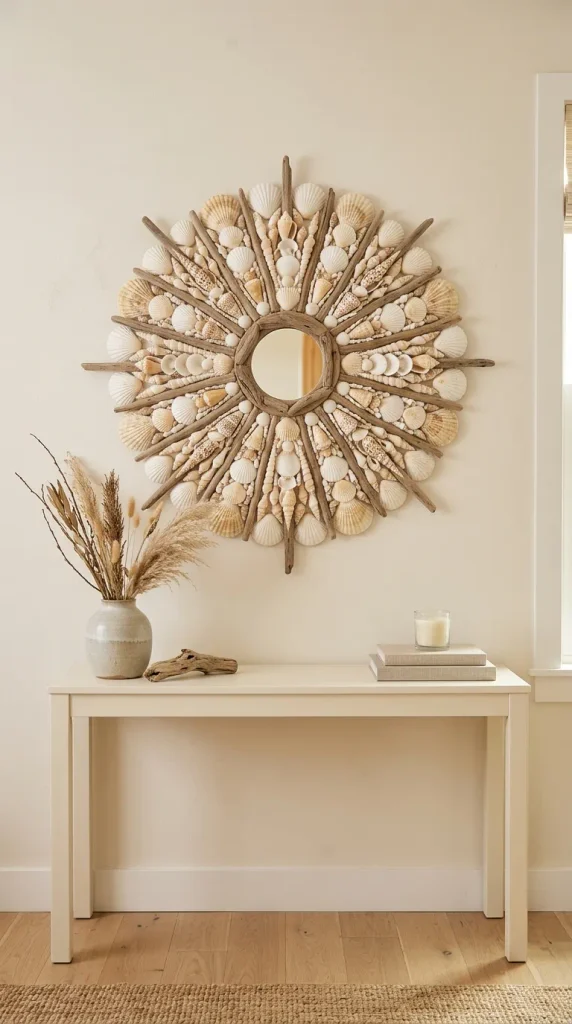
A sunburst design can turn seashells into a dramatic piece of coastal wall decor. This project works particularly well above beds, consoles, sofas, or dining room furniture.
Start with a circular center, such as a wooden disk or small mirror. Arrange shells around it in radiating lines to create the appearance of sun rays.
Longer shells can be used as the primary rays, while smaller shells can fill gaps and create additional layers. You can also incorporate pieces of driftwood or natural wooden sticks.
Keep the center relatively simple so the radiating pattern remains clear.
Materials Used
- Wooden circular base
- Assorted shells
- Small mirror or decorative center
- Driftwood pieces
- Strong adhesive
- Paint
- Hanging hardware
How to Make It
Paint the base if necessary. Mark the center point and begin arranging shells outward in evenly spaced sections. Attach each piece carefully and allow the entire artwork to dry before hanging.
Styling Tip
The sunburst design looks best when displayed alone on a relatively empty wall. Give it enough space to become the focal point.
8. DIY Seashell and Driftwood Wall Hanging
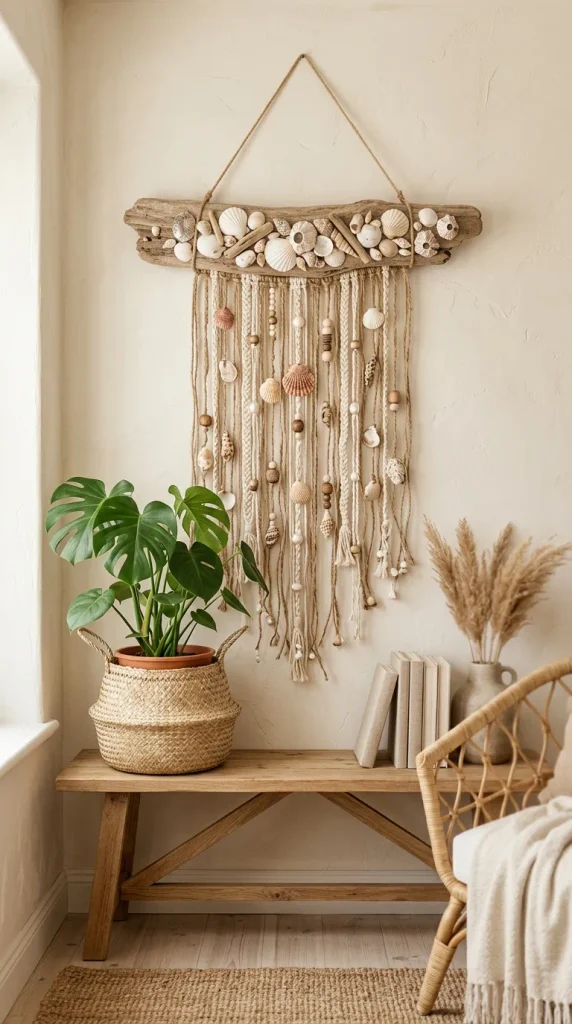
Combining seashells with driftwood creates a naturally textured wall hanging that feels relaxed and beach-inspired. This project is particularly suited to boho, coastal, rustic, and organic interiors.
Find a piece of driftwood with an interesting natural shape. Clean it gently and allow it to dry completely. Attach shells to sections of the wood using strong adhesive.
You can also hang additional shells beneath the driftwood using jute, cotton cord, or natural twine. This creates movement and gives the artwork a beautiful three-dimensional quality.
Add wooden beads, pearls, small knots, or decorative rope for additional texture.
Materials Used
- Driftwood
- Seashells
- Jute or cotton cord
- Wooden beads
- Pearls
- Strong adhesive
- Scissors
- Hanging hardware
How to Make It
Arrange the shells across the driftwood before attaching them. Tie several strands of cord beneath the wood at different lengths and attach shells to the ends.
Styling Tip
Hang the piece where natural airflow can gently move the hanging shells and cords, creating a relaxed coastal feeling.
9. Elegant Seashell Gallery Wall
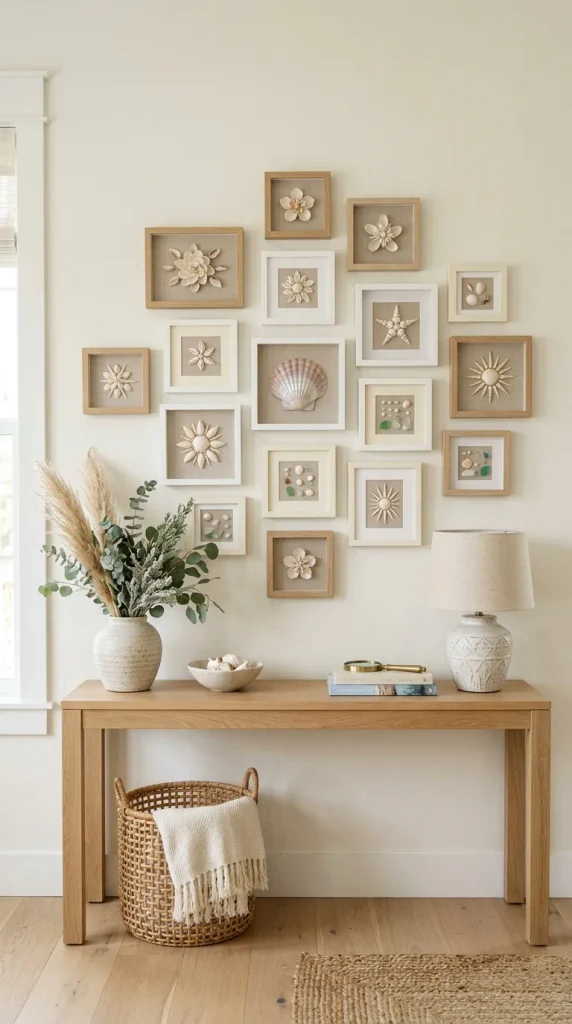
Instead of creating one large artwork, create a collection of smaller seashell pieces to form a coastal gallery wall. This approach allows you to combine different shapes, colors, and designs while maintaining an overall theme.
Use small canvases, shadow boxes, wooden plaques, or decorative frames. Each piece can feature a different shell arrangement.
For example, one frame could contain a single large shell, another could feature a shell flower, while another could display shells arranged in a geometric pattern. You can also include small coastal prints between the shell artworks.
Choose frames in similar finishes to maintain cohesion. Natural wood, white, cream, or light gold frames can work beautifully.
Materials Used
- Small frames
- Mini canvases
- Shadow boxes
- Seashells
- Adhesive
- Coastal artwork
- Natural wood elements
- Hanging hardware
How to Make It
Create each artwork individually, then arrange the finished pieces on the floor before mounting them. Experiment with spacing until you find a balanced composition.
Styling Tip
Keep the color palette consistent across the entire gallery wall. Repeating cream, white, beige, and natural wood will make different designs feel connected.
10. Luxury Pearl and Seashell Wall Panel
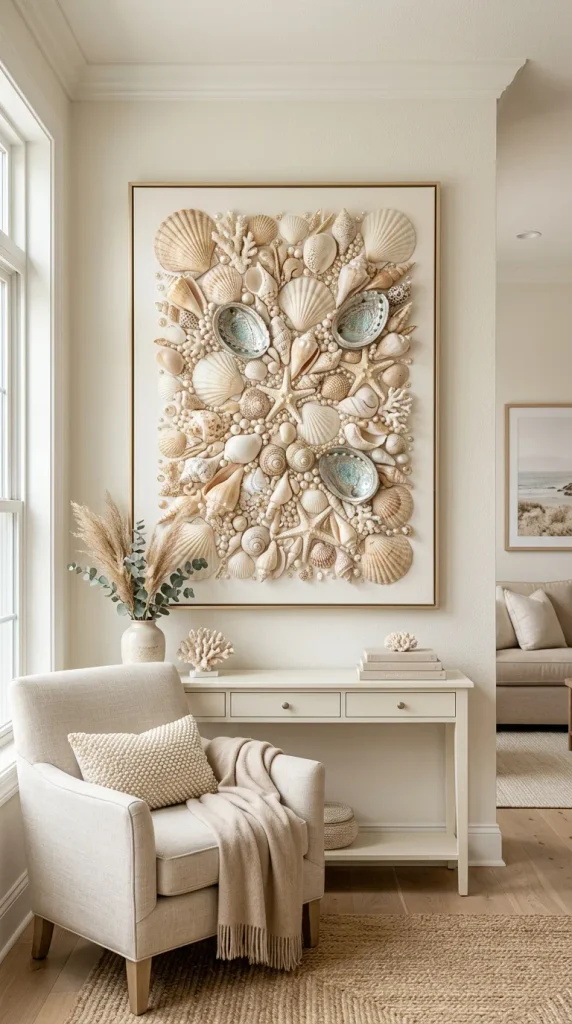
For a more elegant interpretation of seashell decor, combine shells with pearls and a sophisticated neutral background. This project can transform simple beach materials into a statement artwork suitable for a bedroom, bathroom, dressing area, or elegant coastal living room.
Use a large canvas or decorative wood panel as your foundation. Paint it in warm white, ivory, soft beige, or another neutral shade.
Arrange larger shells strategically across the surface. Add clusters of pearls around selected shells rather than covering the entire artwork. This creates a luxurious layered appearance.
You can also incorporate subtle metallic details, such as champagne gold or soft brass accents. Keep these details limited so the natural shells remain the focus.
Materials Used
- Large canvas or wood panel
- Seashells
- Faux pearls
- Strong adhesive
- Neutral acrylic paint
- Small metallic accents
- Decorative beads
- Hanging hardware
How to Make It
Prepare and paint the background. Arrange the largest shells first, then create smaller clusters using pearls and beads. Attach everything carefully and allow the artwork to dry thoroughly.
Styling Tip
Use an oversized panel and display it on a relatively simple wall. The negative space around the artwork will make the finished piece look more luxurious.
How to Make DIY Seashell Wall Art Step by Step
Creating seashell wall art is relatively straightforward, but preparation makes a major difference in the finished result.
Step 1: Clean the Seashells
If you are using collected shells, gently clean them and allow them to dry completely. Remove visible sand, dirt, and debris.
Step 2: Choose Your Base
Select a canvas, wooden panel, frame, mirror, wreath base, or another suitable surface.
Step 3: Create a Color Palette
Decide whether you want natural shells, monochromatic white shells, pastel colors, or a combination of coastal tones.
Step 4: Plan the Arrangement
Place all shells on your surface before gluing. Move them around until the composition feels balanced.
Step 5: Start With Large Pieces
Attach the largest shells first. These establish the major shapes of the design.
Step 6: Fill the Gaps
Use smaller shells, beads, pearls, or natural materials to fill empty areas.
Step 7: Let Everything Dry
Do not immediately move or hang your artwork. Give the adhesive sufficient time to set according to its instructions.
Step 8: Add Hanging Hardware
Use suitable hardware for the weight of your finished artwork and the type of wall where it will be displayed.
Materials Used for DIY Seashell Wall Art
The materials required will vary according to the project, but a basic seashell art collection may include:
- Assorted seashells
- Canvas
- Wooden boards
- Picture frames
- Mirrors
- Wreath bases
- Driftwood
- Strong craft adhesive
- Acrylic paints
- Paintbrushes
- Jute rope
- Cotton cord
- Faux pearls
- Wooden beads
- Decorative sand
- Small mirrors
- Ceramic or wooden accents
- Hanging hardware
- Scissors
- Pencil
- Ruler
- Protective work surface
The best part of DIY seashell art is that you can adapt the materials according to what you already have at home.
How to Choose Seashells for Wall Art
Different shells create different visual effects. Large smooth shells can become focal points, while tiny shells are useful for filling spaces.
Large Shells
Use these as statement pieces or the centers of floral arrangements.
Small Shells
These are ideal for borders, patterns, backgrounds, and filling gaps.
White Shells
Perfect for minimalist and elegant coastal interiors.
Beige and Cream Shells
Excellent for warm neutral rooms and organic interiors.
Pearly Shells
These create a slightly luxurious and feminine appearance.
Irregular Shells
Natural irregular shapes are perfect for rustic or organic compositions.
Proper Pinterest-Style Pattern for Seashell Wall Art
A successful Pinterest-style seashell wall art project generally follows this formula:
Natural Shells + Neutral Background + Layered Texture + Balanced Composition + Coastal Details + Clean Presentation
Start with a clean neutral base so the shells remain the main attraction. Arrange large shells first, then introduce smaller pieces to create layers.
Use the rule of three when possible. For example, combine three larger shells with smaller shells and a few pearls. Vary the size and orientation to avoid a repetitive appearance.
Texture is extremely important. Combining shells with wood, rope, beads, pearls, or sand creates a richer visual effect.
For Pinterest-style photography, display the finished artwork against a simple wall with a few carefully selected coastal accessories nearby. Avoid overcrowding the scene.
Natural daylight works beautifully for seashell crafts because it highlights the shells’ curves and textures.
Tips for Making Seashell Wall Art Look More Expensive
Use a Limited Color Palette
White, cream, beige, pearl, and natural wood create an elegant appearance.
Mix Shell Sizes
Using only identical shells can make the design look repetitive. Different sizes create depth.
Add Negative Space
You do not need to cover every part of your canvas. Empty areas can make the artwork feel more sophisticated.
Use Quality Frames
A beautiful frame can make a simple seashell project look much more polished.
Introduce Pearls Carefully
A few pearls can create a luxurious appearance without overwhelming the natural shells.
Choose a Strong Focal Point
One large shell or central arrangement can give the entire artwork structure.
Avoid Excessive Glue
Use enough adhesive to secure the shells but avoid visible glue around the edges.
Coordinate With Your Room
Choose shell colors and frame finishes that complement your existing decor.
Final Thoughts
DIY seashell wall art is a creative way to bring natural coastal beauty into your home without needing complicated materials or advanced crafting skills. From shell flowers and decorative mirrors to driftwood wall hangings and luxurious pearl-covered panels, there are countless ways to transform ordinary seashells into beautiful artwork.
The secret to creating attractive results is thoughtful arrangement. Rather than randomly attaching shells, experiment with different sizes, shapes, textures, and patterns before committing to the final design. A little planning can make a simple craft look much more polished.
Neutral shells are especially versatile because they work with coastal, boho, farmhouse, minimalist, organic modern, and contemporary interiors. You can also introduce subtle colors if you want something more playful.
Whether you are decorating a beach-inspired bedroom, creating a coastal bathroom accent, adding personality to an entryway, or looking for a unique piece above your living room sofa, these 10 DIY seashell wall art ideas offer plenty of inspiration.
Start with the shells you love most, choose a suitable base, create a balanced arrangement, and layer in natural materials such as driftwood, jute, beads, and pearls. With a little creativity, simple seashells can become beautiful handmade artwork that adds texture, character, and a relaxed seaside feeling to your home.





Leave a Reply