
Introduction
Pumpkin carving is one of the most enjoyable ways to decorate your home for fall and Halloween. Whether you love cute seasonal decorations, spooky Halloween designs, or elegant autumn accents, carved pumpkins can add personality and warmth to almost any space. From your front porch and entryway to your living room, kitchen, and staircase, pumpkins offer endless opportunities to create beautiful seasonal displays.
The best part about pumpkin carving is that you can customize each design to match your home’s interior style. If you prefer a traditional Halloween look, you can carve classic jack-o’-lantern faces with spooky smiles. For a softer aesthetic, floral patterns, stars, moons, and decorative geometric shapes can turn ordinary pumpkins into stylish fall decorations.

You can also combine carved pumpkins with candles, fairy lights, dried flowers, autumn leaves, wooden trays, and cozy textiles to create an inviting seasonal atmosphere. Different pumpkin sizes, shapes, and colors make it easy to design a display that feels unique to your home.
In this article, you’ll discover 10 creative pumpkin carving ideas for your house, along with materials, step-by-step instructions, styling tips, and common mistakes to avoid.
Materials Needed for Pumpkin Carving
Before starting your pumpkin carving project, gather the essential materials to make the process easier and safer.
- Fresh pumpkins in different sizes and shapes
- Pumpkin carving tools or small serrated carving knives
- A sturdy spoon or pumpkin scoop
- A washable marker or pencil
- Paper templates for detailed designs
- A small drill or carving tool for decorative holes, if appropriate
- LED tea lights or battery-operated candles
- Fairy lights for illuminated displays
- Newspaper or a protective table covering
- A damp cloth for cleaning the pumpkin
- Autumn leaves, dried flowers, ribbons, and other decorative accessories
Choose pumpkins that have firm skin and a flat base so they can stand securely. Medium-sized pumpkins are usually easiest for beginners, while smaller pumpkins work beautifully for tabletop arrangements.
For safety, children should draw designs and decorate finished pumpkins rather than handle sharp carving tools. Adults should perform the cutting. Use battery-operated lights instead of open flames, particularly when pumpkins are displayed near curtains, dried leaves, or other flammable materials.
1. Classic Jack-o’-Lantern Pumpkin Carving
Classic jack-o’-lanterns are timeless Halloween decorations that look wonderful outside the front door, beside the fireplace, or along the front porch steps. Their expressive faces can make a home feel festive and welcoming while preserving the traditional charm of Halloween.
You can create a traditional design with triangular eyes, a pointed nose, and a wide, toothy smile. Alternatively, experiment with different expressions, such as a mischievous grin, a surprised face, or a friendly smile. A collection of pumpkins featuring different expressions can create a playful display.
Materials needed: A medium or large pumpkin, marker, carving tools, scoop, and an LED tea light.
How to make it:
- Wash the pumpkin and dry it thoroughly.
- Draw a circle around the stem and carefully remove the top as an adult.
- Scoop out the seeds and stringy pulp until the inside is relatively clean.
- Draw your chosen face on the pumpkin’s front surface.
- Carefully carve along the marked lines.
- Remove loose pieces and clean the edges.
- Place an LED tea light inside and position the pumpkin where it can be seen.
For a more decorative appearance, use three pumpkins of different sizes. Place the largest pumpkin at the back and the smaller ones in front to create a layered arrangement.
You can also surround the pumpkins with autumn leaves, small gourds, and a natural-fiber doormat. For an indoor display, place them on a wooden tray to protect furniture from moisture.
Styling tip: Choose warm-white LED lights for a traditional, cozy glow or orange LEDs for a more dramatic Halloween atmosphere.

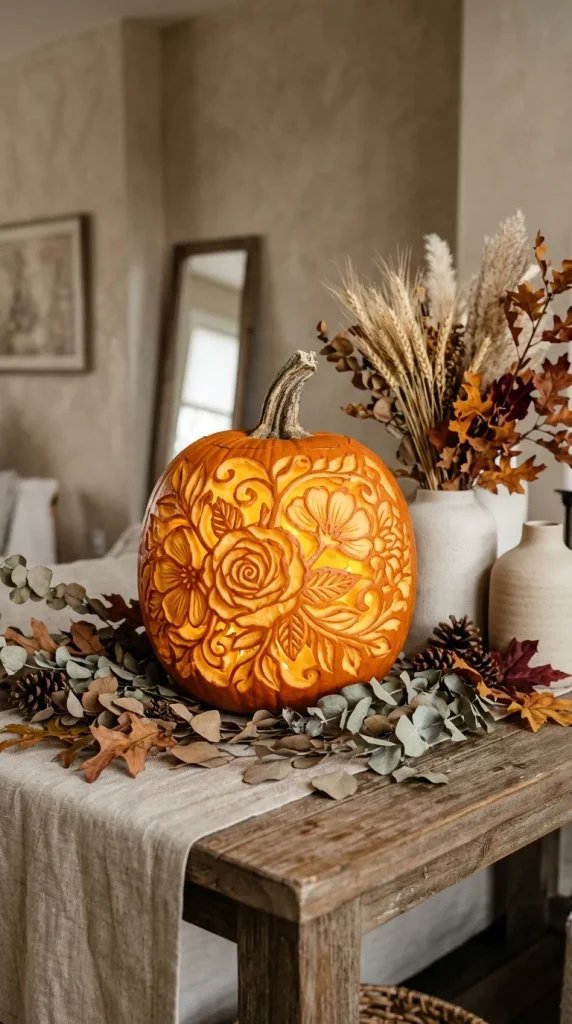
2. Floral Pumpkin Carving for Elegant Home Decor
Floral pumpkin carving is ideal for homeowners who want seasonal decorations that look artistic rather than frightening. Delicate flowers, curling vines, leaves, and botanical patterns can transform an ordinary pumpkin into an attractive decorative accent.
This design works particularly well in living rooms, dining rooms, covered porches, and entryways. It complements rustic, cottagecore, farmhouse, and romantic interior styles.
Materials needed: A medium pumpkin, washable marker, pumpkin carving tools, floral stencil, and LED light.
How to make it:
- Select a pumpkin with a relatively smooth surface.
- Clean the pumpkin and allow it to dry.
- Draw or transfer a floral pattern onto the front.
- Mark the larger flower shapes first, followed by smaller leaves and vines.
- Carefully carve the main shapes using suitable carving tools.
- Add small decorative openings around the flowers to allow more light to shine through.
- Place an LED light inside to highlight the design.
Beginners can start with one large flower surrounded by simple leaves. More experienced crafters can try a repeating botanical pattern that wraps around the pumpkin.
For a sophisticated arrangement, combine one floral-carved pumpkin with two smaller uncarved pumpkins in cream or muted orange. Add dried eucalyptus, faux autumn foliage, and a ceramic vase to complete the display.
You can also place the pumpkin on a console table beside a framed botanical print. Keep the surrounding decor simple so the carved design remains the focal point.
Styling tip: Use a white or pale orange pumpkin for a softer, more refined appearance. Pair it with warm lighting and natural textures rather than brightly colored Halloween accessories.
3. Star and Moon Pumpkin Carving
Star and moon pumpkin carving brings a dreamy, celestial atmosphere to seasonal home decor. Instead of carving a traditional face, create a collection of crescent moons, tiny stars, dots, and sparkling shapes across the pumpkin’s surface.
This design is especially suitable for bedroom dressers, window displays, covered porches, and cozy living room corners. It works beautifully with celestial decor, dark academia styling, and whimsical autumn themes.
Materials needed: A pumpkin, marker, star and moon templates, carving tools, and battery-operated fairy lights or an LED candle.
How to make it:
- Choose a pumpkin with enough surface area for several decorative shapes.
- Draw a large crescent moon near the center.
- Add stars of different sizes around the moon.
- Include small dots to fill empty spaces without overcrowding the pattern.
- Carefully carve the shapes, keeping the narrow points of the stars as sturdy as possible.
- Clean the inside and position a battery-operated light inside the pumpkin.
For a more dramatic effect, carve a large moon on one side and scatter tiny stars across the rest of the surface. When illuminated, the openings create a magical pattern of glowing shapes.
Create a coordinated display by placing the carved pumpkin beside a dark ceramic vase, metallic star ornaments, and a few miniature gourds. A black, cream, and burnt-orange color palette helps the arrangement feel cohesive.
If you are decorating a bedroom, use battery-powered lights and place the pumpkin on a stable surface away from bedding and curtains. Never leave illuminated decorations unattended.
Styling tip: Combine one celestial pumpkin with smaller pumpkins painted in midnight blue, cream, or muted gold for a coordinated autumn display.

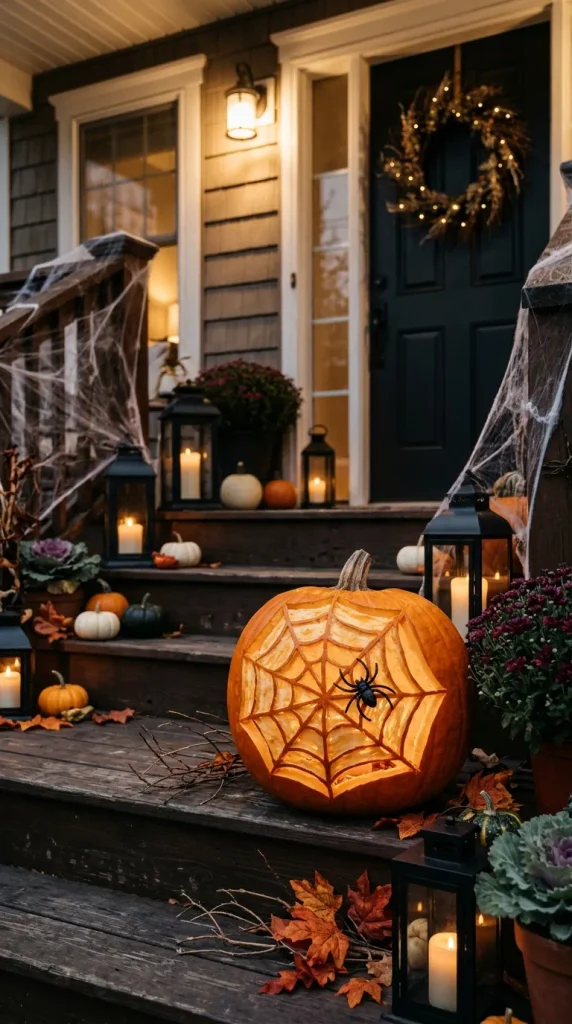
4. Spiderweb Pumpkin Carving for Halloween
Spiderweb pumpkin carving is a creative option for anyone who enjoys spooky Halloween decorations without relying on a traditional jack-o’-lantern face. The delicate web pattern creates visual interest and looks particularly effective when illuminated from within.
This design is ideal for front porches, outdoor steps, window ledges, and Halloween-themed entryway arrangements. You can make it eerie and dramatic or keep it simple and elegant.
Materials needed: A medium or large pumpkin, washable marker, spiderweb stencil, carving tools, and an LED light.
How to make it:
- Clean the pumpkin and draw a small central point on the front.
- Sketch several lines extending outward from that point.
- Connect the lines with curved sections to form a spiderweb.
- Decide which lines should be carved completely through the pumpkin.
- Carefully cut the selected sections, leaving enough pumpkin flesh between the openings to maintain the web’s structure.
- Add a small spider shape beside the web if desired.
- Place an LED light inside and test the effect in a dim room.
For beginners, a simple web with four or five main lines is easier to carve than a highly detailed pattern. Avoid making the spaces between the lines too narrow, as thin sections may break.
For an outdoor arrangement, place the pumpkin beside black lanterns, faux cobwebs, and small black or orange gourds. Indoors, use a wooden tray and a few dark decorative accents for a more controlled display.
You can also carve two pumpkins with different web designs and place them at different heights using sturdy decorative stands.
Styling tip: Keep the surrounding decorations understated if you want the web pattern to stand out. A softly illuminated pumpkin can look just as effective as a display filled with bright Halloween accessories.
5. Geometric Pumpkin Carving
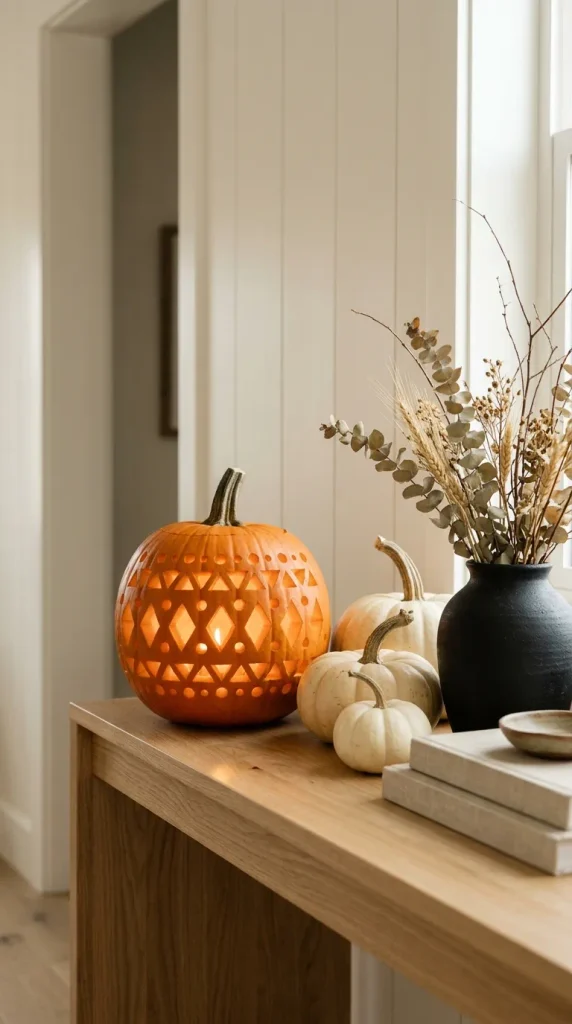
Geometric pumpkin carving is a modern alternative to traditional Halloween designs. Triangles, diamonds, zigzags, circles, and repeating lines create a contemporary pattern that complements minimalist, Scandinavian, and modern farmhouse interiors.
Unlike character faces, geometric patterns can remain attractive throughout the autumn season, making them useful for homeowners who want decorations that do not feel limited to Halloween night.
Materials needed: A medium pumpkin, ruler, marker, geometric templates, carving tools, and an LED light.
How to make it:
- Choose a pumpkin with a relatively even surface.
- Draw a simple geometric design using a ruler or paper template.
- Start with a repeating pattern of triangles, diamonds, or circles.
- Check that the shapes are spaced evenly.
- Carefully carve the pattern, avoiding extremely thin connecting sections.
- Remove loose pieces and clean the openings.
- Place a warm LED light inside the pumpkin.
A diamond pattern looks attractive when repeated across the front, while a series of circles can create a softer, more playful effect. If you prefer a minimalist style, carve just one large geometric shape surrounded by a few smaller openings.
For a modern entryway, arrange the pumpkin on a black or wooden tray with neutral-colored gourds and a simple vase. In the living room, combine it with cream cushions, textured throws, and natural wood accessories.
You can also experiment with pumpkins in different colors. A white pumpkin with geometric cutouts offers a subtle look, while a classic orange pumpkin feels more traditional.
Styling tip: Choose one dominant pattern and repeat it across two or three pumpkins. Coordinated designs create a more polished display than combining too many unrelated shapes.
6. Cute Cat Face Pumpkin Carving
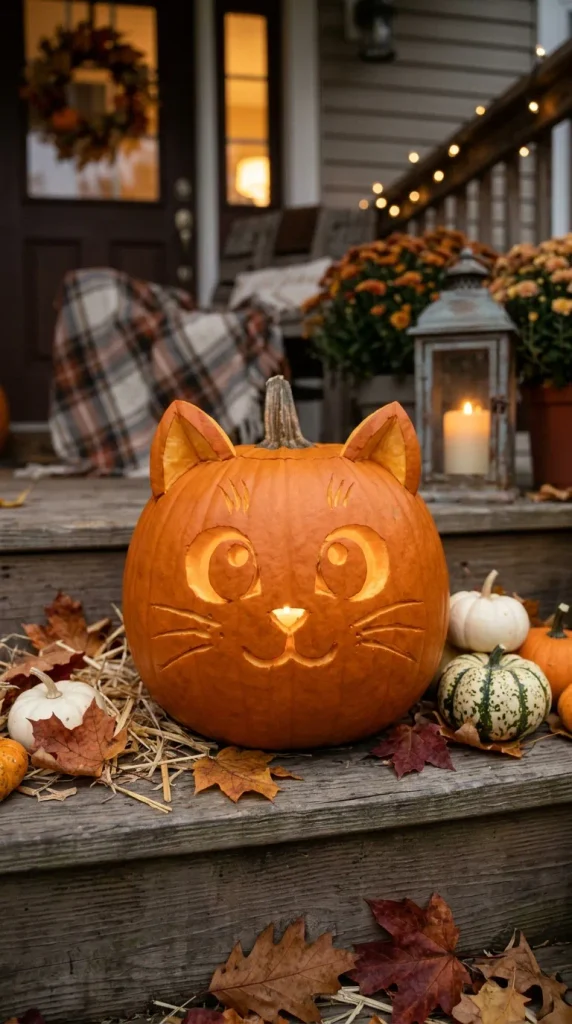
A cat-face pumpkin is a charming choice for people who prefer playful Halloween decorations. Pointed ears, curved eyes, whiskers, and a tiny nose create an adorable design that works well in family rooms, children’s play areas, entryways, and covered porches.
You can make the cat look curious, sleepy, mischievous, or friendly. Pairing several pumpkins with different expressions can make the arrangement even more interesting.
Materials needed: A round pumpkin, washable marker, cat-face template, carving tools, and an LED light.
How to make it:
- Select a pumpkin with a broad front surface.
- Draw two pointed ears near the top.
- Sketch the eyes, nose, mouth, and whiskers.
- If desired, draw separate triangular ear shapes and carve them carefully.
- Cut out the facial features using suitable carving tools.
- Clean the inside and add an LED light.
- Position the pumpkin so its face is visible from the main viewing angle.
For an easier version, carve only the eyes, nose, and mouth, then use a separate black paper or decorative backdrop to suggest the ears. Keep any additional materials away from the light source and ensure they cannot fall into the pumpkin.
To style the finished decoration, place it beside miniature gourds, faux autumn leaves, or a small decorative cat figure. A black-and-orange color scheme works well for Halloween, while cream pumpkins and neutral accessories create a softer look.
Styling tip: If you have several pumpkins, carve a large cat face on one and smaller matching designs on the others. Arrange them together for a coordinated seasonal vignette.
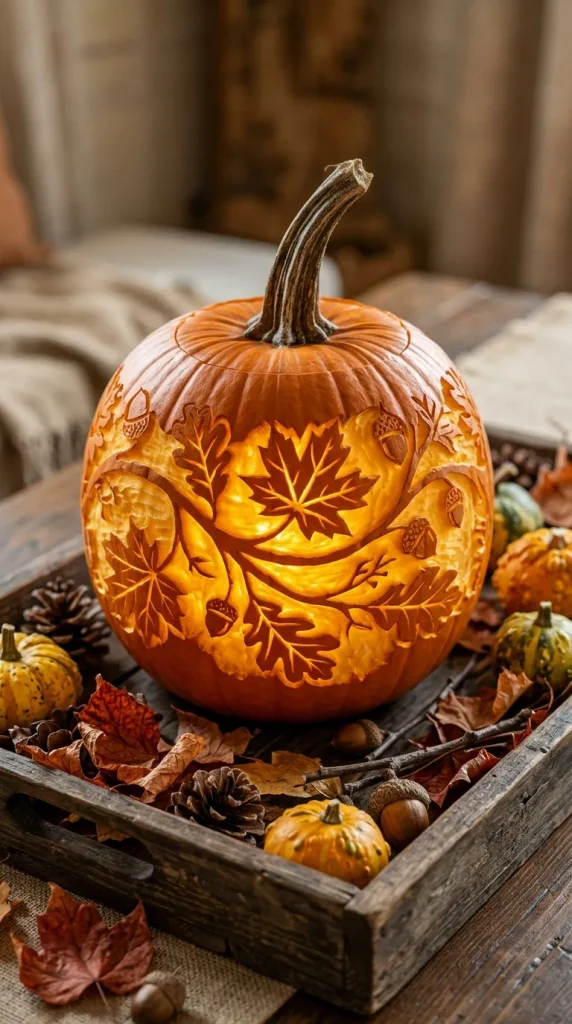
7. Pumpkin Carving with Leaf Patterns
Autumn leaves are among the most recognizable symbols of the fall season. Carving maple leaves, oak leaves, and delicate branches into pumpkins creates a natural design that feels warm, seasonal, and timeless.
This idea is particularly suitable for homes decorated in rustic, farmhouse, cottagecore, and traditional styles. It also works well for people who want autumn decorations that can be displayed before Halloween and kept up throughout the fall.
Materials needed: A pumpkin, leaf templates, marker, carving tools, and an LED light.
How to make it:
- Choose a pumpkin with a smooth surface.
- Arrange several leaf templates around the front.
- Draw a few stems connecting the leaves for a natural appearance.
- Vary the leaf sizes to avoid a repetitive pattern.
- Carefully carve the leaves and selected stems.
- Clean the inside and illuminate the pumpkin with an LED light.
You can carve a single large leaf for a minimalist design or create a wreath-like pattern that circles the front of the pumpkin. Keep the leaf stems thick enough to remain stable after carving.
For an attractive indoor arrangement, place the pumpkin on a wooden board with dried leaves, pinecones, and small gourds. Add a vase of dried grasses to create height and texture.
On a dining table, use the carved pumpkin as a centerpiece surrounded by neutral linens and a few seasonal accessories. Make sure the display does not obstruct conversation or interfere with serving dishes.
Styling tip: Combine natural leaf patterns with pumpkins in muted orange, cream, and green. These colors create a cohesive autumn palette without making the room feel overly themed.
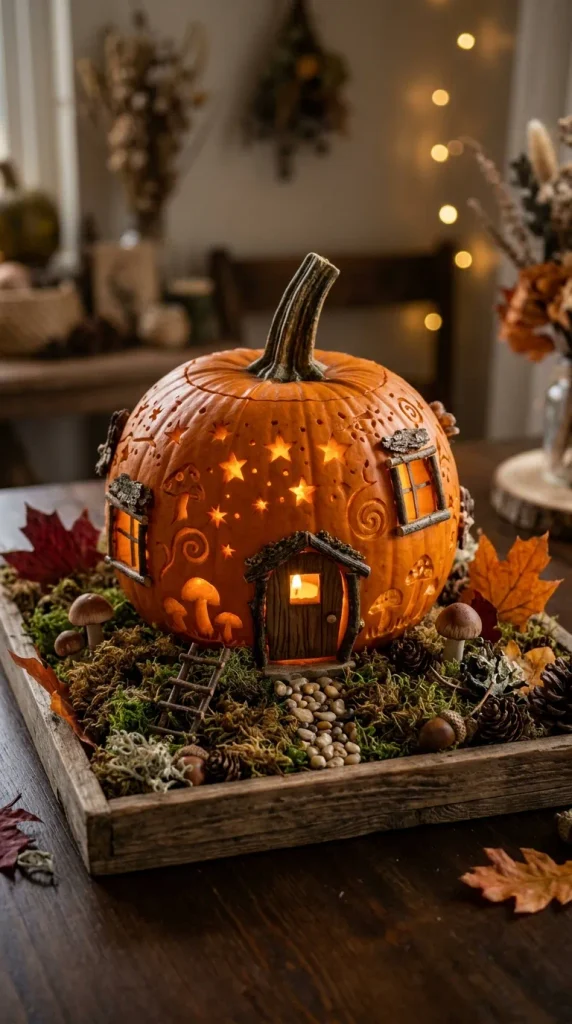
8. Whimsical Mushroom and Fairy Garden Pumpkin
A whimsical mushroom and fairy garden pumpkin brings a storybook feeling to your home. Instead of using a conventional Halloween face, carve tiny mushrooms, miniature doors, stars, and delicate foliage to create a magical garden-inspired design.
This idea is ideal for whimsical interiors, cottagecore bedrooms, children’s rooms, reading corners, and covered porch displays. The design can be as simple or detailed as your carving skills allow.
Materials needed: A medium pumpkin, marker, mushroom and foliage templates, carving tools, and an LED light.
How to make it:
- Select a pumpkin with enough room for several small designs.
- Draw a cluster of mushrooms near the bottom.
- Add small leaves, stars, and a miniature door or window.
- Keep the shapes relatively large if you are a beginner.
- Carefully carve the outlines and remove the cut pieces.
- Clean the pumpkin and illuminate it with an LED light.
A particularly charming approach is to create one larger mushroom surrounded by smaller mushrooms and tiny stars. You can also carve a little doorway at the bottom, suggesting a miniature woodland home.
To style the pumpkin, place it on a wooden tray with moss-like faux greenery, small decorative mushrooms, pinecones, and miniature fairy garden accessories. Keep loose decorative materials away from electrical lights and avoid placing them inside the pumpkin around the light source.
For a bedroom display, choose a small pumpkin and pair it with a ceramic mushroom ornament, a stack of books, and a soft bedside lamp.
Styling tip: Use natural textures, muted colors, and warm lighting to emphasize the enchanting woodland theme.
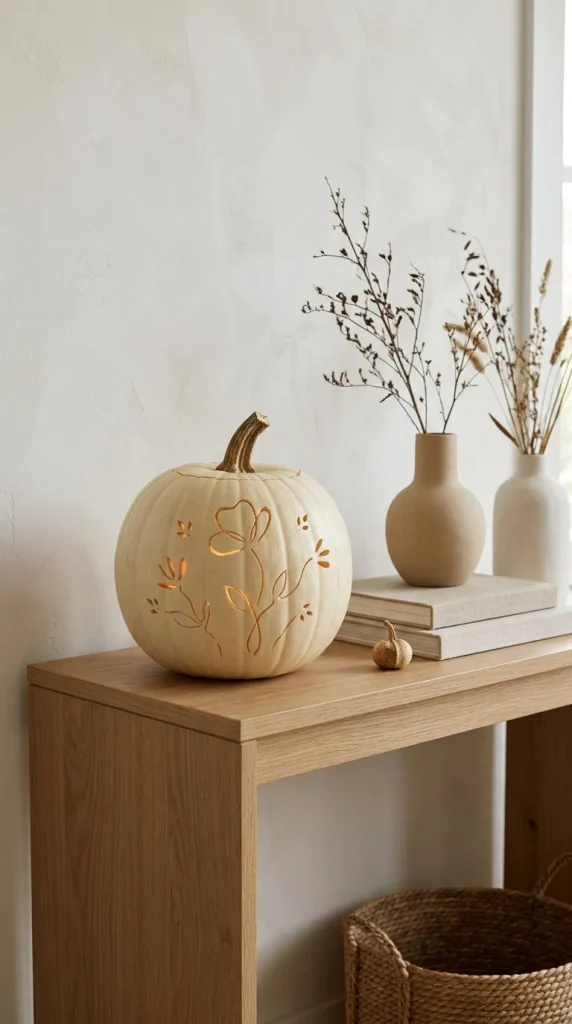
9. Minimalist Line-Art Pumpkin Carving
Minimalist line-art pumpkin carving is perfect for homeowners who appreciate simple designs and uncluttered decor. Instead of cutting a large face or complex pattern, create a few carefully placed openings that form a continuous-looking line drawing.
Popular designs include a simple flower, a smiling face, a crescent moon, an abstract wave, or a single botanical stem. These understated patterns can look stylish on a console table, kitchen counter, bookshelf, or bedroom dresser.
Materials needed: A small or medium pumpkin, washable marker, simple line-art template, carving tools, and an LED light.
How to make it:
- Choose a pumpkin with a clean, smooth surface.
- Select a simple design with limited details.
- Transfer the outline onto the pumpkin.
- Identify the sections that should be cut through completely.
- Carefully carve the openings while keeping enough pumpkin flesh between them.
- Remove loose pieces and clean the surface.
- Place a small LED light inside the pumpkin.
A simple flower outline is an excellent starting point. Draw a central circle with a few rounded petals, then carve the shapes carefully. Another easy option is a minimalist smile with two eyes and a curved mouth.
For a modern display, pair the pumpkin with a neutral ceramic vase, a stack of books, or a small wooden sculpture. Keep the color palette limited to two or three tones, such as cream, tan, and orange.
Minimalist pumpkin carving is especially useful when your home already has decorative accessories and you do not want the seasonal display to feel crowded.
Styling tip: Choose one or two small pumpkins rather than filling the entire surface with decorations. The simplicity of the design is what makes it appealing.
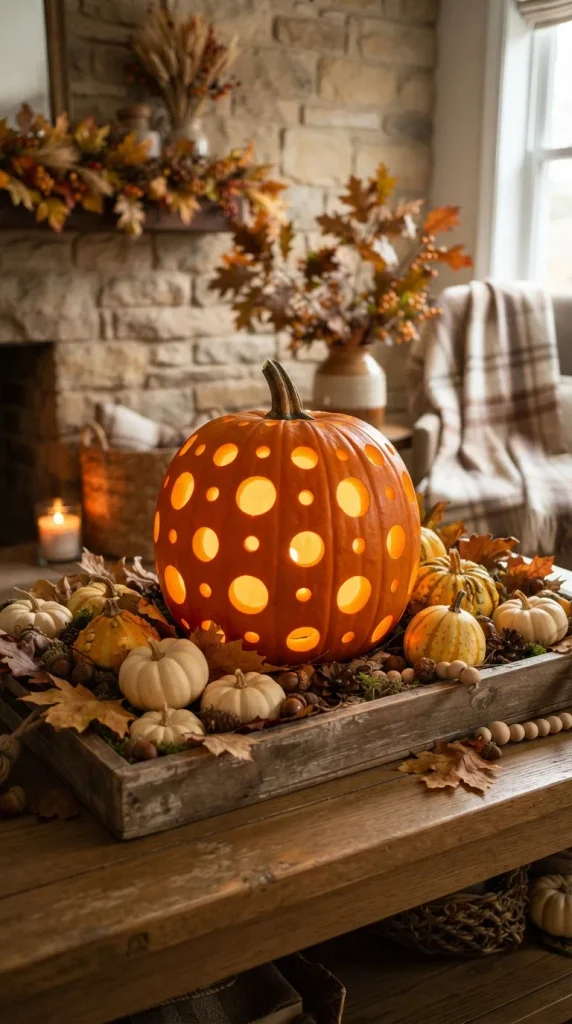
10. Glowing Polka-Dot Pumpkin Carving
A polka-dot pumpkin is one of the easiest decorative carving ideas for beginners. Its repeating circular openings create a playful pattern that looks beautiful when illuminated. Depending on the pumpkin’s color and the placement of the dots, the finished design can feel modern, whimsical, or traditionally festive.
This style works well on front porches, fireplace mantels, dining tables, and indoor shelves. It is also easy to coordinate with other pumpkins because the pattern does not depend on a particular Halloween character.
Materials needed: A pumpkin, washable marker, appropriate carving tools, a circular stencil, and an LED light.
How to make it:
- Clean the pumpkin and choose the side you want to display.
- Draw circles in a repeating pattern.
- Use different circle sizes to make the design more dynamic, or keep them uniform for a modern appearance.
- Space the circles far enough apart to preserve the pumpkin’s structure.
- Carefully carve each circle.
- Remove the pulp and loose pieces.
- Place an LED light inside and check how the pattern looks in a dim room.
For a simple design, use evenly spaced circles in straight rows. For a whimsical look, vary their sizes and positions. You can also concentrate the openings on the front and leave the sides mostly intact.
Style the pumpkin with miniature gourds, autumn leaves, and a decorative tray. If you want a more dramatic arrangement, place three polka-dot pumpkins of different sizes together, using one larger pumpkin as the centerpiece.
For a softer appearance, choose white or pale green pumpkins and warm-white LEDs. Classic orange pumpkins with amber lighting create a more traditional fall atmosphere.
Styling tip: Repeating shapes look most effective when the spacing feels intentional. Sketch the complete design before carving so you can adjust the pattern without damaging the pumpkin.
Tips for Making Your Pumpkin Carving Last Longer
Carved pumpkins naturally begin to soften and decompose once exposed to air, moisture, and microorganisms. A few simple habits can help your decorations remain attractive for longer.
- Choose a fresh pumpkin: Avoid pumpkins with soft spots, mold, deep cuts, or damaged stems.
- Keep the surface clean: Remove dirt before carving and dry the outside thoroughly.
- Avoid unnecessary cuts: Every opening exposes more of the pumpkin’s flesh, which can accelerate drying and decay.
- Use LED lights: Battery-operated candles and fairy lights provide illumination without the risks associated with an open flame.
- Display pumpkins in a cool place: Heat and direct sunlight can cause carved pumpkins to deteriorate more quickly.
- Protect furniture: Place indoor pumpkins on trays or washable surfaces to catch moisture.
- Check them regularly: Remove pumpkins that develop mold, unpleasant odors, or extensive soft spots.
- Consider artificial pumpkins: Reusable craft pumpkins can be carved with suitable tools and stored for future seasons.
If you use any pumpkin-preservation spray or treatment, follow its product instructions and keep treated pumpkins away from children and pets as directed.
Common Pumpkin Carving Mistakes to Avoid
Even a simple pumpkin design can become difficult if you rush the preparation. Avoid these common mistakes to get a cleaner result.
1. Choosing the wrong pumpkin
A very small or uneven pumpkin may not provide enough space for a detailed design. Select a size that suits your pattern and has a stable base.
2. Drawing a complicated design too early
Intricate patterns can be difficult to carve, especially for beginners. Start with large, simple shapes before attempting fine details.
3. Cutting the connecting sections too thin
Narrow strips of pumpkin flesh can break when you remove carved pieces. Leave enough space between shapes to support the design.
4. Removing too much pumpkin flesh
A very thin wall can collapse or become fragile. Clean out the pulp thoroughly but avoid scraping away more flesh than necessary.
5. Using a real candle carelessly
Open flames can ignite nearby materials and heat the pumpkin. Battery-operated lights are a safer option for indoor and outdoor displays.
6. Forgetting where the pumpkin will be displayed
A design intended for a porch may need to be larger and bolder than one for a small shelf. Consider the viewing distance and available space before carving.
7. Overdecorating the finished display
Too many accessories can hide the pumpkin’s design. Use a few coordinated pieces to support the overall theme rather than compete with it.
Conclusion
Pumpkin carving is a creative way to bring autumn charm and Halloween personality into your home. From classic jack-o’-lanterns and spooky spiderwebs to elegant floral patterns, celestial designs, and whimsical fairy gardens, there is an option for every decorating style.
If you prefer traditional seasonal decor, start with a smiling jack-o’-lantern or a leaf-patterned pumpkin. For a modern home, geometric and minimalist designs offer a cleaner look. If you enjoy playful decorations, try cat faces, mushroom patterns, or glowing polka dots.
The key is to choose a design that suits your skill level, use safe carving practices, and arrange your finished pumpkin thoughtfully. Pair your creation with warm LED lights, natural autumn foliage, small gourds, or simple decorative accessories to create a welcoming seasonal display.
With a little planning and creativity, these 10 pumpkin carving ideas can help transform your porch, living room, dining table, or entryway into a cozy autumn-inspired space.





Leave a Reply