
Introduction
A bedroom ceiling is often one of the most overlooked parts of interior design, yet it offers an incredible opportunity to create a cozy, romantic, and visually stunning space. If you want to give your bedroom a makeover without spending a fortune on expensive renovations, fabric ceiling decorations can be a wonderful DIY solution. From soft, flowing canopies to elegant draped fabric panels, there are countless ways to transform an ordinary ceiling into a beautiful design feature.
Fabric ceiling ideas are especially popular for bedrooms because they introduce softness, texture, and warmth. Whether you love bohemian interiors, romantic cottage-inspired spaces, modern minimalist bedrooms, or luxurious hotel-style decor, fabric can help you achieve the look you want. You can experiment with lightweight cotton, sheer voile, linen, muslin, and other suitable fabrics to create different moods and effects.

The best part is that many fabric ceiling projects can be completed with basic materials, simple tools, and a little creativity. You do not necessarily need professional decorating skills to create a beautiful result. With thoughtful planning, secure mounting, and the right fabric, you can design a ceiling that feels personal, inviting, and stylish.
In this guide, you will discover 10 fabric ceiling ideas for a bedroom DIY project. Each idea includes design inspiration, recommended materials, practical installation steps, and styling tips to help you create a bedroom that feels fresh and beautiful.
1. Romantic Sheer Fabric Ceiling Canopy
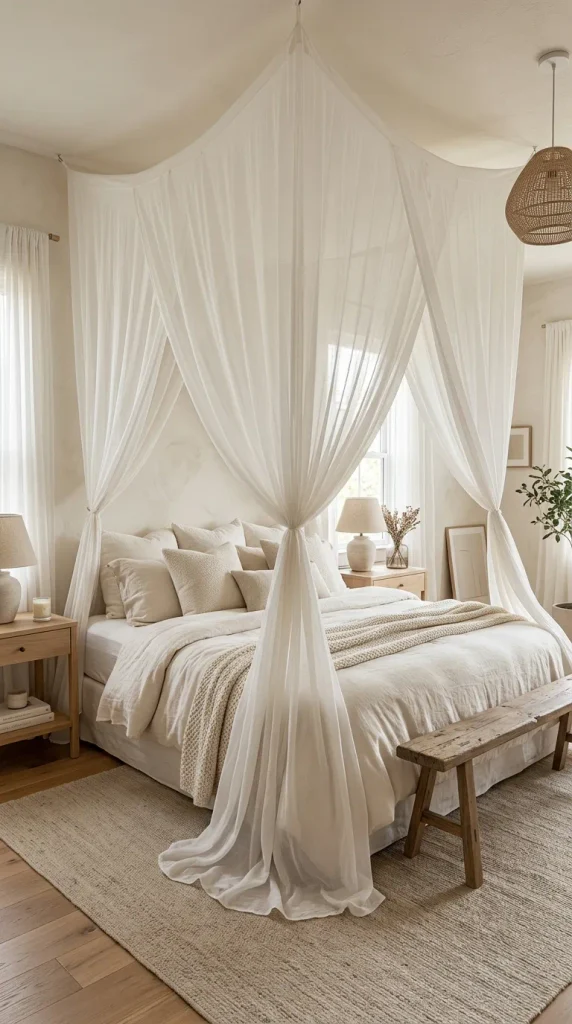
A romantic sheer fabric ceiling canopy is one of the prettiest ways to transform a simple bedroom into a dreamy retreat. This design uses lightweight, translucent fabric that flows gently from the ceiling toward the bed, creating a soft, cloud-like effect. It works particularly well in bedrooms with white bedding, warm lighting, neutral walls, and delicate decorative accessories.
White voile, sheer cotton, and lightweight muslin are excellent fabric choices because they allow light to pass through while adding a gentle layer of texture. If you prefer a warmer atmosphere, choose ivory, champagne, or soft beige fabric. For a more contemporary look, pale gray or muted sage can introduce subtle color without overwhelming the room.
Materials Used
- Lightweight voile, muslin, or sheer cotton fabric
- Ceiling-rated mounting hooks or suitable support hardware
- Measuring tape and fabric scissors
- Fabric tape or a sewing kit for finished edges
- Appropriate anchors and screws for the ceiling structure
- Optional decorative ties or fabric ribbons
How to Create This DIY Ceiling
Step 1: Measure your bedroom. Measure the distance from the intended ceiling attachment points to the desired draping height. Purchase enough fabric to create graceful folds rather than stretching it tightly across the ceiling.
Step 2: Plan the arrangement. Decide whether the fabric should form a single central canopy or several flowing sections above the bed. Keep the fabric clear of ceiling fans, lights, vents, and other fixtures.
Step 3: Install secure supports. Locate suitable ceiling joists or use mounting hardware rated for the ceiling material and intended load. Do not rely on ordinary adhesive hooks for overhead fabric.
Step 4: Arrange the fabric. Gather the material loosely at the support points, allowing it to fall in gentle curves. Keep it away from your face and body while sleeping.
Step 5: Finish the details. Neaten the edges and adjust the folds until the canopy looks balanced from different angles.
Styling Tips
Pair the canopy with white bedding, soft cushions, and warm bedside lamps for a romantic atmosphere. A natural jute rug or light wood furniture can prevent the room from looking overly delicate.
This design is ideal for creating a peaceful, elegant bedroom without changing the existing furniture or wall color. Choose flame-resistant fabric where available, and keep all fabric well away from hot bulbs and other heat sources.
2. Bohemian Fabric Ceiling With Flowing Layers
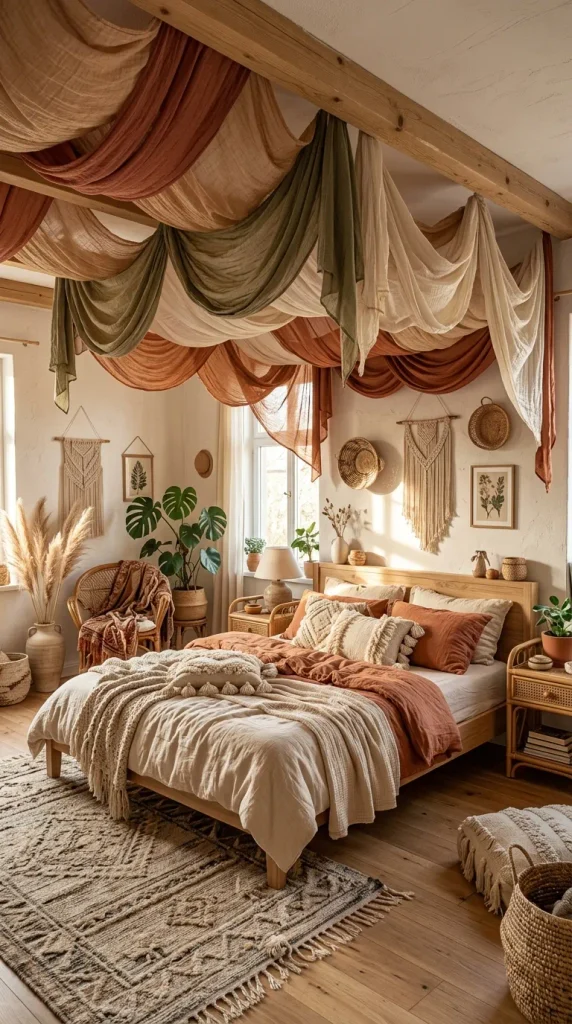
If you love relaxed interiors, earthy colors, and natural textures, a bohemian fabric ceiling can bring personality and warmth to your bedroom. Unlike a traditional canopy, which usually focuses on the bed, a boho-inspired design can extend across a larger section of the ceiling, creating a layered and artistic effect.
The key to this style is combining complementary colors and different fabric textures. Consider terracotta, rust, cream, muted mustard, olive green, dusty rose, or warm brown. You can use two or three colors together to create depth without making the room feel chaotic.
Lightweight cotton, muslin, and loosely woven fabrics are suitable choices. A mixture of plain fabric and subtle printed material can also create a collected, handmade appearance.
Materials Used
- Lightweight cotton or muslin fabric in two or three colors
- Measuring tape and fabric scissors
- Secure ceiling mounting hardware
- Fabric ties or sewn loops
- Needle, thread, and optional decorative trim
- Optional removable wall-mounted supports where appropriate
How to Create This DIY Ceiling
Step 1: Choose a color palette. Select two or three shades that coordinate with your bedding, rug, and existing furniture.
Step 2: Measure the ceiling area. Decide whether to cover the entire ceiling or create a feature above the bed. A smaller arrangement is easier to install and maintain.
Step 3: Cut the fabric into sections. Prepare long panels of varying widths. Slight differences in width can create a more relaxed, organic appearance.
Step 4: Mount the fabric securely. Install suitable supports into the ceiling structure. Arrange the panels in overlapping curves, leaving enough space between them to avoid a heavy, crowded appearance.
Step 5: Balance the layers. Step back and check that the colors are distributed evenly. Avoid placing all the darker fabric on one side.
Styling Tips
Complete the bohemian look with woven baskets, rattan furniture, textured bedding, handmade ceramics, and a patterned rug. Keep larger furniture pieces relatively simple so the ceiling remains the main feature.
For a small bedroom, use light-colored fabric with just one earthy accent shade. This maintains the relaxed boho atmosphere without making the ceiling appear visually low.
The most important rule is to keep the fabric lightweight, securely supported, and clear of electrical fixtures, sprinklers, and ventilation openings.
3. Elegant White Fabric Draping for a Luxury Bedroom
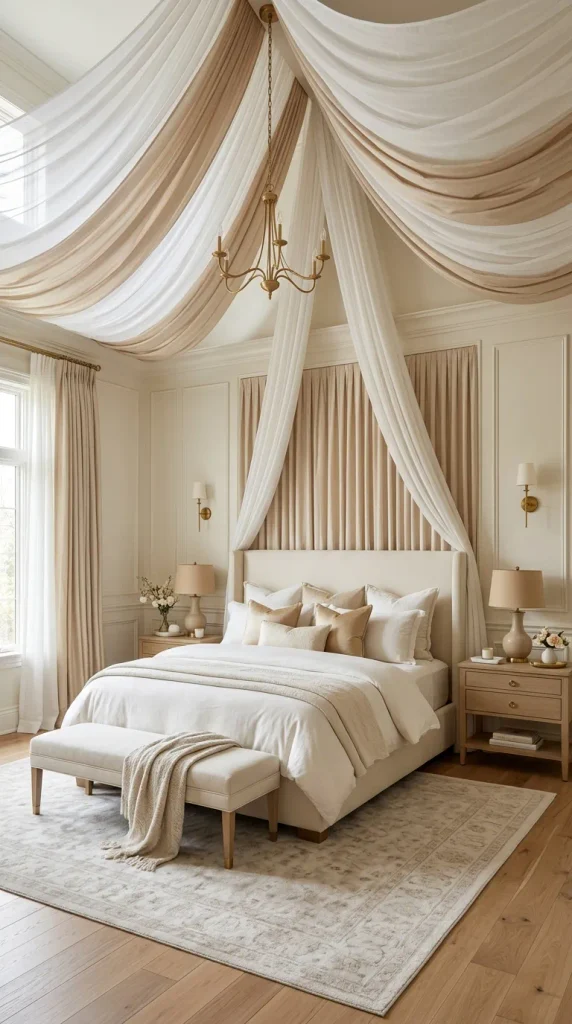
You do not need an expensive renovation to create a luxurious bedroom. Carefully arranged white or cream fabric can introduce the refined appearance of a boutique hotel while keeping the project relatively affordable. The secret is choosing high-quality-looking material and arranging it in clean, symmetrical folds.
For this style, consider opaque cotton, lightweight linen, or a soft matte fabric with a beautiful drape. White creates a crisp, fresh appearance, while ivory and champagne add warmth. If your bedroom already has dark wood furniture, cream fabric can soften the contrast and make the space feel more inviting.
Materials Used
- White, ivory, or champagne fabric
- Measuring tape and fabric scissors
- Ceiling-rated mounting hardware
- Appropriate screws and anchors
- Sewing supplies or hemming tape
- Optional decorative fabric bands
How to Create This DIY Ceiling
Step 1: Establish a focal point. Position the main draping above the center of the bed. A symmetrical design creates a polished, hotel-inspired appearance.
Step 2: Select the right fabric. Choose material that hangs smoothly without excessive bulk. Avoid very heavy upholstery fabric overhead.
Step 3: Prepare the panels. Cut matching lengths and finish the edges. If the fabric is wide enough, fold it into soft pleats before installation.
Step 4: Create a balanced arrangement. Secure the fabric at planned support points and allow it to curve gently toward the bed. Keep the drapes consistent on both sides.
Step 5: Refine the finish. Adjust each fold until the design appears intentional rather than improvised. Conceal support hardware only when doing so does not interfere with inspection or safe maintenance.
Styling Tips
Use crisp white bedding, upholstered furniture, neutral curtains, and a restrained color palette. Brushed brass or matte black accents can add contrast, depending on your preferred style.
A pair of matching bedside lamps helps reinforce the symmetrical design. Keep decorative accessories minimal so the ceiling does not compete with the rest of the room.
For an especially cohesive result, repeat the fabric’s color in the curtains or cushions. This connects the ceiling to the wider bedroom design and makes the DIY project feel like a planned interior upgrade.
4. Rustic Linen Fabric Ceiling
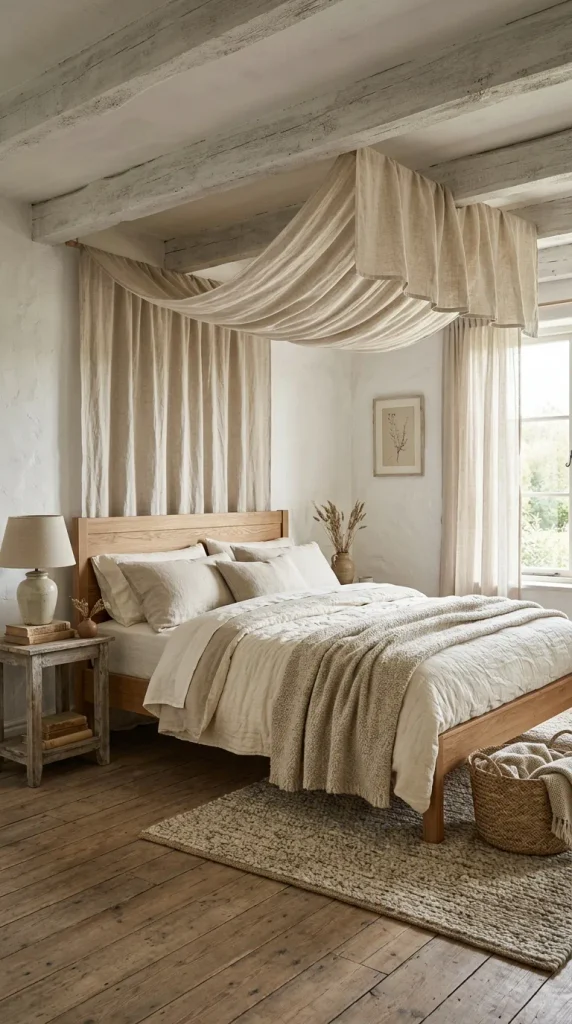
A rustic linen fabric ceiling is an excellent option for anyone who appreciates natural materials, farmhouse decor, Scandinavian simplicity, or understated country interiors. Instead of creating a glamorous or dramatic effect, this design focuses on subtle texture, warm neutrals, and an inviting atmosphere.
Natural-looking linen, lightweight linen blends, and cotton in oatmeal, sand, taupe, or warm white work particularly well. These colors complement timber furniture, woven baskets, neutral bedding, and earthy accessories.
You can leave the fabric relatively flat for a simple, tailored appearance or introduce gentle folds for a softer look. The goal is to make the ceiling feel like a natural extension of the bedroom rather than a separate decorative feature.
Materials Used
- Lightweight linen or linen-look cotton
- Measuring tape and fabric scissors
- Secure ceiling mounting brackets or suitable hooks
- Appropriate ceiling anchors and screws
- Needle, thread, or hemming supplies
- Optional fabric bands for a tailored finish
How to Create This DIY Ceiling
Step 1: Choose a warm neutral shade. Compare fabric samples against your walls and bedding in both daylight and evening light.
Step 2: Plan the coverage. For a rustic bedroom, a single panel above the bed or a few long sections can be more effective than covering every inch of the ceiling.
Step 3: Prepare the material. Wash or pre-shrink the fabric if the manufacturer’s care instructions allow it. Finish the edges to reduce fraying.
Step 4: Attach the panels. Secure the fabric using hardware suitable for the ceiling construction. Keep the material taut enough to remain stable but relaxed enough to preserve its natural texture.
Step 5: Complete the room. Coordinate the fabric with wood, woven accessories, and simple bedding.
Styling Tips
Natural linen works beautifully with oak bedside tables, cream quilts, wool throws, and textured rugs. A muted green cushion or clay-colored vase can introduce a small amount of color.
If your bedroom is small, use a shade close to the ceiling color to avoid creating a strong visual boundary overhead. In a larger room, a slightly darker oatmeal fabric can provide a more noticeable feature.
Linen may wrinkle, but those gentle irregularities can contribute to its charm. Choose a lightweight material suitable for overhead installation, and ensure it does not obstruct lighting, ventilation, or safety equipment.
5. Fairy-Light Fabric Ceiling for a Dreamy Bedroom
A fairy-light fabric ceiling can turn an ordinary bedroom into a magical, relaxing retreat. The combination of soft fabric and tiny points of light creates a dreamy atmosphere that works particularly well in teenage bedrooms, cozy guest rooms, romantic interiors, and bohemian spaces.
The fabric acts as a decorative backdrop, while the lights add gentle visual interest. White voile, sheer cotton, and pale ivory muslin allow the light to remain visible without introducing too much visual weight. You can also use pale blush or soft beige fabric for a warmer, more intimate appearance.
Safety is especially important with this design. Fabric must never be wrapped around bulbs or placed against hot lighting equipment. Use only suitable, low-heat LED lights approved for the intended installation, and follow the manufacturer’s instructions.
Materials Used
- Lightweight sheer fabric
- Suitable ceiling mounting hardware
- Compatible low-heat LED fairy lights
- Measuring tape and fabric scissors
- Cable clips or supports approved for the lighting system
- Optional fabric ribbons for decorative finishing
How to Create This DIY Ceiling
Step 1: Plan the layout. Decide whether the fabric will form a canopy above the bed or extend along one section of the ceiling.
Step 2: Install the fabric first. Secure the fabric with appropriately rated mounting hardware. Arrange it in soft, shallow curves rather than deep folds that could conceal lighting components.
Step 3: Arrange the lights separately. Follow the lighting manufacturer’s installation instructions, ensuring that cables, power supplies, and connectors remain accessible and are not trapped beneath fabric.
Step 4: Check the spacing. Keep all lights and wiring clear of fabric where required by the manufacturer’s instructions. Do not cover electrical connections or power supplies.
Step 5: Test the finished arrangement. Confirm that the lights operate correctly, the fabric remains secure, and nothing interferes with safe movement or access.
Styling Tips
Pair the ceiling with soft white bedding, textured cushions, and a warm neutral rug. Keep other lighting simple so the fairy lights remain a subtle decorative accent.
A small bedside lamp can provide practical reading light while the ceiling lights create a gentle evening atmosphere. Choose a timer or switching arrangement approved for your lighting system rather than leaving decorative lights operating unattended.
For a particularly elegant finish, use warm-white lights rather than flashing multicolored bulbs. The result is a cozy bedroom feature that feels delicate, inviting, and thoughtfully styled.

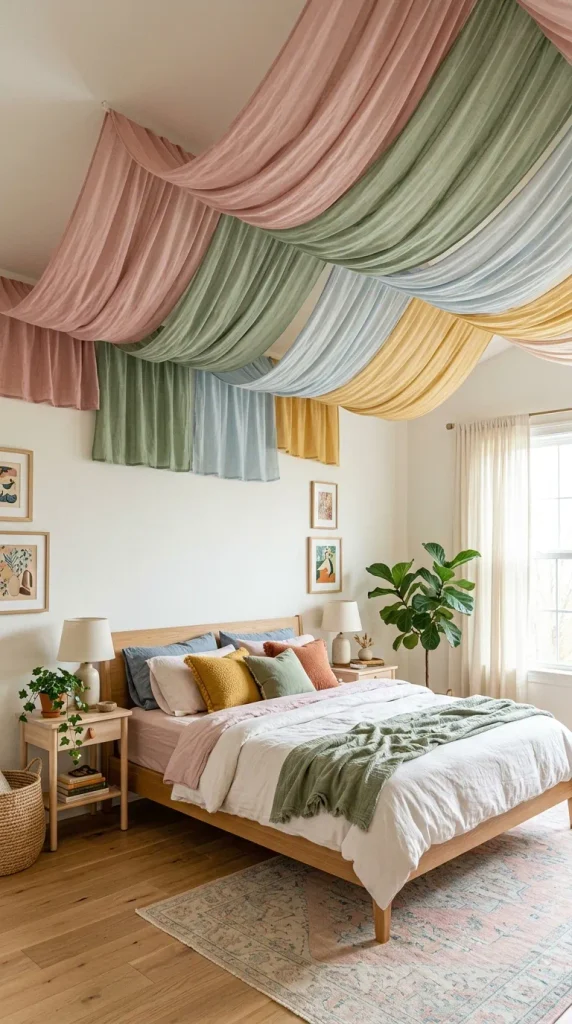
6. Colorful Fabric Ceiling for a Creative Bedroom
If neutral bedrooms feel too plain for your personality, a colorful fabric ceiling offers an opportunity to introduce creativity without repainting every wall. By using carefully selected colors overhead, you can create a cheerful bedroom that feels expressive, playful, and unique.
This idea works especially well in creative bedrooms, eclectic interiors, guest rooms, and spaces that need a distinctive focal point. You can choose pastel shades for a soft and youthful appearance or deeper jewel tones for a richer, more dramatic design.
Consider combining dusty pink with cream, sage with pale blue, or mustard with terracotta. If you prefer a more energetic look, introduce three or four complementary shades in separate fabric panels. Avoid choosing too many competing patterns, particularly if the bedding and curtains already contain strong prints.
Materials Used
- Lightweight cotton, voile, or muslin in coordinating colors
- Measuring tape and scissors
- Secure mounting hardware
- Appropriate ceiling anchors and screws
- Sewing supplies or fabric hemming tape
- Optional fabric ties or decorative borders
How to Create This DIY Ceiling
Step 1: Select a palette. Choose a dominant color and one or two supporting shades. Use the existing bedroom decor as your starting point.
Step 2: Sketch the arrangement. Decide whether the fabric will run in parallel strips, radiate outward from a central point, or form a colorful canopy over the bed.
Step 3: Measure and prepare. Cut the fabric into panels of suitable lengths, finishing all edges neatly.
Step 4: Install the support points. Secure suitable mounting hardware into the ceiling structure. Arrange the panels so the colors appear balanced from the doorway and from the bed.
Step 5: Adjust the folds. Create gentle curves and consistent spacing. Make sure the design does not feel too crowded or visually heavy.
Styling Tips
For a colorful ceiling to look intentional, repeat at least one of its shades in the bedding, cushions, artwork, or rug. This simple technique creates a visual connection between the ceiling and the rest of the room.
If you choose bold fabric, keep the walls relatively simple. Alternatively, use pale pastel fabric in a room with patterned bedding for a coordinated, playful atmosphere.
This DIY idea is also useful when decorating a rental bedroom because the fabric can serve as a major color feature without permanently changing the walls. However, any overhead installation must still use secure, suitable mounting hardware and comply with your rental property’s requirements.
7. Canopy-Style Fabric Ceiling for a Small Bedroom
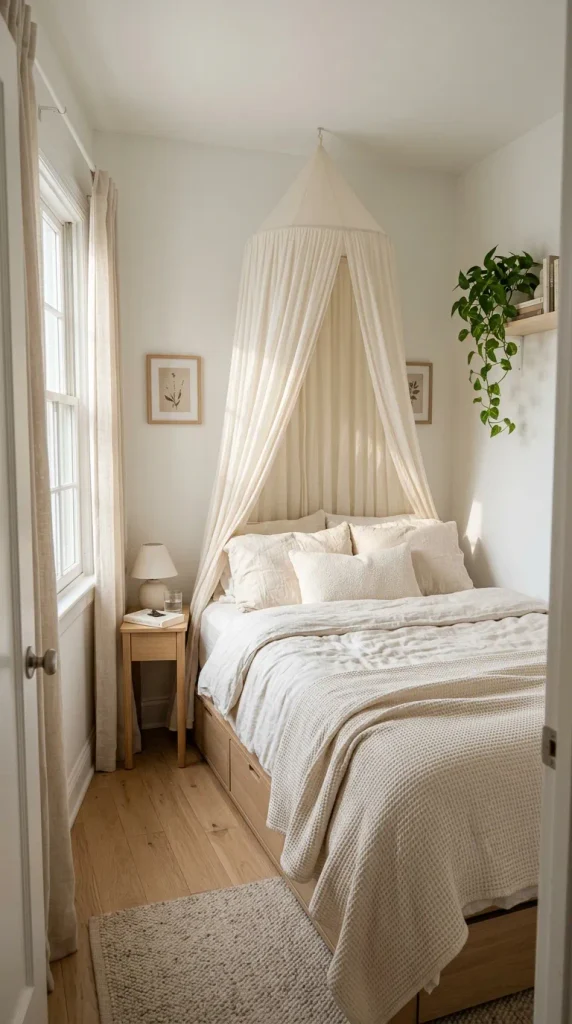
A small bedroom can benefit enormously from a carefully designed fabric ceiling. The right arrangement adds softness and visual interest without requiring extra furniture, bulky accessories, or valuable floor space.
The key is to keep the canopy focused above the bed rather than covering the entire ceiling. A compact arrangement creates a clear focal point and helps the room feel organized. Lightweight white, ivory, or pale beige fabric is particularly effective because it maintains an airy appearance.
Avoid heavy layers, excessive fabric pooling, or deep hanging folds. In a small room, these details can make the ceiling feel lower and the space more crowded.
Materials Used
- Lightweight cotton, voile, or muslin
- Measuring tape and scissors
- Suitable ceiling-mounted supports
- Ceiling anchors and screws appropriate for the structure
- Sewing kit or hemming supplies
- Optional matching fabric ties
How to Create This DIY Ceiling
Step 1: Measure the bed area. Establish the width and length of the canopy based on your bed and the available ceiling space.
Step 2: Select a light color. Choose fabric that coordinates with the ceiling or bedding. Similar colors help the arrangement blend into the room.
Step 3: Plan a simple design. Two or three support points may be sufficient for a small canopy, depending on its dimensions and the mounting system.
Step 4: Install the fabric securely. Attach the fabric using appropriately rated hardware. Arrange the material in shallow folds and keep it clear of your head and sleeping area.
Step 5: Check the proportions. View the canopy from the doorway and the bed. If it dominates the room, reduce its coverage or simplify the arrangement.
Styling Tips
Use a light duvet, a few coordinated cushions, and streamlined bedside furniture. Wall-mounted reading lights can free up bedside table space, provided they are professionally and safely installed where required.
Mirrors, pale curtains, and simple furniture can help maintain an open feeling. If you want a little color, introduce it through a single cushion, throw, or small artwork instead of using several bold ceiling fabrics.
For renters, a compact canopy may be easier to plan than a full-ceiling installation, although ceiling attachments still require permission and suitable mounting methods.
The best small-bedroom ceiling design is one that enhances the room without overwhelming it. Keep the fabric light, the arrangement simple, and the overall palette cohesive.
8. Vintage Floral Fabric Ceiling for a Cottage-Style Bedroom
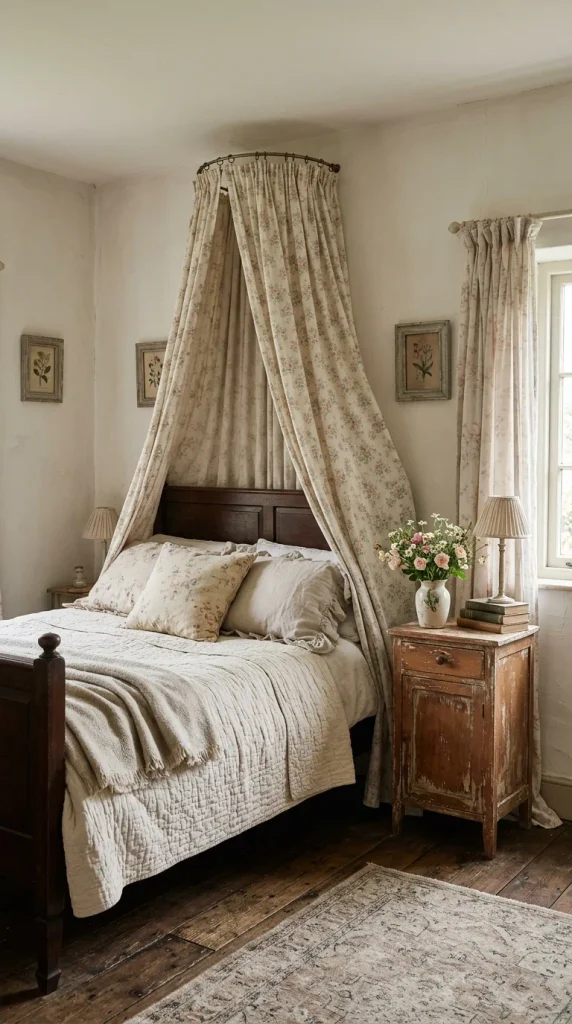
A vintage floral fabric ceiling brings the charm of a country cottage into your bedroom. This design is ideal for anyone who loves delicate botanical prints, antique furniture, romantic bedding, and interiors that feel collected over time.
Small floral patterns generally work better overhead than oversized, high-contrast prints because they create texture without overwhelming the room. Look for fabrics featuring faded roses, tiny wildflowers, soft leaves, or traditional botanical motifs.
Colors such as dusty pink, sage green, pale blue, ivory, and muted lavender are excellent choices. If your bedroom already includes patterned curtains or bedding, select a fabric with a coordinating background color to maintain a harmonious appearance.
Materials Used
- Lightweight floral cotton or cotton voile
- Measuring tape and fabric scissors
- Suitable ceiling mounting hardware
- Appropriate anchors and screws
- Needle, thread, and hemming supplies
- Optional plain fabric borders
How to Create This DIY Ceiling
Step 1: Choose the floral print. Look for a pattern that complements the bedroom’s existing colors and furniture.
Step 2: Decide on the coverage. A canopy above the bed is a manageable starting point. More extensive ceiling draping requires additional planning and support.
Step 3: Prepare the fabric. Follow the care label when washing or pressing the material. Finish the edges to create a clean appearance.
Step 4: Secure the supports. Use suitable hardware attached to the ceiling structure. Arrange the fabric in gentle folds so the pattern remains visible.
Step 5: Coordinate the room. Introduce the floral colors through cushions, a quilt, or a small decorative accessory.
Styling Tips
Combine the ceiling with cream bedding, a painted wooden bed frame, vintage bedside tables, and delicate curtains. A muted floral pattern looks especially beautiful alongside natural wood and softly aged finishes.
To avoid an overly busy appearance, choose plain bedding if the ceiling fabric has a noticeable print. Alternatively, combine subtle floral fabric with a small-scale striped cushion or understated botanical artwork.
If you enjoy thrifted decor, vintage-style lamps, ceramic vases, and antique-inspired picture frames can complete the look.
For a more modern interpretation, use floral fabric only in the central canopy and keep the rest of the room simple. This creates a charming focal point without making the bedroom feel old-fashioned.
Vintage floral fabric proves that a ceiling can become part of a room’s overall story. With thoughtful color coordination and careful installation, this DIY project can make the bedroom feel warm, personal, and timeless.
9. Modern Minimalist Fabric Ceiling With Clean Lines
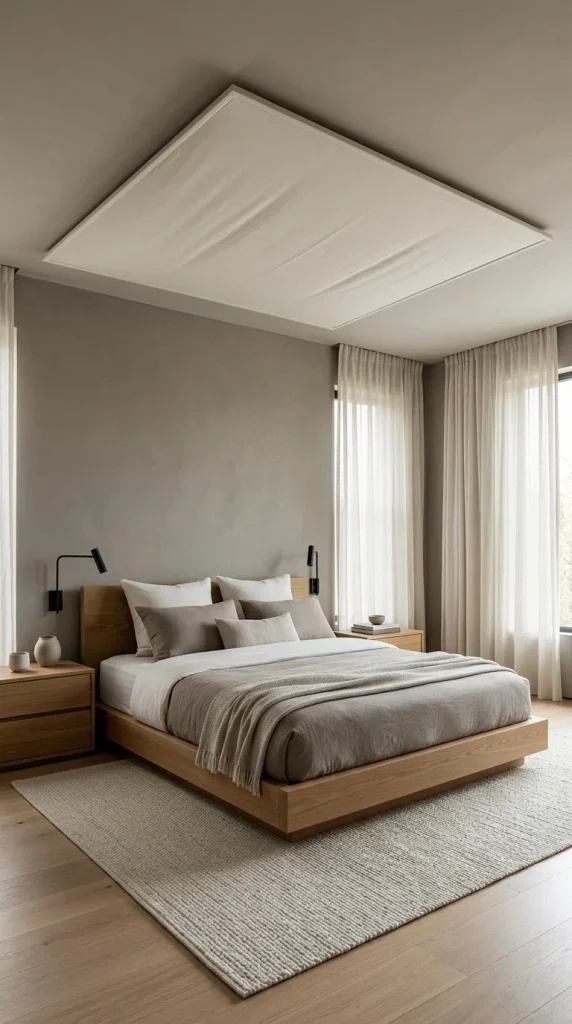
If you prefer a bedroom that feels calm, uncluttered, and contemporary, a minimalist fabric ceiling may be the perfect DIY project. Rather than using dramatic swags or multiple layers, this design focuses on straight lines, carefully controlled folds, and a limited color palette.
The idea is to use fabric as an architectural accent rather than a decorative accessory. A single rectangular panel above the bed, a narrow strip running along the ceiling, or two parallel fabric sections can create visual interest while preserving the simplicity of a modern interior.
Choose materials with a refined appearance, such as lightweight linen-look cotton, matte cotton voile, or another lightweight fabric that holds its shape reasonably well. White, soft gray, warm beige, and muted taupe work particularly well in minimalist bedrooms.
Materials Used
- Lightweight cotton or linen-look fabric
- Measuring tape and fabric scissors
- Suitable ceiling mounting hardware
- Ceiling anchors and screws appropriate for the structure
- Sewing supplies or hemming tape
- Optional slim support rails rated for the intended installation
How to Create This DIY Ceiling
Step 1: Define the shape. Decide whether you want a rectangular panel, a narrow ceiling strip, or a simple canopy aligned with the bed.
Step 2: Measure precisely. Measure the intended coverage and mark the proposed arrangement on paper. Symmetry and accurate proportions are especially important for minimalist designs.
Step 3: Prepare the edges. Cut the material neatly and finish the edges so the panel looks intentional. Press the fabric according to its care instructions.
Step 4: Install the mounting system. Use appropriate support hardware and follow the manufacturer’s load limits. If you use rails, ensure they are designed for the fabric arrangement and securely attached to the ceiling structure.
Step 5: Position the fabric. Arrange the material in straight lines or shallow, consistent folds. Remove unnecessary decorative elements that distract from the design.
Styling Tips
Pair the ceiling with simple bedding, streamlined furniture, and one or two carefully chosen decorative accents. Natural wood, black metal, and muted ceramics can introduce contrast without creating visual clutter.
Lighting should also be simple. Recessed lights or well-positioned bedside lamps can complement the design, provided they remain unobstructed and are installed safely.
This approach is particularly suitable for modern apartments, small bedrooms, and spaces where simplicity is more important than elaborate decoration.
For the most polished result, repeat the ceiling fabric’s color in at least one other element, such as the curtains or bedding. This creates a subtle connection throughout the room.
A minimalist fabric ceiling demonstrates that even a small amount of material can make a noticeable difference when it is measured carefully, installed securely, and styled thoughtfully.
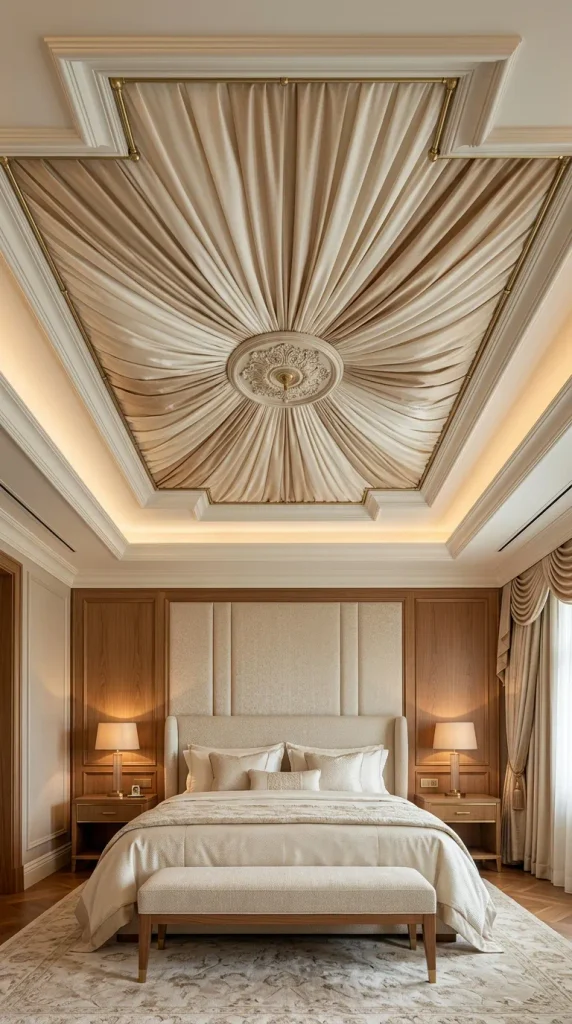
10. Luxury Layered Fabric Ceiling With a Statement Centerpiece
For a dramatic finishing touch, consider a layered fabric ceiling with a central decorative arrangement. This style draws inspiration from romantic boutique hotels, elegant event spaces, and luxurious traditional interiors. It uses carefully arranged fabric to create a focal point above the bed, making the ceiling feel like a planned design feature.
Unlike a simple canopy, a layered arrangement uses multiple fabric panels to create depth. The panels may radiate outward from a central point, follow a symmetrical pattern, or form a series of shallow curves across the ceiling.
For a sophisticated appearance, choose two coordinating shades rather than several competing colors. Champagne and ivory, cream and beige, or white and pale gray can produce an elegant result. Lightweight matte fabrics generally work better overhead than heavy velvet or thick upholstery textiles.
Materials Used
- Lightweight fabric in one or two complementary colors
- Measuring tape and fabric scissors
- Secure mounting hardware designed for the ceiling structure
- Suitable anchors and screws
- Needle, thread, and hemming supplies
- Optional lightweight decorative trim
How to Create This DIY Ceiling
Step 1: Plan the centerpiece. Determine the size and position of the feature in relation to the bed. A centered arrangement usually works best in a symmetrical bedroom.
Step 2: Choose the fabric. Select lightweight material that creates attractive folds without adding unnecessary overhead weight.
Step 3: Measure the panels. Cut several matching lengths, allowing enough material for the intended curves. Finish all edges before installation.
Step 4: Create the layered design. Install appropriately rated supports at the planned points. Arrange the panels in a balanced pattern, ensuring that the mounting system can safely support the combined load.
Step 5: Refine the appearance. Adjust the folds until the fabric looks evenly distributed. Check the design from the entrance, the bedside, and the foot of the bed.
Styling Tips
Pair the ceiling with upholstered furniture, soft bedding, and carefully selected metallic accents. A champagne-colored canopy looks beautiful with cream textiles and warm wood, while white fabric creates a cleaner, more contemporary result.
Keep other decorative elements restrained. When the ceiling is the main attraction, excessive wall decorations, bold curtains, and numerous patterned cushions can compete for attention.
You can also introduce subtle texture through a quilted bedspread, a woven rug, or velvet cushions placed at bed level.
Because layered ceiling arrangements involve multiple attachment points and overlapping fabric, installation requires particular care. Keep the design clear of electrical fixtures, ceiling fans, ventilation systems, smoke alarms, and fire sprinklers. Use professional assistance if the ceiling structure or mounting requirements are uncertain.
The finished result can be striking, romantic, and elegant while remaining a relatively simple decorating concept. Careful measurements, lightweight fabric, and secure installation are the foundations of a successful design.
Essential Safety Tips for DIY Fabric Ceilings
Before starting any fabric ceiling project, consider the practical requirements of installing material overhead. A beautiful design should also be safe, easy to maintain, and appropriate for your bedroom.
1. Choose Lightweight Fabric
Lightweight cotton, voile, and muslin are generally easier to work with than thick upholstery materials. Always consider the total weight of the fabric, including any accessories, and ensure that the mounting system is suitable for the load.
2. Use Secure Mounting Hardware
Identify the ceiling construction before installing hooks, rails, or brackets. Use suitable fixings and follow the hardware manufacturer’s instructions. Adhesive hooks alone are not an appropriate substitute for secure overhead mounting.
If you rent your home, check the property rules before drilling into the ceiling.
3. Keep Fabric Away From Heat and Electrical Equipment
Never drape fabric over bulbs, ceiling fans, heaters, or electrical equipment. Keep all materials clear of smoke alarms, sprinklers, vents, and other safety devices. Do not assume that a small gap is sufficient; follow the applicable installation and clearance requirements.
Where available, choose fabric with an appropriate fire-retardant treatment, while remembering that such treatment does not make fabric fireproof.
4. Maintain Good Ventilation
Fabric should not block air-conditioning outlets, return-air grilles, or other ventilation openings. A canopy should also be arranged so it cannot fall into your sleeping area or interfere with movement around the bed.
5. Clean and Inspect the Fabric Regularly
Dust can accumulate in overhead fabric, especially in layered designs. Choose washable material when practical and follow the care label. Periodically inspect the fabric, supports, seams, and fixings for wear or loosening.
If the ceiling is high, the installation is extensive, or the mounting system is unfamiliar, consult a qualified professional before proceeding.
How to Choose the Best Fabric Ceiling for Your Bedroom
With so many attractive designs available, the best option is the one that suits your bedroom’s size, existing decor, budget, and maintenance needs.
Consider Your Bedroom’s Size
For a small bedroom, use a limited amount of fabric and light colors to preserve an open feeling. Larger rooms can accommodate more elaborate arrangements, provided the mounting system and ceiling structure are suitable.
Match the Existing Color Palette
Your fabric ceiling should complement your bedding, curtains, furniture, and wall color. If the room already contains several patterns, a solid-colored fabric can create balance. If the room is neutral, a patterned or colorful ceiling can introduce personality.
Think About Maintenance
A simple, removable panel is often easier to clean than an intricate arrangement with many folds. If you have pets, allergies, or limited time for cleaning, prioritize accessible fabric and a design that can be removed without difficulty.
Set a Realistic Budget
Your budget should account for more than the fabric itself. Include mounting hardware, edge finishing, any necessary professional assistance, and replacement materials if needed. A smaller, carefully executed canopy may produce a better result than a full-ceiling installation made with unsuitable materials.
Conclusion
Fabric ceiling ideas offer a creative way to make your bedroom feel warmer, softer, and more personal without committing to a major renovation. Whether you prefer a romantic sheer canopy, a relaxed bohemian arrangement, a rustic linen design, or a sophisticated layered centerpiece, fabric gives you plenty of opportunities to experiment with texture, color, and shape.
The most successful DIY projects begin with a clear plan. Measure your ceiling, select lightweight fabric, choose a design that complements your room, and use secure mounting hardware suitable for the ceiling structure. Pay careful attention to electrical fixtures, ventilation, and fire safety throughout the process.
You do not have to decorate the entire ceiling to create an impressive effect. Even a simple fabric panel above the bed can introduce a beautiful focal point and make the room feel more inviting. Start with a design that suits your skill level and budget, then add coordinated bedding, lighting, and accessories to complete the look.
The best fabric ceiling is one that combines beauty, comfort, and safety while reflecting your personal style. With thoughtful planning and a little DIY creativity, you can turn an overlooked bedroom ceiling into one of the most memorable features of your home.





Leave a Reply