
Wall paneling is one of the most effective ways to transform an ordinary living room into a stylish, elegant, and visually interesting space. Whether you prefer a modern minimalist interior, a cozy farmhouse atmosphere, or a luxurious contemporary design, the right wall paneling can add depth, texture, and character to your home. Instead of leaving your walls plain, you can use decorative panels to create a beautiful focal point that complements your furniture, lighting, and overall color palette.
One of the biggest advantages of living room wall paneling is its versatility. Traditional raised panels can create a timeless, sophisticated appearance, while vertical wood slats bring a modern architectural feel. Fluted panels add subtle texture, geometric designs introduce artistic interest, and painted MDF panels can make a living room look professionally designed without requiring an expensive renovation.

Wall paneling can also help define different areas within an open-plan living room. For example, a paneled wall behind the sofa can establish a comfortable seating zone, while panels behind a television can create a cohesive entertainment area. When combined with thoughtful lighting, artwork, and coordinated furniture, wall paneling can make even a simple living room feel more intentional.
Before choosing a paneling style, consider the size of your living room, ceiling height, existing furniture, and natural lighting. Light-colored panels can make a room feel airy, while darker finishes create drama and intimacy. Natural wood introduces warmth, and painted panels allow you to coordinate the walls with almost any interior style.
Below are 10 beautiful wall paneling ideas for living rooms that combine visual appeal, practical styling, and Pinterest-worthy design inspiration.
1. Classic Wall Paneling for a Timeless Living Room
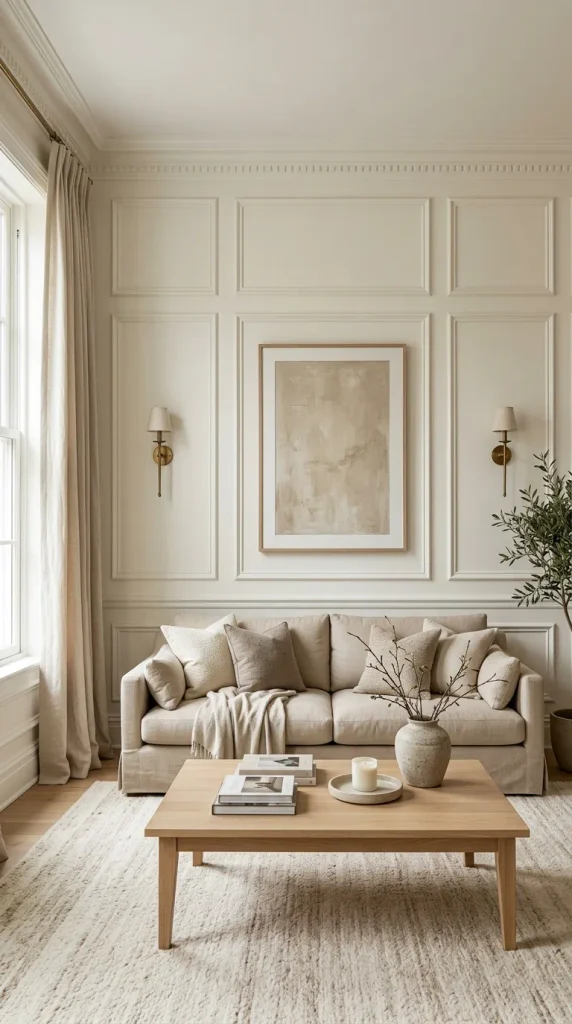
Classic wall paneling is an excellent choice if you want your living room to feel elegant, balanced, and timeless. This style usually features rectangular or square frames arranged symmetrically across the wall. The design draws inspiration from traditional interiors but can also work beautifully in modern homes when paired with simple furniture and a restrained color palette.
To achieve this look, install decorative molding to create large rectangular panels. The frames can extend across the entire wall or cover only the lower portion, depending on your preferred style. For a traditional appearance, choose raised or decorative molding. For a more contemporary finish, use narrow, clean-lined trim with minimal ornamentation.
Paint the panels and the surrounding wall in the same color for a seamless appearance. Warm white, ivory, soft beige, pale gray, and muted sage are attractive choices. Painting everything in one shade emphasizes the architectural detail without making the wall look overly busy.
A classic paneled wall works especially well behind a sofa, where it can serve as the main visual feature of the living room. Position a large piece of artwork above the sofa or add symmetrical wall sconces to enhance the design.
Furniture should complement the wall rather than compete with it. A neutral sofa, elegant coffee table, textured rug, and a few carefully selected cushions can create a balanced arrangement.
For a more luxurious effect, introduce brass lighting, velvet cushions, or a marble-topped side table. If you prefer a relaxed modern look, choose natural wood furniture and linen upholstery.
Classic paneling is particularly effective in living rooms that need more architectural character. It can make a plain wall feel thoughtfully designed without relying on bold colors or complicated patterns.
Materials Used: MDF or wood molding, measuring tape, level, adhesive or suitable fasteners, caulk, primer, paint, and painting tools.
Styling Tip: Use consistent spacing between the frames and paint the molding the same color as the wall for a sophisticated, seamless finish.
2. Vertical Wood Slat Wall Paneling
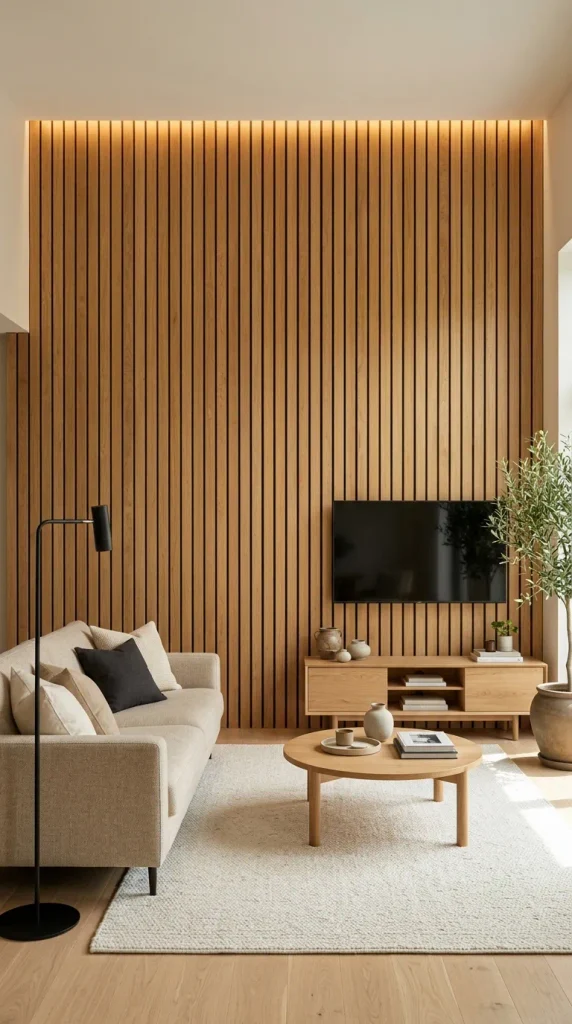
Vertical wood slat paneling is a popular choice for modern living rooms because it creates strong architectural lines while adding warmth and texture. The narrow vertical strips draw the eye upward, making the ceiling appear taller and helping the room feel more structured.
This design works particularly well behind a television, behind a sofa, or on a feature wall opposite the main entrance. You can cover the entire wall with slats or use a partial installation to create a more subtle focal point.
Natural oak, walnut, and light ash finishes are excellent choices for different interior styles. Light oak creates a Scandinavian atmosphere, while walnut introduces a richer and more dramatic appearance. Painted black or charcoal slats can work well in contemporary living rooms with contrasting furniture.
Spacing is important. Closely spaced slats create a more continuous textured surface, while wider gaps produce a more open and pronounced linear effect. If you prefer an especially polished look, keep the slats consistent in width and spacing.
Combine the paneling with simple furniture. A cream or gray sofa can balance the warmth of natural wood, while black metal accessories introduce contrast. A low-profile media console can sit in front of the paneling, creating a cohesive entertainment wall.
Lighting can enhance the design significantly. Wall sconces or carefully positioned ambient lighting can create soft shadows between the slats, emphasizing the texture. If the paneling is installed behind a television, plan cable access and mounting arrangements before installation.
Wood slat paneling is suitable for contemporary, Scandinavian, Japandi, and modern minimalist interiors. It adds character without requiring elaborate decoration.
Materials Used: Wood or MDF slats, suitable backing or mounting system, adhesive or fasteners, measuring tools, level, finish or paint, and optional acoustic backing.
Styling Tip: Pair natural wood slats with soft neutral furniture and warm lighting to create a welcoming modern living room.
3. Fluted Wall Paneling for a Modern Luxury Look
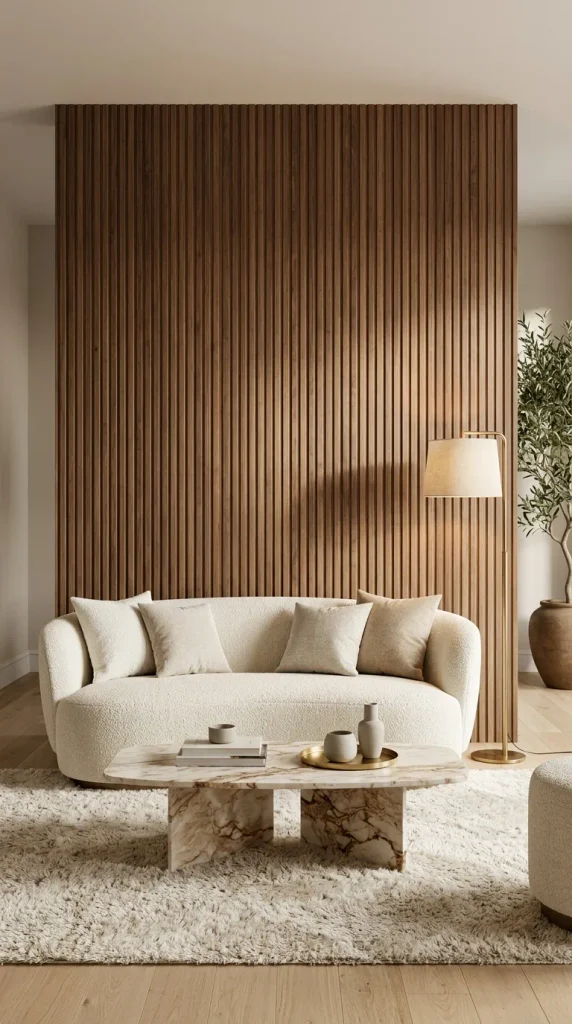
Fluted wall paneling features narrow vertical grooves that create a soft, repetitive texture. Unlike flat walls, fluted panels catch light and shadow throughout the day, giving the living room a sophisticated architectural appearance.
This style is particularly attractive for contemporary and luxury-inspired interiors. It can be installed behind a television, behind a sofa, around a decorative niche, or across an entire feature wall. Because the grooves create visual movement, fluted paneling can make a simple wall look more expensive and carefully finished.
For a warm, luxurious design, consider fluted panels in walnut, oak, or medium brown wood finishes. If you prefer a lighter interior, choose ivory, cream, warm white, or pale beige panels. Dark charcoal and deep brown create a dramatic effect in larger living rooms.
You can also use painted fluted panels to match the wall color. This creates a subtle texture that does not overpower the furniture or artwork.
Pair fluted paneling with curved furniture, rounded coffee tables, soft upholstery, and simple decorative accessories. The combination of vertical grooves and curved shapes creates an attractive balance between structure and softness.
Lighting is another important consideration. A floor lamp, wall sconce, or concealed LED lighting can emphasize the grooves and create a layered atmosphere in the evening. However, avoid excessive decorative lighting if you want the wall to remain elegant rather than theatrical.
Fluted panels can be especially effective in compact living rooms when used on one carefully selected wall. A lighter finish helps maintain an airy feeling, while the texture provides enough visual interest to make the space memorable.
Materials Used: Fluted MDF or wood panels, mounting adhesive or fasteners, measuring tools, level, appropriate finish, and optional LED lighting.
Styling Tip: Keep surrounding decor simple and let the fluted texture provide the main visual interest.
4. Two-Tone Wall Paneling for a Stylish Living Room
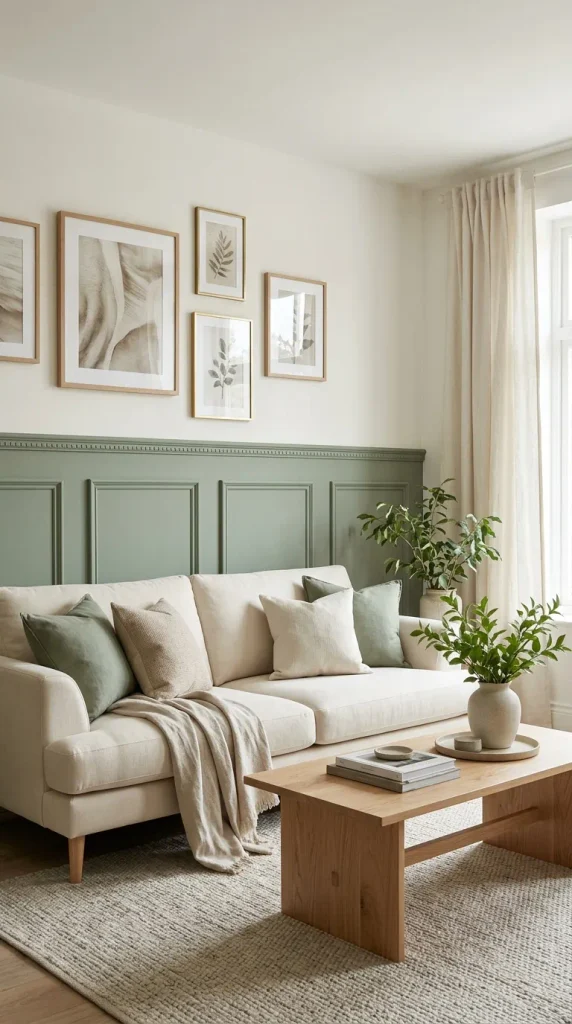
Two-tone wall paneling is a creative way to introduce color while maintaining a coordinated appearance. Instead of painting the entire living room one shade, you can divide the wall into two complementary colors and use panel molding to define the arrangement.
A common approach is to use darker paint on the lower portion of the wall and a lighter shade above it. For example, deep sage green below warm white creates a fresh, nature-inspired atmosphere. Taupe and cream produce a softer neutral combination, while navy and ivory create a more dramatic and classic look.
You can use traditional rectangular molding, square frames, or simple horizontal divisions to establish the two-tone design. The proportions should suit the room. In many interiors, a lower panel section that occupies approximately one-third to one-half of the wall can create a balanced appearance, but the ideal height depends on ceiling height and furniture placement.
This design works beautifully behind a sofa or around the entire living room. If you are paneling only one wall, repeat one of the colors in cushions, curtains, artwork, or decorative accessories to make the palette feel intentional.
For a modern look, choose clean-lined furniture and minimal accessories. For a traditional living room, add a classic coffee table, patterned cushions, and elegant lighting.
The main advantage of two-tone paneling is that it adds depth without requiring expensive materials. Paint and decorative molding can transform a plain wall into a carefully designed feature.
Before painting, test your chosen shades in the actual room. Colors may appear different depending on daylight, artificial lighting, and the surrounding furniture.
Materials Used: Decorative molding, measuring tape, level, adhesive or fasteners, caulk, primer, two paint colors, painter’s tape, and brushes or rollers.
Styling Tip: Choose two colors with a clear relationship, such as a darker shade and a lighter version of the same color family.
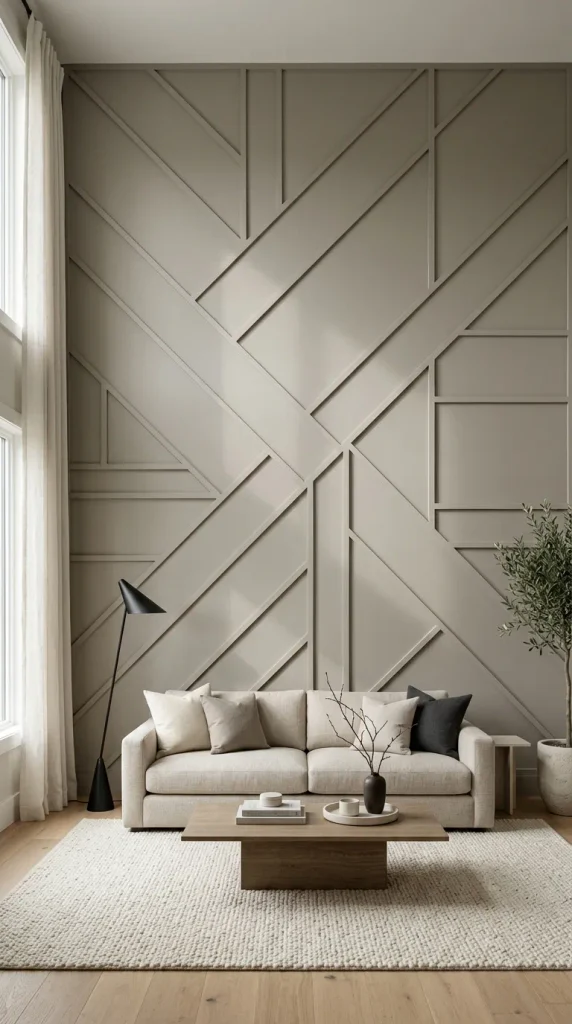
5. Geometric Wall Paneling for a Contemporary Living Room
Geometric wall paneling is ideal for homeowners who want a modern living room with a distinctive feature wall. Instead of using traditional rectangular frames, this style introduces diagonal lines, angular shapes, triangles, or asymmetrical patterns.
The result can feel artistic and architectural without requiring wallpaper or large pieces of artwork. Geometric paneling works particularly well behind a sofa or on a wall that is otherwise visually plain.
Before installation, plan the pattern carefully. Sketch the wall dimensions and map out where each line will meet. Consider the positions of windows, doors, outlets, and furniture so the finished design looks balanced.
For a sophisticated appearance, paint the entire wall and the molding in the same color. Warm white, greige, charcoal, muted green, and deep blue are all possible options. A monochromatic finish allows the geometry to stand out through shadows rather than color contrasts.
If you want a more playful design, use two related paint shades to emphasize selected sections. Avoid using too many colors, because a complicated pattern can quickly become visually overwhelming.
Furniture should be relatively simple. A clean-lined sofa, understated coffee table, and restrained accessories allow the wall to remain the focal point. Artwork may be unnecessary if the paneling already provides enough visual interest.
Geometric paneling suits contemporary, eclectic, and modern minimalist interiors. It can also work in smaller living rooms when the pattern is carefully scaled to the available wall space.
For a polished result, prioritize accurate measurements and consistent finishing. Uneven lines or poorly aligned intersections can make an otherwise attractive design appear unfinished.
Materials Used: MDF trim or decorative molding, measuring tools, pencil, level, adhesive or fasteners, caulk, primer, paint, and cutting tools.
Styling Tip: Choose one statement wall and keep the surrounding decor simple so the geometric design does not compete with other features.
6. Dark Moody Wall Paneling
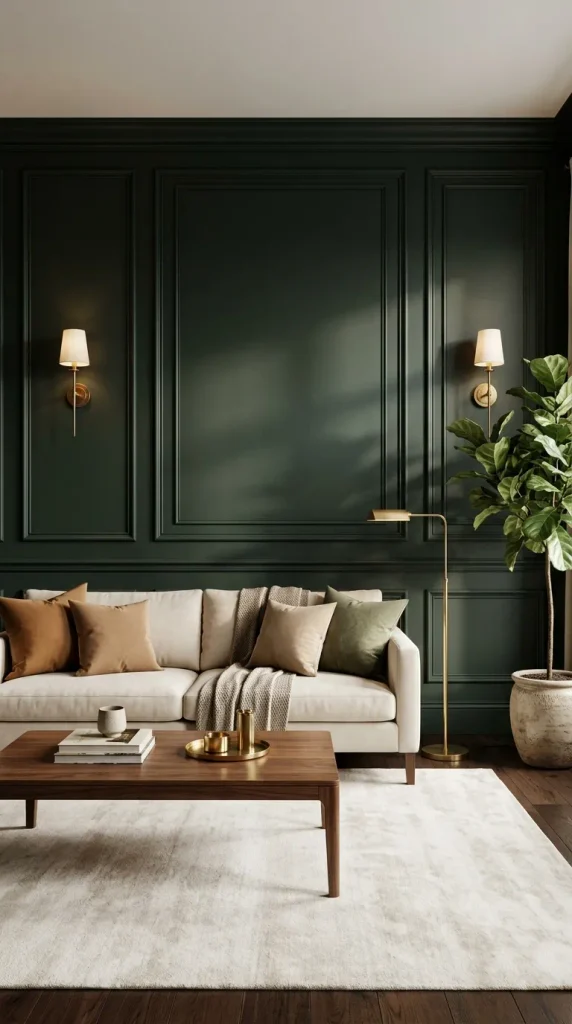
Dark wall paneling can create a dramatic and sophisticated living room. Deep green, navy, charcoal, chocolate brown, and black bring depth to the interior and can make a large room feel more intimate.
Traditional rectangular molding is especially effective in dark colors because the raised frames create subtle shadows. Vertical slats and fluted panels can also work beautifully when you want a more contemporary appearance.
A dark paneled wall is often most successful when it serves as a focal point rather than covering every surface. Consider placing it behind the sofa or television. If the room receives limited daylight, balance the dark finish with lighter furniture, reflective surfaces, and layered lighting.
For example, a deep green paneled wall can look beautiful with a cream sofa, warm wood coffee table, and brass floor lamp. Charcoal paneling works well with beige upholstery and black accents, while chocolate brown creates a rich atmosphere when paired with ivory and caramel tones.
Lighting is essential for dark paneling. Use a combination of ceiling lighting, floor lamps, table lamps, and wall sconces to prevent the room from feeling flat. Warm bulbs can enhance the richness of the color.
Textiles also help soften the appearance. Add cushions, curtains, rugs, and throws in lighter shades or contrasting textures.
Dark paneling is particularly suitable for modern classic, contemporary, moody, and luxury-inspired living rooms. It can make an ordinary wall feel dramatic and architectural.
Materials Used: Decorative molding or panel boards, suitable adhesive or fasteners, caulk, primer, dark wall paint, brushes or rollers, and warm lighting fixtures.
Styling Tip: Balance dark paneling with lighter textiles and several sources of warm light for a comfortable, sophisticated atmosphere.
7. Natural Oak Paneling for a Scandinavian Living Room
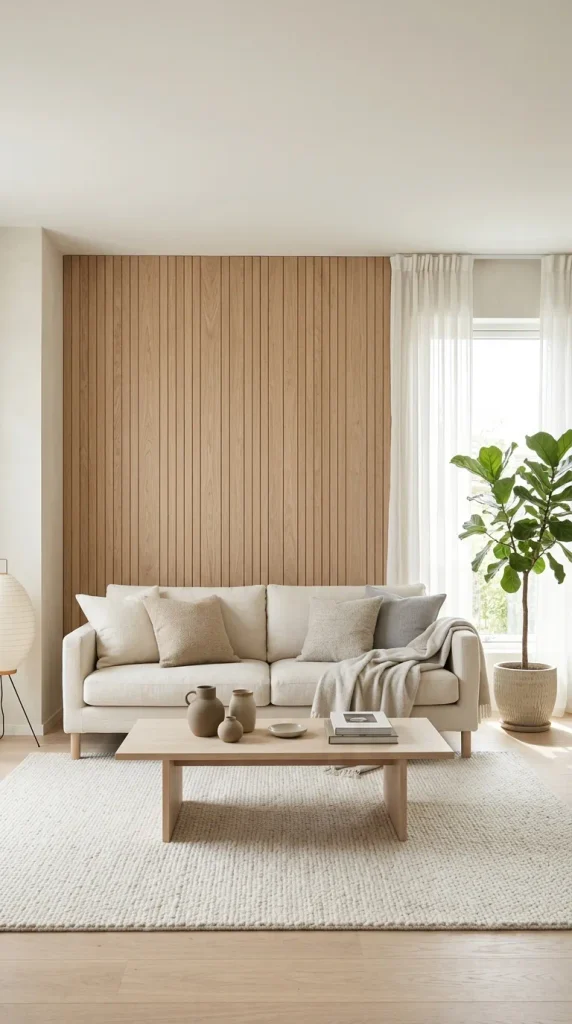
Natural oak wall paneling is an excellent choice for a living room that feels warm, airy, and connected to nature. Its light wood grain adds texture without making the space appear heavy, making it especially suitable for Scandinavian and Japandi interiors.
You can choose flat oak panels, narrow vertical slats, or simple wood boards depending on the look you want. Vertical paneling creates height, while horizontal boards emphasize the width of the wall. A flat wood panel installation can provide a clean, understated backdrop.
Install the paneling behind a sofa or across the television wall. If you want a lighter appearance, choose a pale oak finish with a matte protective coating. Avoid overly glossy finishes if you prefer a natural Scandinavian aesthetic.
Combine the wood with white walls, cream upholstery, soft gray accents, and natural fabrics. A linen sofa, wool-style rug, simple coffee table, and ceramic accessories can complete the look.
Plants are particularly effective with oak paneling because their green leaves complement the natural wood tones. A tall plant beside the sofa or a small plant on a console table can introduce freshness without cluttering the space.
Keep decorative objects limited and choose pieces with simple forms. Scandinavian interiors tend to emphasize practical furniture, natural materials, and comfortable open spaces.
Natural oak paneling can also make an open-plan living room feel more cohesive when repeated in a media console, shelving, or dining furniture.
Materials Used: Oak veneer or wood panels, suitable backing or mounting system, measuring tools, fasteners or adhesive, wood finish, and optional protective coating.
Styling Tip: Combine light oak with cream, white, pale gray, and greenery for a fresh, calm, and timeless living room.
8. Painted Shaker-Style Wall Paneling
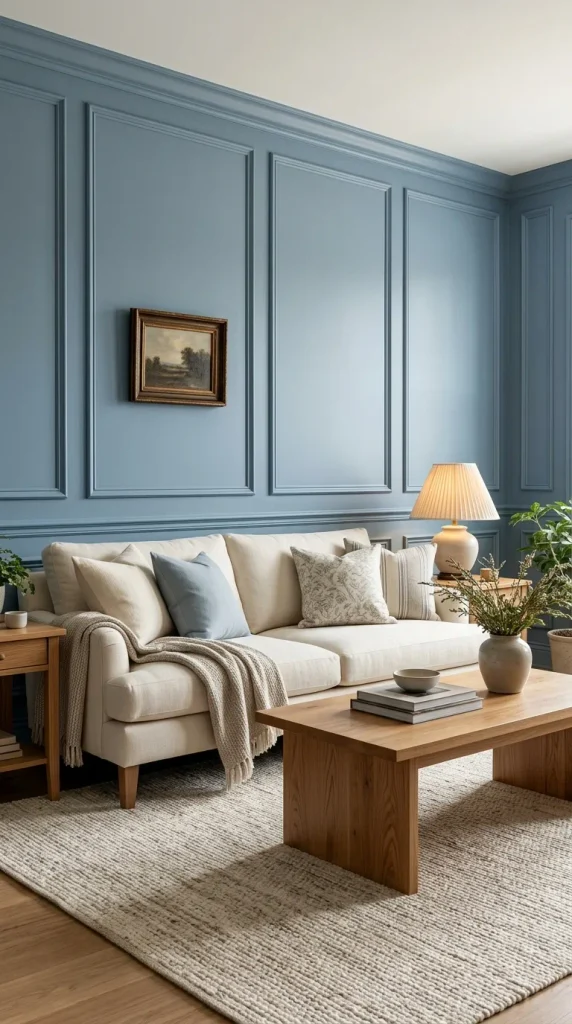
Shaker-style wall paneling offers a clean and understated look that works across traditional, transitional, farmhouse, and contemporary interiors. It typically features simple rectangular frames with minimal decorative detail.
This style is especially useful when you want architectural interest without an elaborate design. The narrow molding creates structure while allowing furniture, artwork, and lighting to remain important parts of the room.
Begin by deciding whether the paneling should cover the full wall or only the lower section. Full-height paneling creates a stronger architectural statement, while half-height paneling can make a living room feel classic and balanced.
Painted finishes are one of the biggest advantages of this style. Soft white produces a fresh appearance, beige creates warmth, sage green feels relaxed, and muted blue introduces subtle color.
For a cohesive finish, paint the molding and wall in the same shade. If you prefer a more decorative result, use a slightly contrasting color, but keep the difference subtle.
A Shaker-style paneled wall looks beautiful behind a sofa, along a hallway-facing living room wall, or around a fireplace. Add a large mirror, framed artwork, or simple wall sconces to complement the panels.
Furniture can range from traditional upholstered sofas to modern curved seating. Because the paneling is relatively simple, it adapts easily to changing decor.
This is also a practical option for a DIY project because the design relies on repeated rectangular shapes rather than complicated curves or geometric layouts.
Materials Used: MDF molding, measuring tape, level, adhesive or suitable fasteners, caulk, primer, paint, brushes, rollers, and cutting tools.
Styling Tip: Use evenly spaced rectangular frames and a soft, timeless paint color to achieve a polished designer look.
9. Wall Paneling With Integrated Shelves
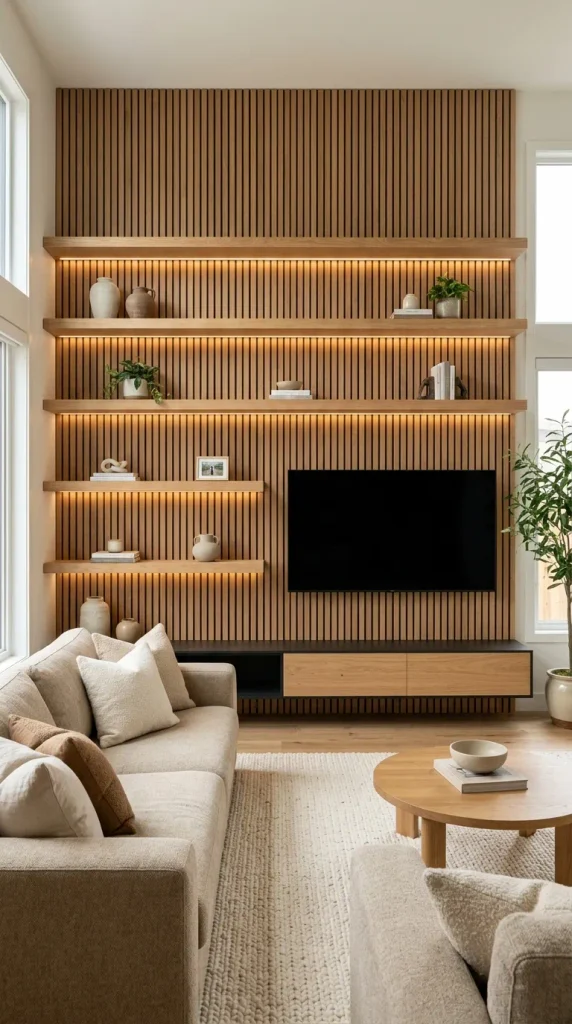
Combining wall paneling with integrated shelves creates a feature wall that is both decorative and functional. This idea is particularly useful in living rooms where you want to display books, plants, artwork, and decorative objects without adding several separate pieces of furniture.
Start by choosing a paneling style that suits your interior. Vertical slats, flat wood panels, or simple painted frames can all work well. Then plan where the shelves will sit in relation to the paneling.
One option is to install wood slats behind a floating media console and add a few shelves to one side. Another is to create a symmetrical paneled wall with recessed shelving or built-in display niches.
Natural wood shelves complement beige, white, gray, and green paneled walls. For a modern look, use slim black shelves against a light wall. If you want a more seamless appearance, paint the shelves and paneling the same color.
Style the shelves with a mixture of books, small plants, ceramic vases, framed photographs, and a few sculptural objects. Vary the heights of the accessories, but avoid filling every shelf.
Lighting can make the feature wall more attractive. Integrated LED lighting or small directional lights can highlight selected objects and add depth in the evening.
Plan the installation carefully if the wall will support a television, heavy shelves, or substantial decorative objects. Fixings must be suitable for the wall structure and intended loads.
This design is ideal for modern family living rooms because it combines storage, display space, and architectural interest in one coordinated arrangement.
Materials Used: Wood or MDF panels, shelving boards, appropriate brackets or concealed supports, wall fixings, measuring tools, finish or paint, and optional LED lighting.
Styling Tip: Leave some shelf space empty so the display feels curated rather than crowded.
10. Marble-Look Wall Paneling for a Luxury Living Room
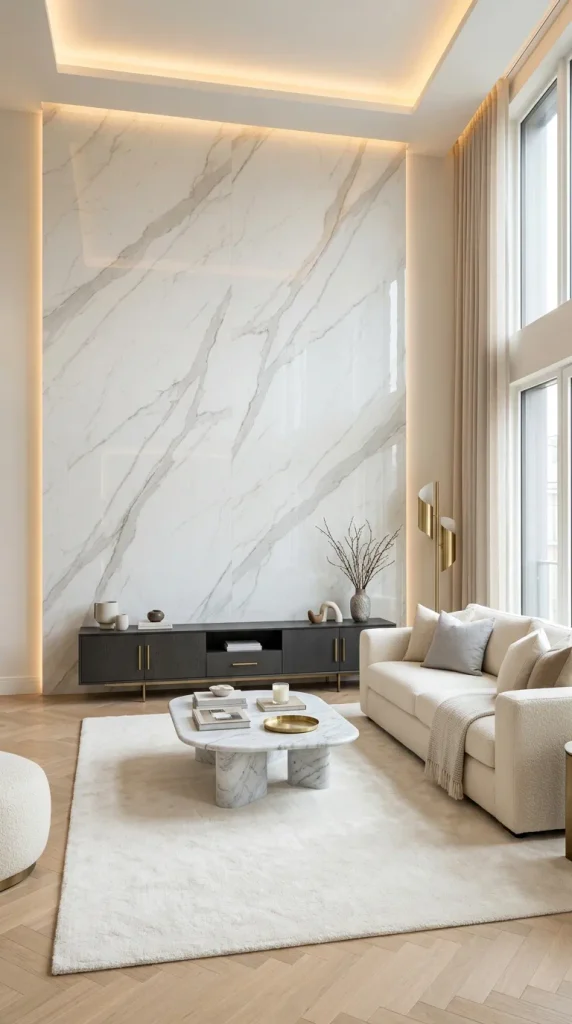
Marble-look wall paneling can create a luxurious living room without requiring an entire wall of natural stone. Large-format decorative panels with marble-inspired veining provide a refined backdrop for contemporary furniture and elegant accessories.
This style works particularly well behind a television, behind a sofa, or on a wall that serves as the main focal point. White marble effects with soft gray veining create a bright and timeless appearance, while darker marble-inspired finishes introduce drama.
Choose a finish that complements your furniture. White and gray panels work beautifully with beige sofas, black accents, and metallic details. Warm cream or beige stone effects pair well with wood furniture and earthy colors.
For a polished feature wall, use large panels with carefully aligned patterns. Repeating or mismatched veining can make the surface look less convincing, so plan the layout before installation.
A slim media console can sit against the wall, while concealed or carefully positioned lighting can emphasize the surface. Brass details, glass accessories, and simple sculptural decor can enhance the luxurious effect.
Avoid combining the marble-look surface with too many other statement materials. If the wall has prominent veining, keep nearby furniture and accessories relatively understated.
Material selection matters. Decorative wall panels vary in durability, moisture resistance, weight, and installation requirements. Choose a product designed for the intended interior application and follow the manufacturer’s instructions.
This style is particularly effective in contemporary, glamorous, and modern luxury living rooms.
Materials Used: Marble-look decorative panels, suitable adhesive or mounting system, measuring tools, level, finishing trims, and compatible cutting equipment.
Styling Tip: Pair marble-look panels with understated furniture, warm lighting, and a few metallic accents for an elegant, balanced finish.
Materials Used for Living Room Wall Paneling
The materials you choose will affect the appearance, durability, installation process, and overall cost of your wall paneling project.
1. MDF Panels and Molding
MDF is commonly used for painted decorative paneling because it offers a smooth surface and can be cut into consistent shapes. Select products suitable for your indoor environment and follow the manufacturer’s guidance for finishing and installation.
2. Natural Wood
Wood panels introduce warmth and visible grain. Oak, walnut, pine, and ash each create a different appearance. Natural wood generally requires appropriate finishing and care.
3. Decorative Fluted Panels
Fluted panels provide repeated grooves and shadows. They are available in different materials and finishes, including wood-based and synthetic options.
4. Marble-Look Panels
These panels imitate the appearance of natural stone and are available in different weights and surface finishes. Check their suitability for your intended wall and installation method.
5. Paint and Primer
Paint can unify the paneling with the surrounding wall. Primer helps prepare many surfaces for a consistent finish.
6. Installation Supplies
Depending on the system, you may need a level, measuring tape, pencil, suitable adhesive, fasteners, caulk, screws, brackets, and cutting tools.
7. Finishing Accessories
Decorative trims, compatible sealants, protective finishes, and optional lighting can help complete the design.
Always check the panel manufacturer’s instructions before purchasing materials. Some products require a specific adhesive, backing, expansion gap, or mounting system.
How to Install Wall Paneling in a Living Room
The exact installation process depends on the panel type, but the following steps provide a general planning guide for many decorative wall-paneling projects.
Step 1: Choose the Feature Wall
Decide whether you want to panel the wall behind the sofa, the television wall, the fireplace surround, or the entire living room.
Step 2: Measure the Wall
Measure the height and width carefully. Account for doors, windows, outlets, switches, and existing fixtures.
Step 3: Select the Paneling Style
Choose between classic frames, wood slats, fluted panels, geometric patterns, or other designs that complement your interior.
Step 4: Plan the Layout
Draw the design on paper before cutting materials. For framed molding, calculate the width and spacing of each frame. For slats, determine the exact spacing between each piece.
Step 5: Prepare the Surface
Make sure the wall is clean, dry, stable, and reasonably smooth. Repair minor defects and follow the panel manufacturer’s surface-preparation instructions.
Step 6: Mark the Design
Use a level and pencil to mark the intended panel positions. Double-check the spacing and alignment before installation.
Step 7: Install the Panels
Use the appropriate adhesive, fasteners, or mounting system for the chosen material and wall structure. Follow product instructions and use suitable tools and protective equipment.
Step 8: Finish the Joints
Fill appropriate gaps, smooth the joints, and install finishing trims where required. Allow materials to dry or cure as instructed.
Step 9: Paint or Seal the Surface
Apply primer and paint to paintable panels. For natural wood, use a suitable finish that protects the material while maintaining the desired appearance.
Step 10: Complete the Styling
Reposition the furniture, add suitable lighting, and introduce coordinated decor. Keep the wall visible so its texture and pattern can be appreciated.
For large installations, complex geometric layouts, heavy panels, or walls that will support a television and shelving, consider professional installation. Always check for hidden electrical wiring and other services before drilling or cutting.
Proper Pinterest-Style Pattern for Living Room Wall Paneling
A Pinterest-worthy paneled living room usually combines a clear focal point, a coordinated color palette, balanced furniture, and carefully layered lighting.
Use this simple design formula:
Statement Paneled Wall + Coordinated Sofa + Natural Texture + Warm Lighting + Minimal Accessories
Here are three examples:
Classic Elegant Living Room: Cream rectangular molding + beige sofa + brass wall sconces + natural wood coffee table + ivory rug.
Modern Living Room: Vertical oak slats + gray sofa + black accents + sculptural floor lamp + simple decorative objects.
Luxury Living Room: Fluted walnut panels + cream curved sofa + marble coffee table + warm lighting + subtle metallic details.
For Pinterest photography, capture the wall from a slightly angled perspective that shows both the paneling and the furniture arrangement. Natural daylight can emphasize the texture, while warm lamps can create a cozy evening atmosphere.
Keep the composition balanced. The paneled wall should remain the main feature, but the sofa, coffee table, rug, and lighting should work together to create a complete living room scene.
Styling Tips for Living Room Wall Paneling
Choose the Right Color
Light shades can create an airy appearance, while darker colors bring depth and drama. Match the finish to the room’s natural light and furniture.
Consider Ceiling Height
Vertical slats can emphasize height, while horizontal paneling may visually emphasize width. Choose the direction that complements your room.
Coordinate Wood Finishes
If your panels have a natural wood finish, repeat a similar tone in the coffee table, media console, or side table.
Avoid Overdecorating
Paneling already introduces texture and architectural interest. Too many accessories can compete with the design.
Use Layered Lighting
Floor lamps, table lamps, wall sconces, and suitable concealed lighting can highlight the paneling and make the room feel more welcoming.
Plan Around the Furniture
A paneled wall should complement the sofa and media furniture. Measure carefully so important design details are not awkwardly hidden behind large pieces.
Balance Texture With Softness
Pair structured paneling with soft cushions, curtains, rugs, and upholstery to make the living room feel comfortable rather than overly rigid.
Final Thoughts
Wall paneling can transform a plain living room into a stylish and thoughtfully designed space. Whether you prefer classic rectangular molding, modern wood slats, luxurious fluted panels, creative geometric patterns, or marble-look finishes, there is an option for almost every interior style.
The best approach is to choose a design that suits the room’s proportions, natural light, furniture, and overall atmosphere. You do not need to panel every wall to create an impressive result. One carefully selected feature wall can provide enough architectural interest to change the entire appearance of the living room.
For a Pinterest-worthy finish, focus on consistent spacing, coordinated colors, suitable lighting, and a balanced arrangement of furniture and accessories. Choose quality materials that suit the installation location, and plan the layout before beginning any DIY work.
With thoughtful planning, wall paneling can become more than a decorative detail. It can provide the focal point that brings your living room together, adding warmth, texture, and a sense of timeless style.





Leave a Reply